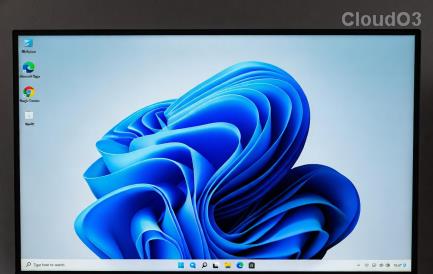
La barra de tareas de Windows ha sido el centro de toda la atención desde que obtuvo su nuevo aspecto renovado con el lanzamiento de Windows 11. Ahora puede centrar su barra de tareas, disfrutar del nuevo centro de acción, cambiar su alineación y colocarla a ambos lados de la pantalla. Lamentablemente, la implementación de esta función no ha sido tan exitosa con más y más usuarios luchando para que su barra de tareas funcione en Windows 11 durante unos meses.
Si bien Microsoft reconoció el problema, emitió una solución alternativa y actualmente está trabajando en una solución, los usuarios aún parecen no poder hacer que la barra de tareas vuelva a funcionar. Si está en el mismo barco, hemos compilado una lista de todas las correcciones disponibles para que su barra de tareas vuelva a funcionar en Windows 11. Siga la guía a continuación para comenzar.
Contenido
¿Por qué no se muestra mi barra de tareas?
La barra de tareas de Windows 11 tiene un nuevo aspecto que proviene de una versión renovada de su funcionamiento. La barra de tareas ahora depende de varios servicios y del propio menú Inicio para funcionar correctamente. Parece que el proceso de actualización de Windows 10 a Windows 11 parece estropear la barra de tareas según la versión de Windows 10 que haya instalado en su sistema y la versión de Windows 11 a la que esté actualizando.
Además, una actualización de Windows reciente lanzada el mes pasado también parece estar causando este problema para algunos usuarios, mientras que otros enfrentan lo mismo debido a que la hora del sistema no coincide a pesar de tener todo configurado correctamente. Hay muchas formas de arreglar su barra de tareas y le recomendamos que comience con las correcciones a continuación una por una.
12 formas de solucionar problemas de la barra de tareas en Windows 11
Utilice los métodos siguientes para comenzar a reparar su barra de tareas en Windows 11. Si ya ha intentado reiniciar su sistema, puede omitir el primer método.
Solución n. ° 1: reiniciar la PC
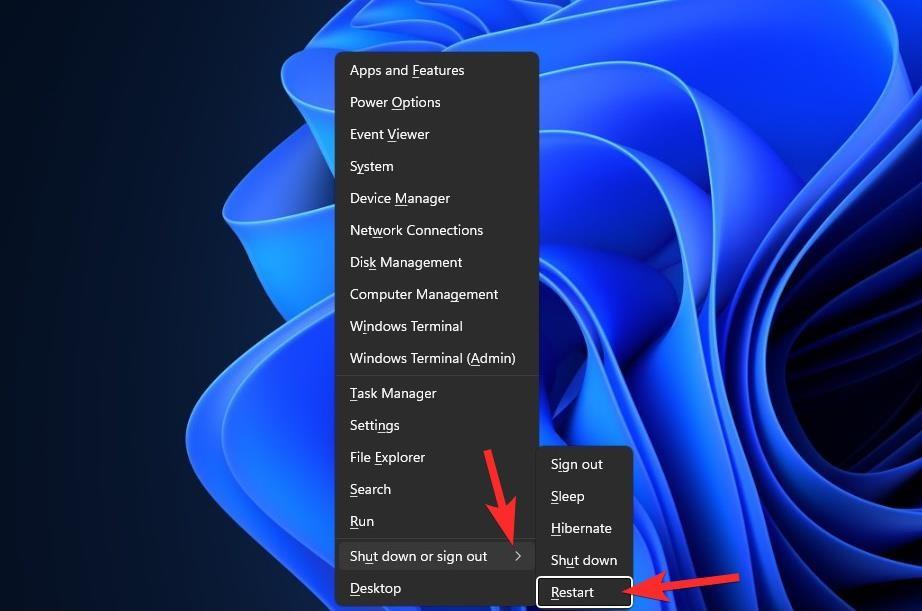
Antes de probar algo sofisticado, es bueno probar medidas más simples, como reiniciar la PC o el Explorador de Windows (ver más abajo). Hacerlo le dará a su sistema un reinicio suave, lo que permitirá que los datos se vuelvan a cargar y, posiblemente, solucione problemas con la barra de tareas y el menú Inicio.
Solución n. ° 2: asegúrese de que 'Ocultar automáticamente la barra de tareas' esté deshabilitado
Presione Windows + ien su teclado y haga clic en 'Personalización' a su izquierda.
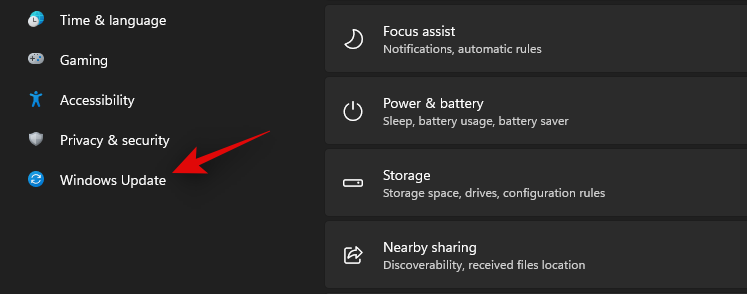
Haga clic en 'Barra de tareas'.
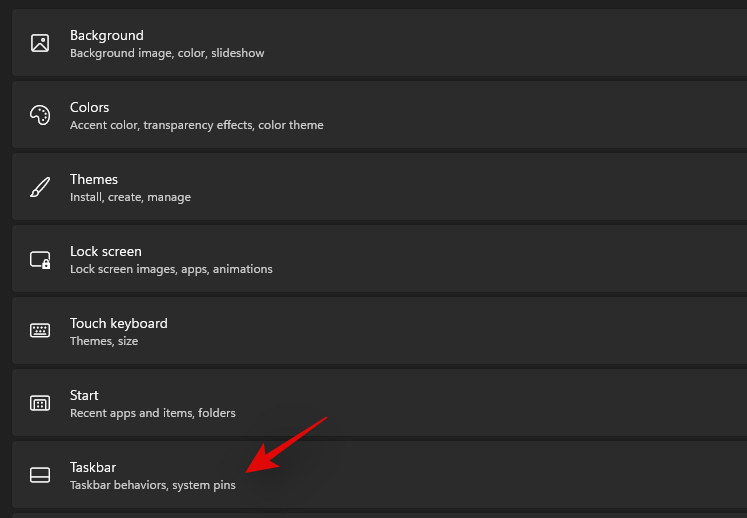
Ahora haga clic en 'Comportamientos de la barra de tareas'.
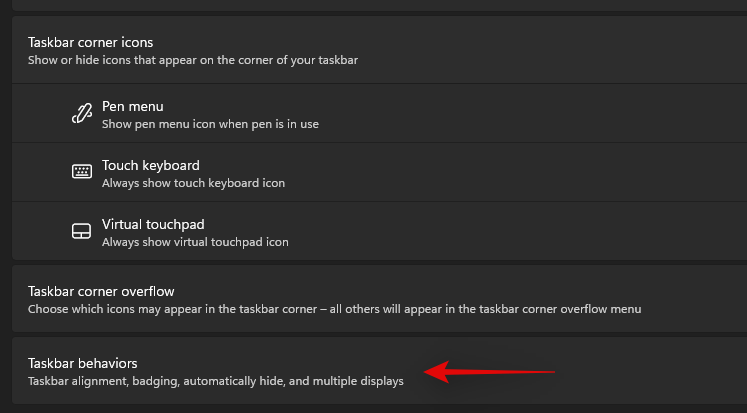
Desmarque la casilla de 'Ocultar automáticamente la barra de tareas'.

Ahora cierre la aplicación Configuración y si su barra de tareas se estaba ocultando automáticamente, ahora debería estar deshabilitada en su sistema.
Solución n. ° 3: reinicie los servicios necesarios
Como se mencionó anteriormente, Windows 11 ha renovado la barra de tareas, lo que ahora significa que depende de múltiples servicios para funcionar correctamente en cualquier sistema. Reiniciemos todos estos servicios para asegurarnos de que un conflicto en segundo plano no impida que la barra de tareas funcione correctamente en su sistema.
Presione Ctrl + Shift + Escen su sistema para iniciar el Administrador de tareas. Cambie a la pestaña 'Detalles' en la parte superior.
Ahora busque los siguientes servicios en ejecución y selecciónelos haciendo clic en ellos. Presione 'Eliminar' en su teclado y confirme su elección seleccionando 'Finalizar proceso'.
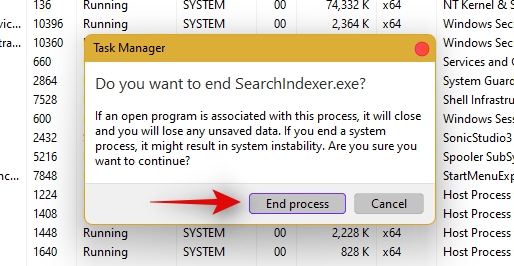
- Explorer.exe
- ShellExperienceHost.exe
- SearchIndexer.exe
- SearchHost.exe
- RuntimeBroker.exe
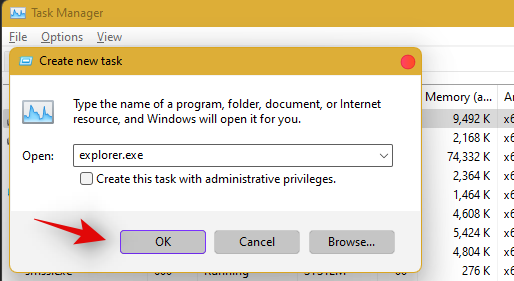
Reiniciemos el Explorador de Windows ahora. Haga clic en 'Archivo' en la esquina superior izquierda y seleccione 'Ejecutar nueva tarea'.
Escriba 'explorer.exe' y presione Entrar en su teclado. También puede hacer clic en 'Aceptar' si es necesario.
Una vez que se reinicia el explorador, simplemente reinicie su PC para reiniciar otros servicios en su sistema.
La barra de tareas ahora debería restaurarse si un conflicto de servicio en segundo plano fue la causa de su problema.
Solución # 4: elimine IrisService en el registro y reinicie
Presione Ctrl + Shift + Escpara abrir el Administrador de tareas. Luego haga clic en Archivo en la esquina superior izquierda.
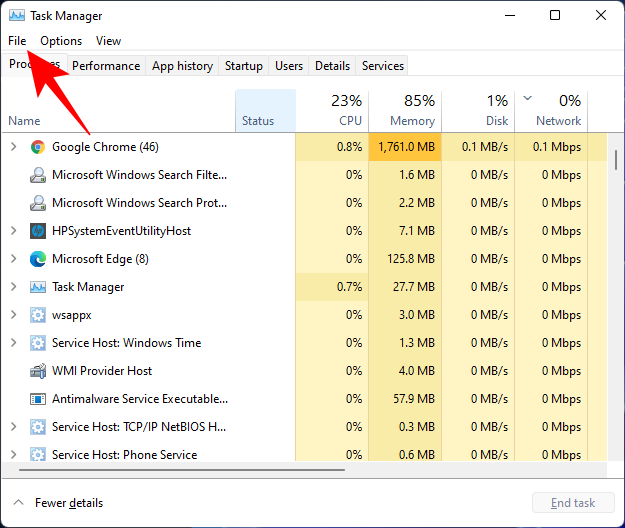
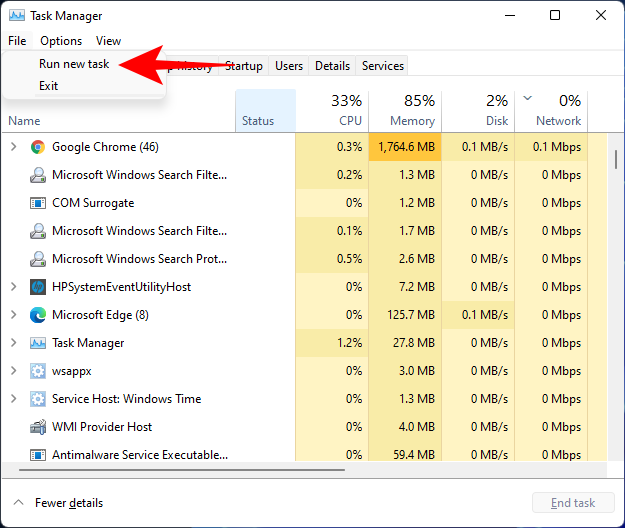
Seleccione Ejecutar nueva tarea .
Escribe cmd y presiona Enter.
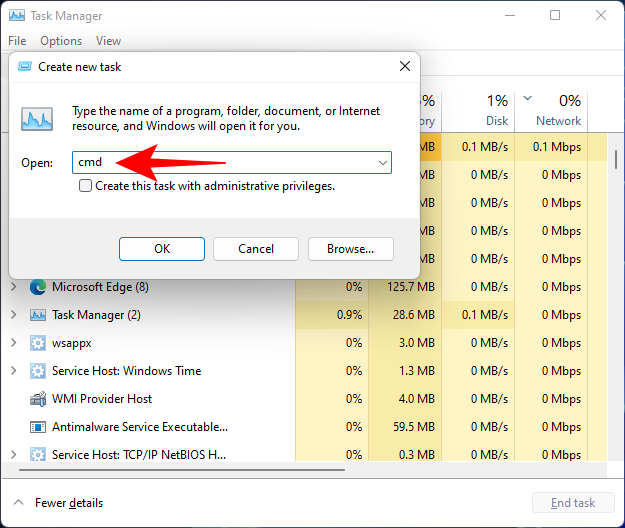
Esto abrirá una instancia elevada del símbolo del sistema. Ahora copie el siguiente comando y péguelo en el símbolo del sistema:
reg delete HKCU\SOFTWARE\Microsoft\Windows\CurrentVersion\IrisService /f && shutdown -r -t 0

Luego presione Enter. Tan pronto como lo haga, su PC se reiniciará. Una vez que se reinicia, todo debería volver a la normalidad, incluida la barra de tareas.
Solución n. ° 5: agregar UndockingDisabled en el registro
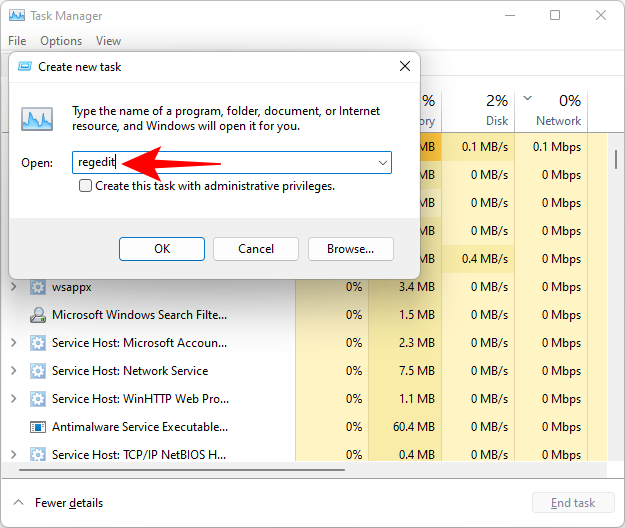
Presione Ctrl + Shift + Escpara abrir el Administrador de tareas. Luego haga clic en Archivo (esquina superior izquierda) y Ejecute una nueva tarea .
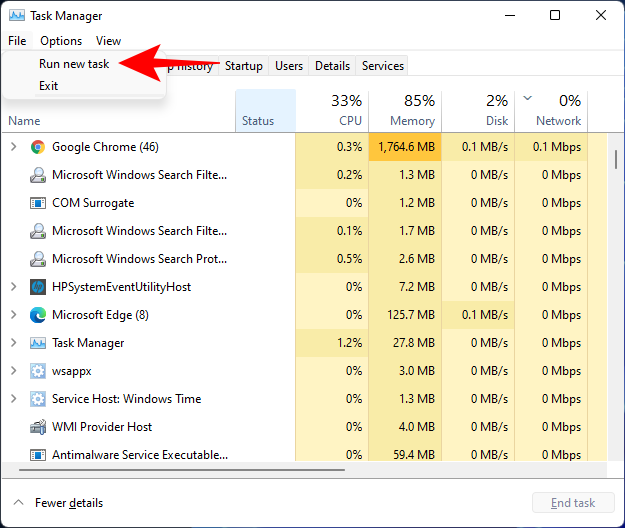
Escribe regedit y presiona Enter.
Esto abrirá el Editor del registro. Ahora navegue a la siguiente dirección:
Computer\HKEY_LOCAL_MACHINE\SOFTWARE\Microsoft\Windows\CurrentVersion\Shell\Update\Packages
Alternativamente, simplemente copie lo anterior y péguelo en la barra de direcciones del Editor del Registro, así:

Una vez que presione Entrar, será dirigido a la clave especificada. A la derecha, haga clic con el botón derecho en el espacio y seleccione Nuevo > Valor DWORD (32 bits) .
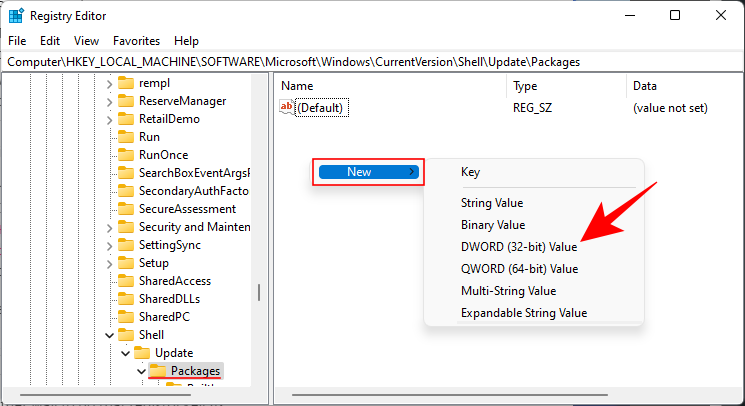
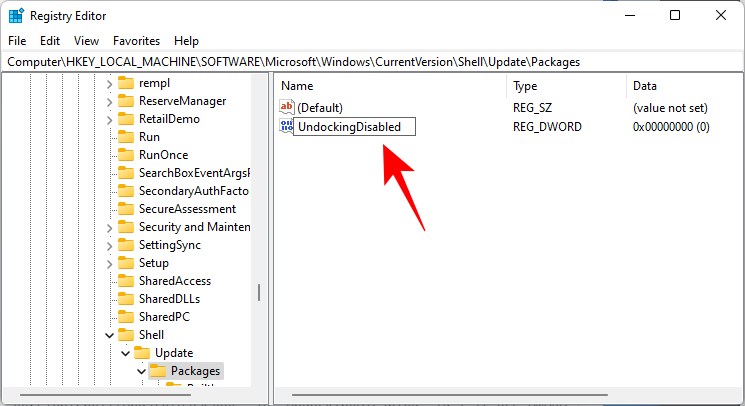
Denomine este DWORD UndockingDisabled recién creado .
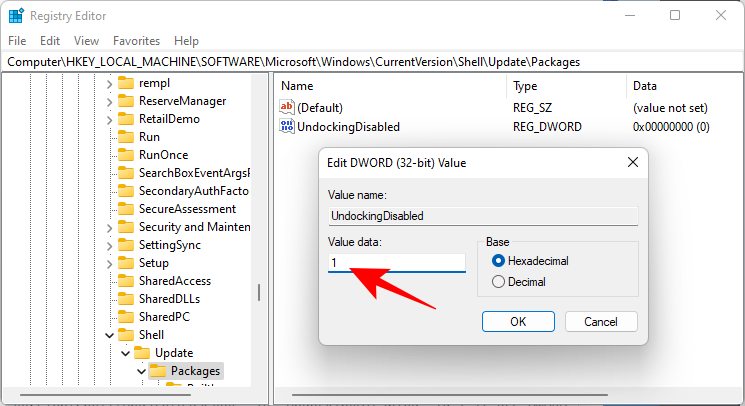
Luego haga doble clic en él y cambie los "Datos del valor" a 1 . Luego haga clic en Aceptar .
Reinicie su PC para que los cambios surtan efecto.
Solución # 6: ejecutar comandos SFC y DISM
Presione Inicio, escriba cmd y haga clic en Ejecutar como administrador .
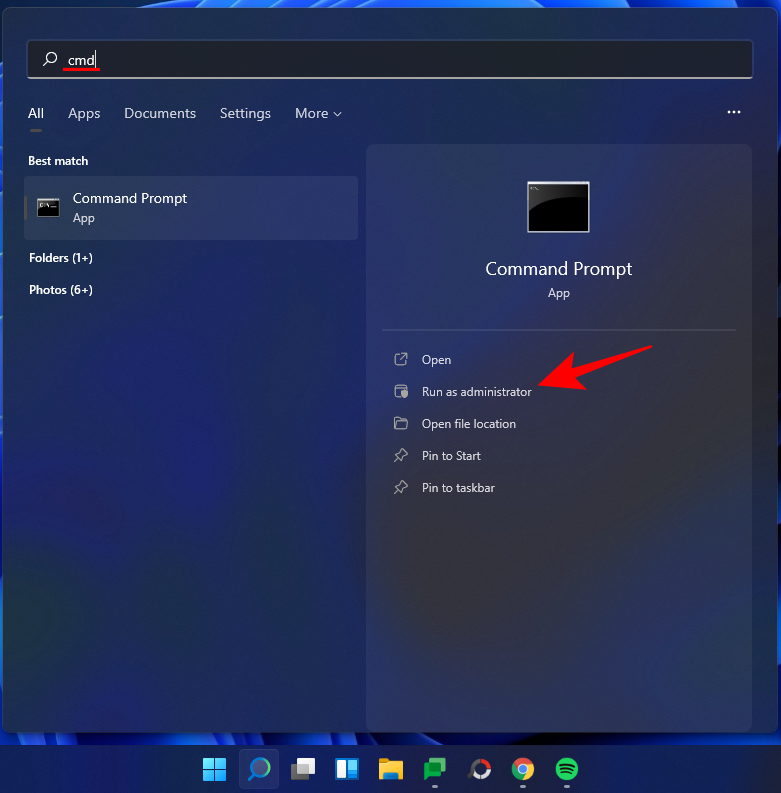
Ahora escriba el siguiente comando:
sfc /scannow
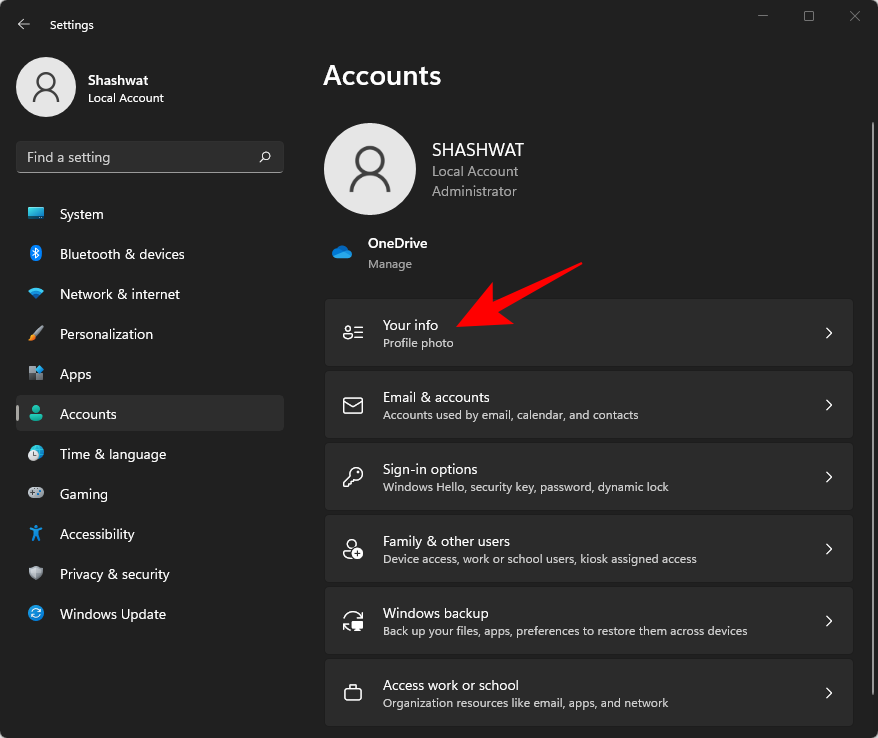
Presione Entrar. Espere a que SFC termine de escanear y solucione los problemas encontrados.

A continuación, ejecute el siguiente comando DISM para la herramienta de administración y mantenimiento de imágenes de implementación:
dism /online /cleanup-image /scanhealth
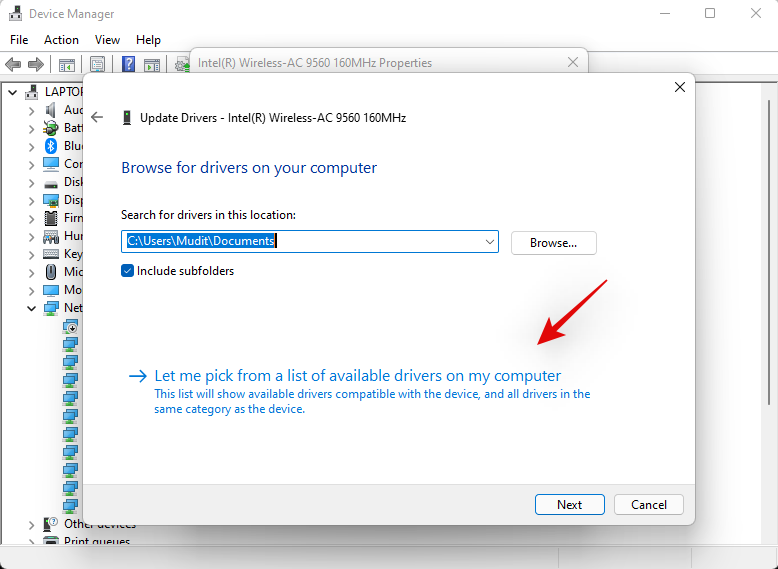
Luego presione Enter. Nuevamente, espere a que se complete el escaneo.

Ahora, ejecute el siguiente comando DISM:
dism /online /cleanup-image /restorehealth

Presione Entrar. Espere a que DISM restaure la salud.

Por último, ejecute el comando chkdsk para ejecutar la utilidad Comprobar disco:
chkdsk c: /r
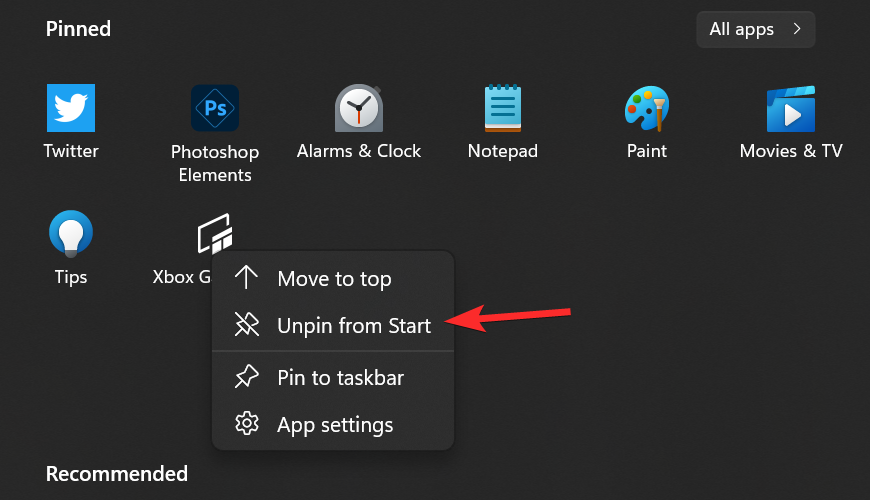
Presione Entrar. El símbolo del sistema mostrará un mensaje que le indicará que "no se puede bloquear la unidad actual ... porque el volumen está siendo utilizado por otro proceso", y le pedirá permiso para programar un análisis antes del próximo inicio. Escriba Ypara cumplir.

Y presione Entrar. Ahora reinicie su computadora, deje que la herramienta Check Disk haga su trabajo y verifique si la barra de tareas ha reanudado su funcionamiento normal.
Solución n. ° 7: reinstale UWP
Presione Ctrl + Shift + Escen su teclado para iniciar el Administrador de tareas. Haga clic en 'Archivo' y seleccione 'Ejecutar nueva tarea'.
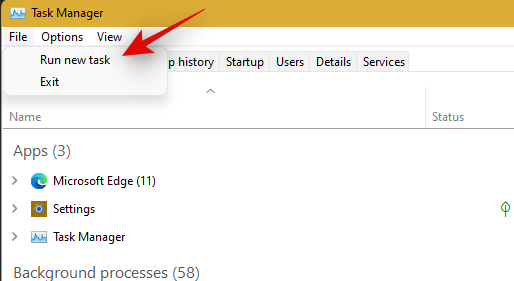
Escriba 'PowerShell' y presione Ctrl + Shift + Enteren su teclado.

PowerShell ahora se iniciará como administrador en su sistema. Escriba el siguiente comando:
Get-AppxPackage -AllUsers | Foreach {Add-AppxPackage -DisableDevelopmentMode -Register “$ ($ _. InstallLocation) \ AppXManifest.xml”}
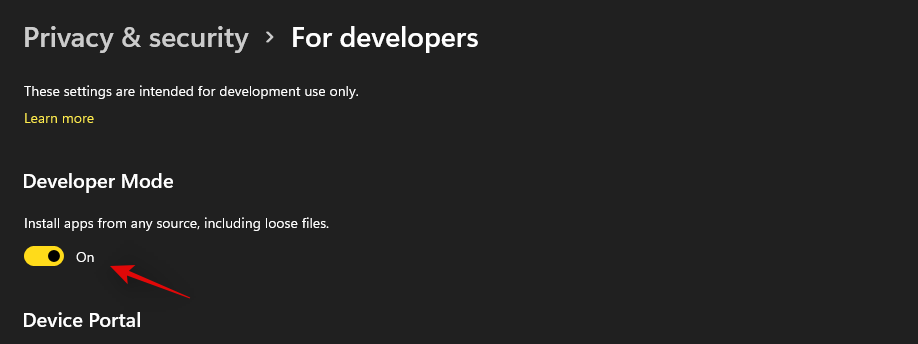
Presione Entrar. PowerShell arrojará una lista en ejecución de mensajes en rojo. Pero no se preocupe por eso. Solo espere a que el comando termine de ejecutarse.

Solución n. ° 8: verifique UAC y agregue editar el registro si es necesario
UAC es imprescindible para todas las aplicaciones y funciones modernas, incluido el menú Inicio y la barra de tareas. Primero debe habilitar UAC si está deshabilitado y reiniciar su sistema. Si la barra de tareas aún no funciona para usted, le recomendamos que intente agregar un valor del menú Inicio de Xaml a su Editor del registro.
Agregar este valor parece reiniciar y volver a registrar los servicios de la barra de tareas que parecen hacer que la barra de tareas vuelva a funcionar en la mayoría de los sistemas. Siga la guía a continuación para comenzar.
Verifique y habilite UAC si está deshabilitado
Presione Ctrl + Shift + Escen su teclado para iniciar el administrador de tareas. Ahora haga clic en 'Archivo' en la esquina superior izquierda de su pantalla y seleccione 'Ejecutar nueva tarea'.

Escriba 'cmd' y presione Ctrl + Shift + Enteren su teclado.
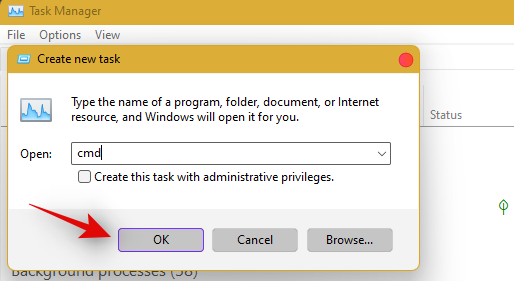
Ahora escriba el siguiente comando y presione Entrar para ejecutar el comando.
C:\Windows\System32\cmd.exe /k %windir%\System32\reg.exe ADD HKLM\SOFTWARE\Microsoft\Windows\CurrentVersion\Policies\System /v EnableLUA /t REG_DWORD /d 0 /f
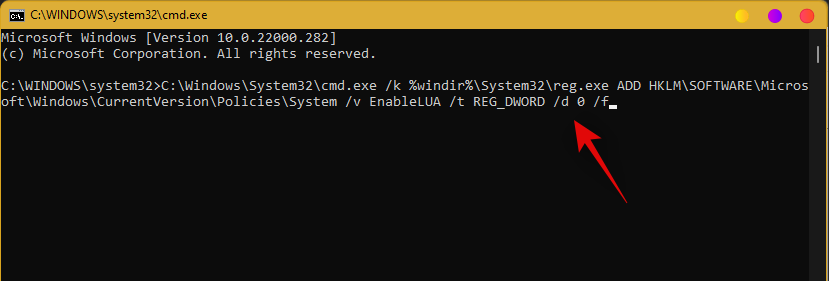
UAC will now be enabled for your system. Restart your PC for the changes to take effect on your system. Once restarted, Taskbar should be up and running on your system if UAC was the issue for you. If not, use the guide below to trigger the taskbar’s functionality on your system.
Add Registry Value
Press Ctrl + Shift + Esc to launch the task manager. Now click on ‘File’ in the top left corner and select ‘Run new task’.

Type in ‘cmd’ and press Ctrl + Shift + Enter on your keyboard.

Now type in the following command and press Enter on your keyboard.
REG ADD "HKCU\Software\Microsoft\Windows\CurrentVersion\Explorer\Advanced" /V EnableXamlStartMenu /T REG_DWORD /D 1 /F
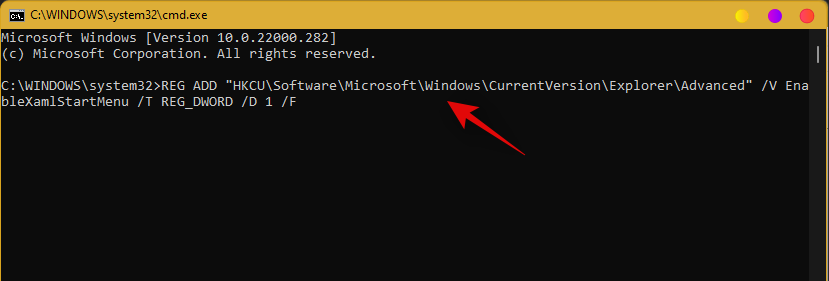
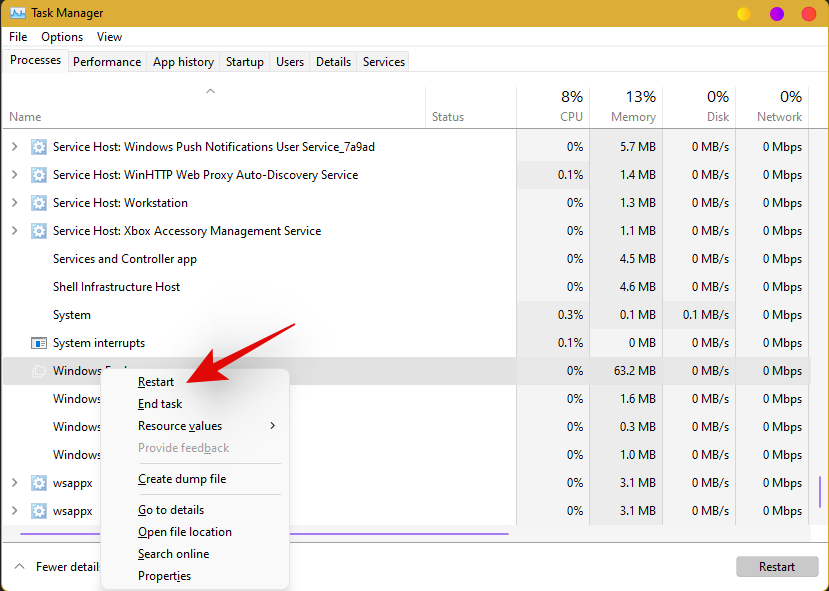
Go back to the task manager now, find Windows Explorer in the list, and right-click on it. Select Restart to restart explorer.exe.
Once restarted, try to access your taskbar. The taskbar should now be available on your system.
Fix #9: Edit date and time to fix Taskbar
Date and Time settings seem to be the major cause of issues with the taskbar in Windows 11. Use the guide below to try out the following time fixes to see which one works the best for you.
Ensure that your time is correctly synchronized with the time server
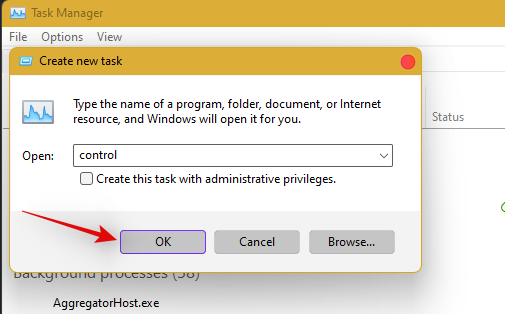
Press Ctrl + Shift + Esc on your keyboard and click on ‘File’. Select ‘Run new task’.

Type in ‘Control’ and hit Enter on your keyboard.
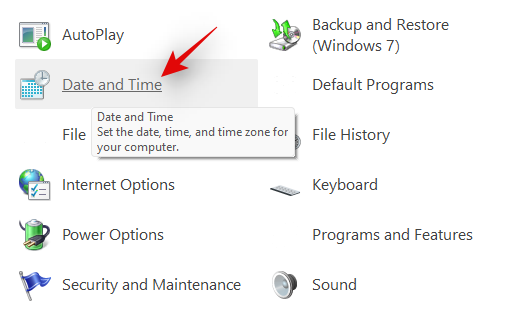
Click on ‘Date and Time’.
Select ‘Internet Time’ from the top.
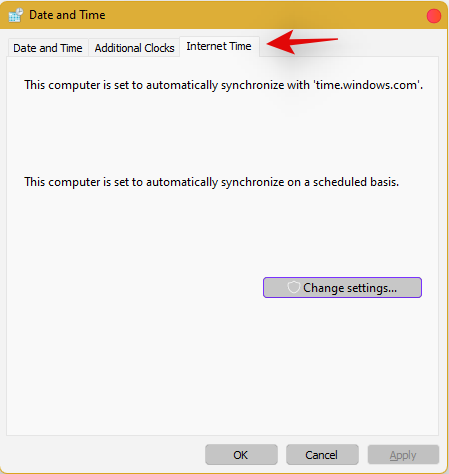
Click on ‘Change Settings’.
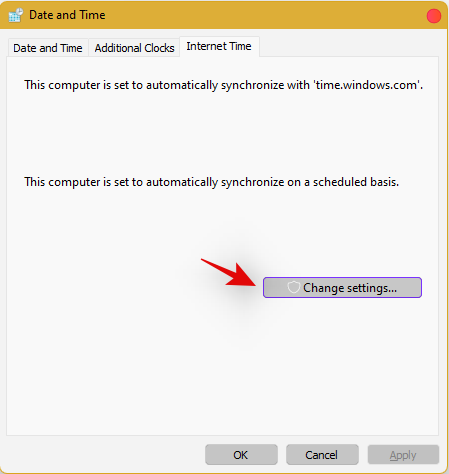
Uncheck the box for ‘Synchronize with an Internet time server’.

Click on ‘Ok’ once you are done.
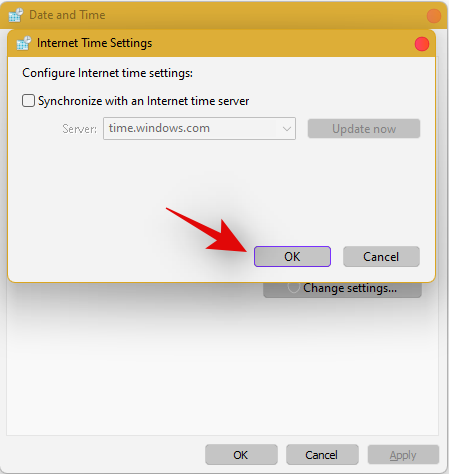
Restart your PC at this point and check your taskbar. If it is still disabled, do not fret, follow the steps above and enable Synchronization with an Internet Time Server again.
Once enabled, press Ctrl + Shift + Esc on your keyboard, and find Windows Explorer in the list on your screen. Right-click the listing and select ‘Restart’.

Once explorer restarts, try using the Taskbar. If synchronization was your issue, then it should now be fixed on your system. If not, continue with the other time fixes mentioned below.
Change date to 1 day ahead
Open the Task Manager by pressing Ctrl + Shift + Esc simultaneously. Then click on File.
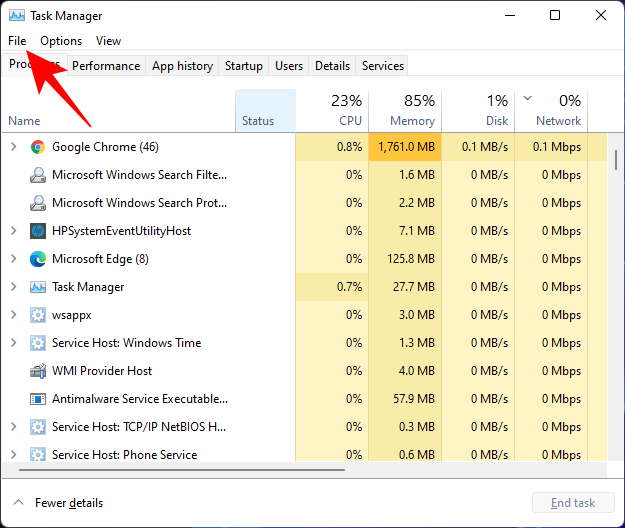
Click on Run new task.
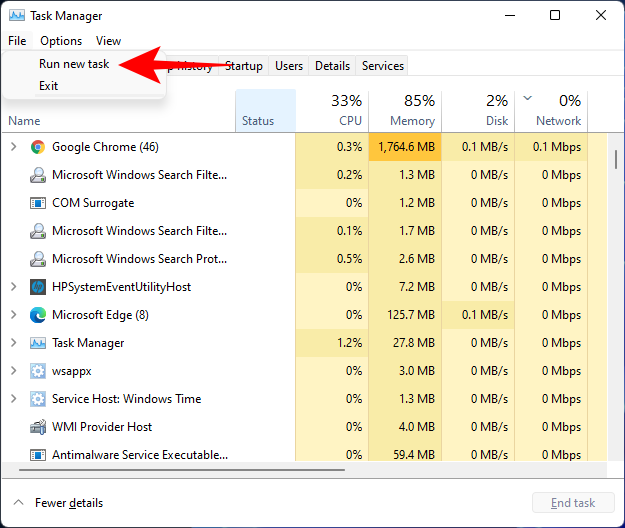
Type control panel and hit Enter.
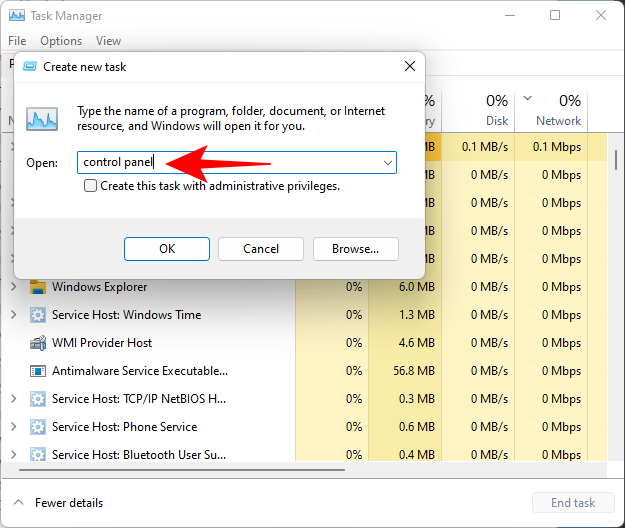
Now click on Clock and Region.
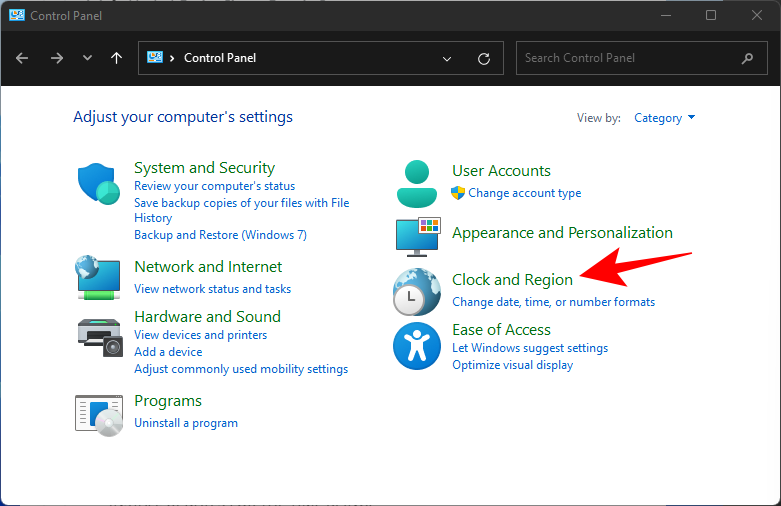
Under “Date and Time”, click on Set the time and date.
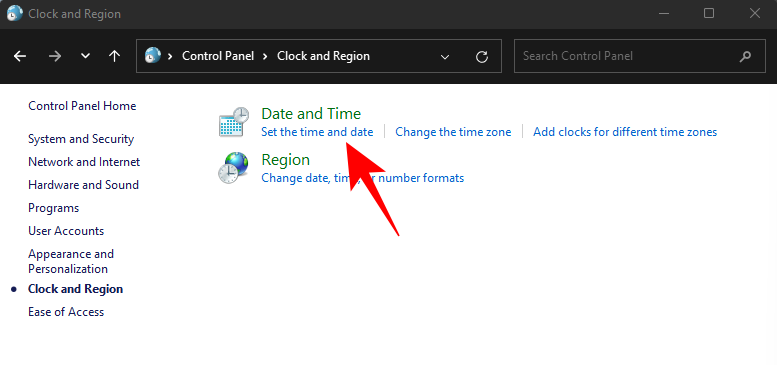
Click on the Internet Time tab to switch to it.
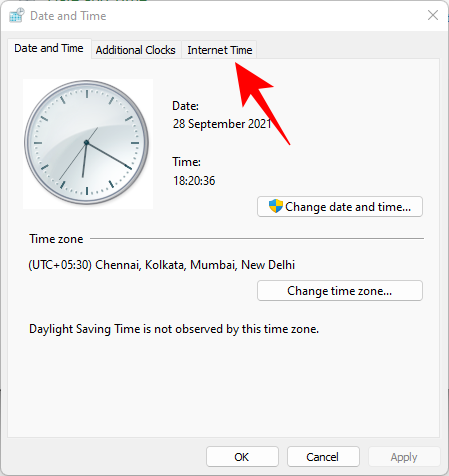
Click on Change settings…
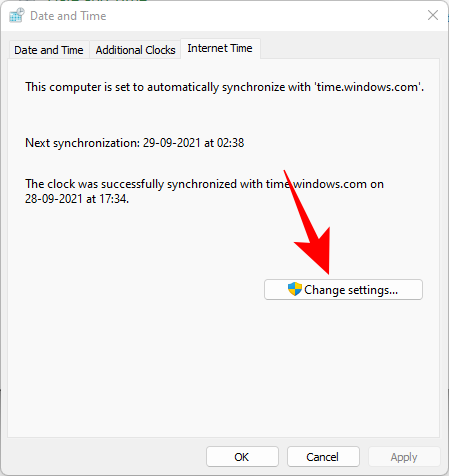
Uncheck Synchronize with an Internet time server, then click OK.

Now click on the Date and Time tab to switch back to it.
Here, click on Change date and time…
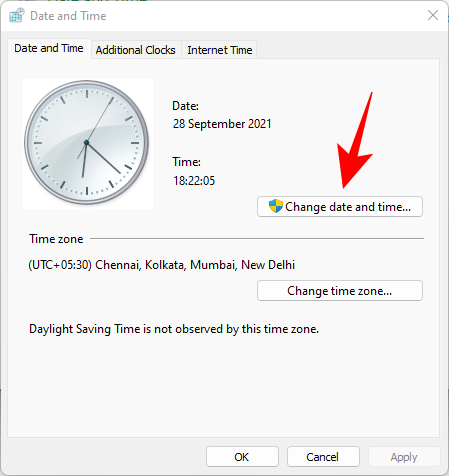
Now change the date and time to reflect tomorrow. As of writing this post, it is the 1st November so we will be changing the date to 2nd November.
Change Dates to last cumulative updates
If you are still unable to get the Taskbar working then you will have to jump through a few hoops to change your date and time multiple times and get the taskbar working on your system. Follow the guide below to get you started.
Press Ctrl + Shift + Esc on your keyboard, click on ‘File’ and select ‘Run new task’.

Type in ‘Control’ and press Enter on your keyboard.

Select ‘Date and Time’.

Switch to ‘Internet time’.

Click on ‘Change Settings’.

Uncheck the box for ‘Synchronize with an Internet Time Server’.

Click on ‘Ok’.

Switch back to ‘Date and Time’. Click on ‘Change Date and Time’ and select your date as 2nd September.
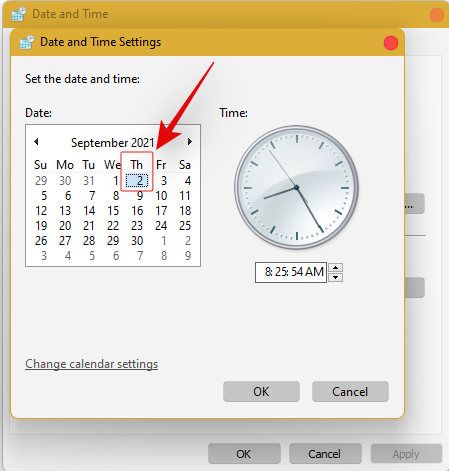
Close all windows and restart your system. Once restarted, open the ‘Date and Time’ dialog box again and change your date to 7th October this time.
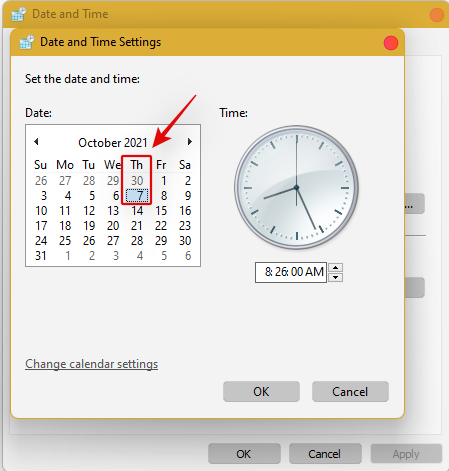
Restart your system again and Taskbar should now be back up and running on your system again. You can now enable synchronization for time again using the steps above on your system.
If synchronizing time does not work, move a month ahead to restore Taskbar
If you are still unable to get Taskbar up and running on your system again you can try the last date change fix. We recommend you use the steps above to change your date and time to a month ahead of your current date. Once changed, restart your system, and the taskbar should be up and running on your system now.
The downside of this fix is that if you revert to your normal date, Taskbar will stop working on your system. Having a mismatched date can cause issues with background syncs for various applications and cause some websites to malfunction. You will also have issues installing and getting the latest Windows Updates, so you will need to check all of these manually when updating in the future.
Fix #10: Uninstall the latest cumulative Windows Update ie: KB5006050
The cumulative update released in September for Windows 11 seems to also cause issues with the taskbar on some desktops and laptops. Use the guide below to uninstall the necessary update from your system.
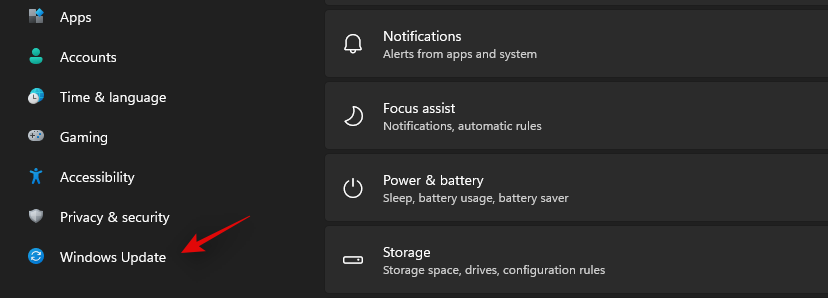
Press Windows + i and select Windows Update from the left.
Click on ‘Update history’.
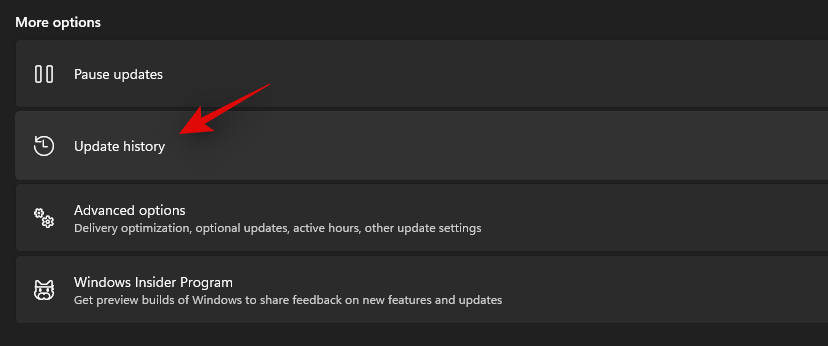
Now select ‘Uninstall updates’.
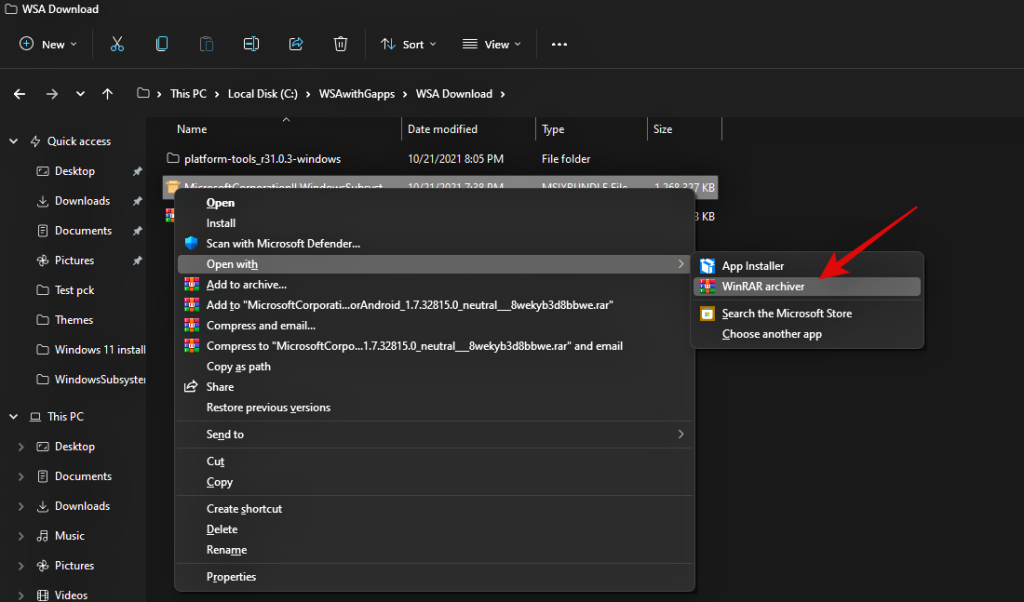
Click and select Windows Cumulative update KB5006050 from the list.

Now click on ‘Uninstall’ at the top and confirm your choice to uninstall the selected update.
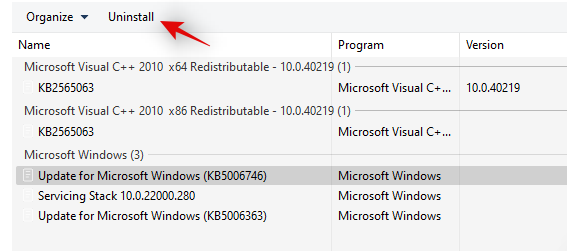
Restart your system and taskbar functionality should now be restored on your system.
Fix #11: Restore PC to a previous restore point
If you had the taskbar working at a previous point in time then we recommend you restore your PC to a previously available restore point on your system. Follow the guide below to get you started.
Press Ctrl + Shift + Esc on your keyboard and click on ‘File’. Select ‘Run new task’ once you are done.

Type in CMD and press Ctrl + Shift + Enter on your keyboard.

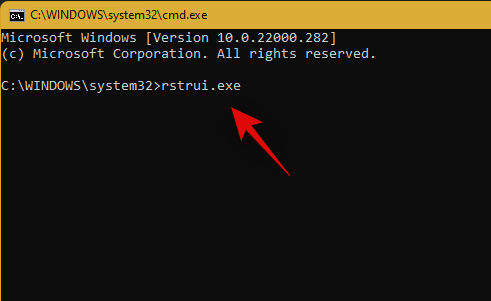
Now type in ‘rstrui.exe’ and press Enter on your keyboard.
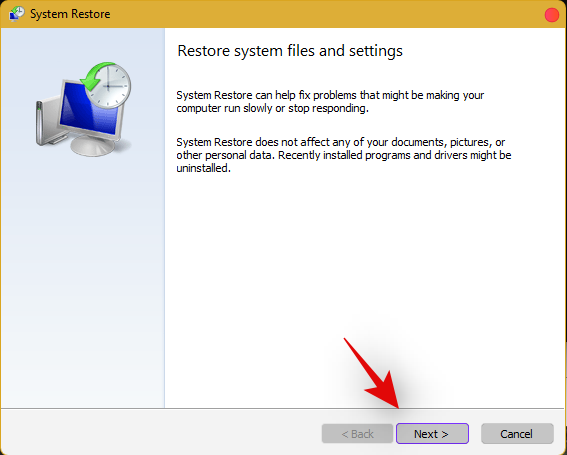
The system restore utility will now launch on your system. Click on ‘Next’.
Select the desired restore point from the list on your screen. Click on ‘Next’ once you are done.
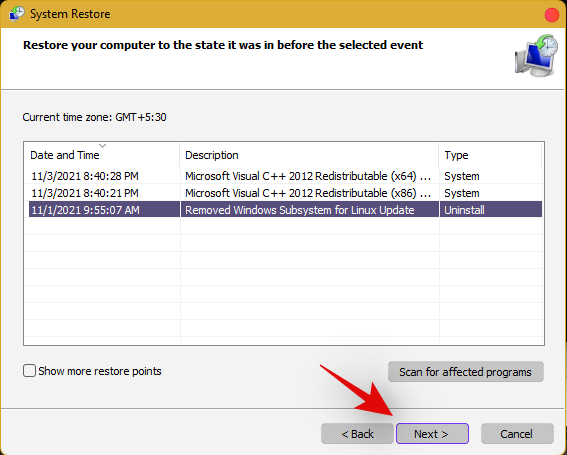
Tip: Click on ‘Scan for affected programs’ to view a list of installed programs that will be removed from your system during the restore process.
Click on ‘Finish’ once the restore finishes and restart your system.
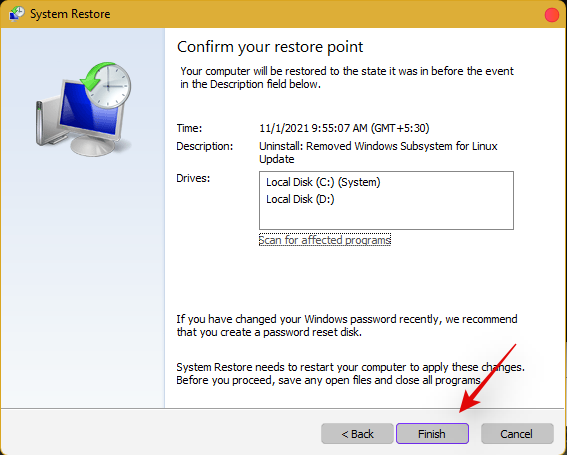
The taskbar should now be back up and running on your system again.
Fix #12: Last Resort: Create a new local admin account and transfer all your data
If by this point Taskbar still fails to work for you then it’s time for some drastic measures. You can create a new local admin account, check if Taskbar is working there, and then transfer all your data to the new account. This will be a tedious process but it is the next best way to get the taskbar working on your system without resetting your PC. Follow the guide below to get you started.
Create a new local admin account
Herre’s how you can create a new local admin account on your system.
Note: Most users facing the taskbar issue are unable to access the Settings app as well. Hence we will be using CMD to add a new local admin account to your PC. However, if the Settings app is available to you then you can use the same to add a new account as well.
Press Ctrl + Shift + Esc on your keyboard, click on ‘File’ and select ‘Run new task’.

Type in ‘cmd’ and press Ctrl + Shift + Enter on your keyboard.

CMD will now be launched as an administrator. Use the command below to add a new local admin account. Replace NAME with the Username of your choice for the new account. You can add a password later once you have confirmed that the taskbar is available in the new account.
net user /add NAME 
Once you have added the new user, use the command below to convert it to an administrator account on your PC. As usual, replace NAME with the Username for the new account you created earlier.
net localgroup Administrators NAME /add

Now type in the following to log out of your current account.
logoff

Once logged out, click on the newly added account to log in to the same. Once logged in, check if the taskbar is available in the new account. If it is, you can use the next section to transfer all your data. However, if the taskbar is still missing then you have no choice but to perform a fresh install of Windows 11 on your PC from a removable USB media drive.
Transfer all your data
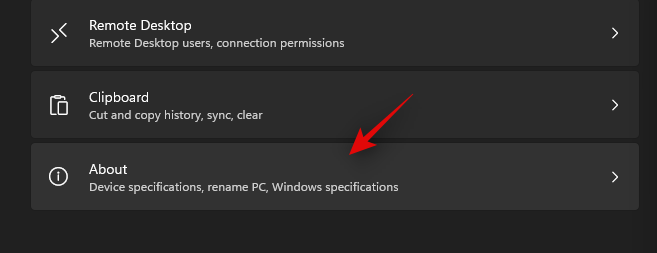
Press Windows + i on your keyboard and click on ‘About’ on your right.
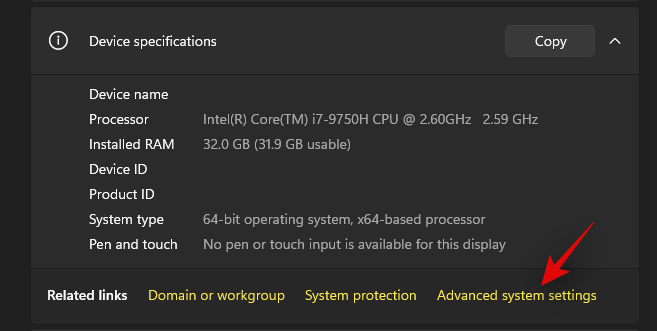
Click on ‘Advanced system settings’.
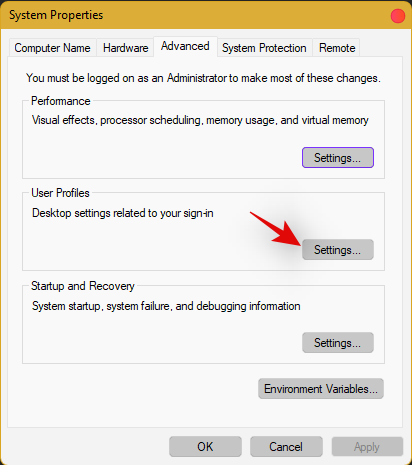
Click on ‘Settings’ under ‘User Profiles’.
Select your original profile by clicking on it and selecting ‘Copy To’.
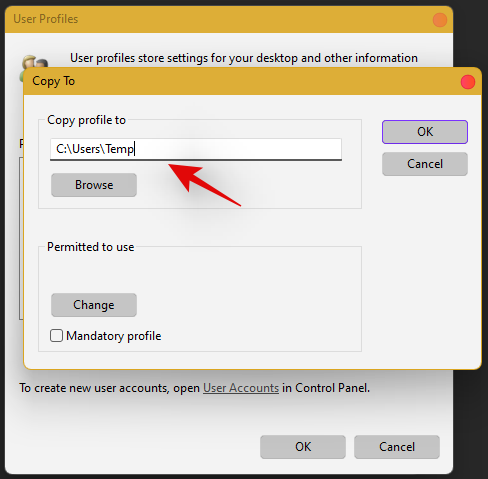
Now enter the following path under ‘Copy profile to’. Rename NAME to the username of your previous profile from where you wish to copy all your data.
C:\Users\NAME
Click on ‘Change’.
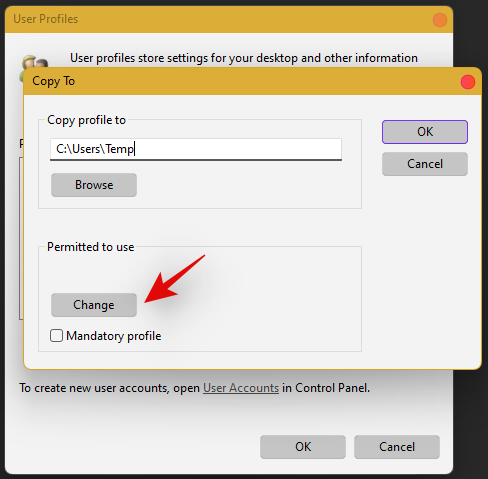
Enter the name for your new user profile and press Enter on your keyboard.
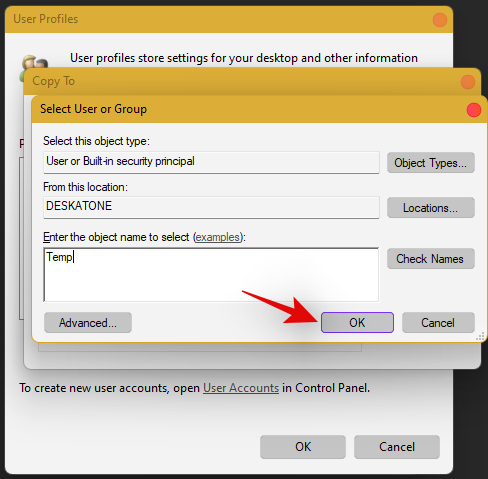
Click on ‘Ok’ once you are done.
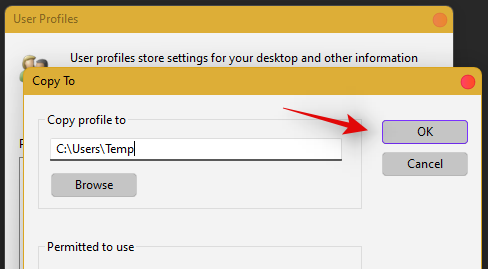
All your data will now be copied over to the new profile where the taskbar is functional on your PC. You can now delete your previous user account and set a password for your new account as well.
Frequently Asked Questions (FAQs):
With so many fixes, you are bound to have a few questions on your mind. Here are some commonly asked ones that should help you get up to speed.
How do I access Windows apps and Settings without a taskbar?
You can use the Task Manager to launch almost any program or Settings page on your system. To launch the desired program, launch the Taskbar > File > Run new task and enter the path to the program you wish to launch. Press Enter if you wish to launch the program normally or press Ctrl + Shift + Enter if you wish to launch the program with administrator privileges.
Is it safe to edit the Registry?
Registry edits are never safe as they have the potential to break your system. Fixes from trusted sources can help you avoid such issues but a good rule of thumb is to always back up your registry before making any edits. This way you can easily restore your Registry values in case some get messed up when editing the Registry.
When will Microsoft fix this issue?
Sadly, Microsoft is yet to release a proper fix for this issue. The company has tried to release a fix in the past cumulative updates to Windows 11 but they have been a hit and miss. We expect Microsoft to completely fix this issue in the upcoming feature update to Windows 11 when the OS gets the ability to run Android apps officially.
Can I update my Windows 11 after fixing the taskbar?
This will depend on the fix that you’re currently using. If you are using a date fix then you won’t be able to install updates until you restore to the current time. This will, however, cause the taskbar to be disabled again and the changes will be carried over after you update your PC. However, if you are using any other fix then you can easily update Windows.
For users with the date fix, you should try updating with the modified time first. If the update gets stuck on ‘Installing 0%’ or ‘Downloading 100%’ then change your date and time to the current date and time and update your PC. Ensure that you do not restart explorer or your PC during this process to keep the current instance of the taskbar alive on your system during the update process. This should help fix the issue for you once Microsoft officially releases an update to fix the issue.
We hope you were able to easily get the taskbar back up and running on your system using the guide above. If you face any more issues, feel free to reach out to us using the comments section below.
Related:


![Cómo reparar el error de pantalla verde de Windows 11 [8 formas] Cómo reparar el error de pantalla verde de Windows 11 [8 formas]](https://cloudo3.com/resources8/images31/image-5564-0105182715287.png)


