Cálculos do Excel Estão Errados
Um tutorial para ajudar com problemas onde planilhas do Microsoft Excel não estão calculando com precisão.

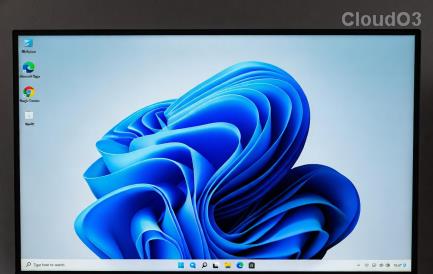
A barra de tarefas do Windows tem sido o centro de todas as atenções desde que teve sua nova aparência renovada com o lançamento do Windows 11. Agora você pode centralizar sua barra de tarefas, desfrutar do novo centro de ação, alterar seu alinhamento e posicioná-lo em qualquer lado da tela. Infelizmente, a implantação desse recurso tem tido menos sucesso, com mais e mais usuários lutando para fazer sua barra de tarefas funcionar no Windows 11 por alguns meses.
Embora a Microsoft tenha reconhecido o problema, emitido uma solução alternativa e esteja atualmente trabalhando em uma correção, os usuários ainda parecem não conseguir fazer a Barra de Tarefas funcionar novamente. Se você estiver no mesmo barco, compilamos uma lista de todas as correções disponíveis para que sua barra de tarefas volte a funcionar no Windows 11. Siga o guia abaixo para começar.
Conteúdo
Por que minha barra de tarefas não está sendo exibida?
A barra de tarefas do Windows 11 tem um novo visual que vem de uma versão reformulada de seu funcionamento. A barra de tarefas agora depende de vários serviços e do próprio menu Iniciar para funcionar corretamente. Parece que o processo de atualização do Windows 10 para o Windows 11 parece bagunçar a barra de tarefas, dependendo de qual versão do Windows 10 você instalou em seu sistema e para qual versão do Windows 11 você está atualizando.
Além disso, um recente Windows Update lançado no mês passado também parece estar causando esse problema para alguns usuários, enquanto outros enfrentam o mesmo devido à incompatibilidade de hora do sistema, apesar de ter tudo configurado corretamente. Existem muitas maneiras de corrigir sua barra de tarefas e recomendamos que você comece com as correções abaixo, uma por uma.
12 maneiras de corrigir problemas da barra de tarefas no Windows 11
Use os métodos abaixo para começar a consertar sua barra de tarefas no Windows 11. Se você já tentou reiniciar o sistema, pode pular o primeiro método.
Correção nº 1: reinicie o PC
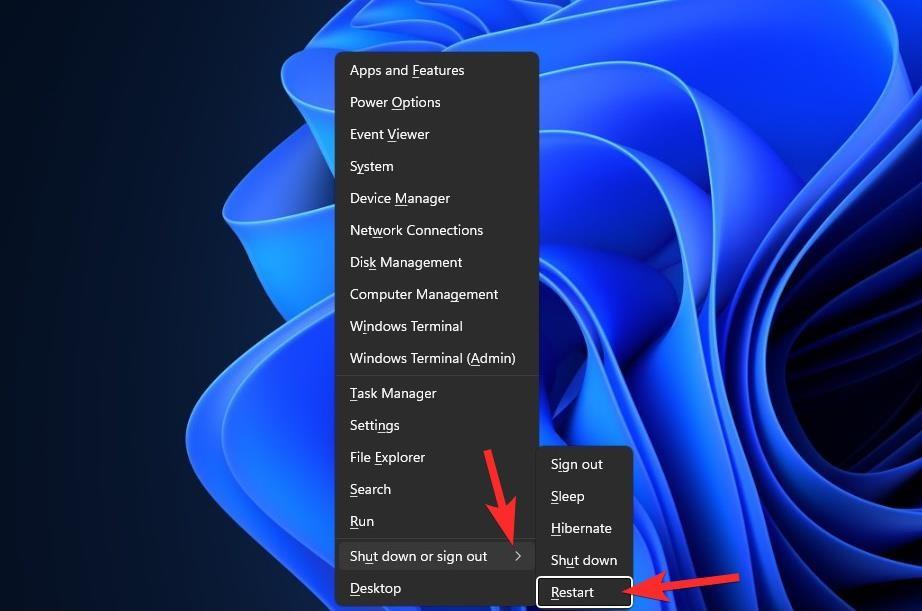
Antes de tentar algo sofisticado, é bom tentar medidas mais simples, como reiniciar o PC ou o Windows Explorer (veja abaixo). Isso dará ao seu sistema uma reinicialização suave, permitindo que os dados sejam recarregados e, possivelmente, corrigindo problemas com a barra de tarefas e o menu Iniciar.
Correção nº 2: certifique-se de que a opção 'Ocultar automaticamente a barra de tarefas' esteja desativada
Pressione Windows + ino teclado e clique em 'Personalização' à sua esquerda.
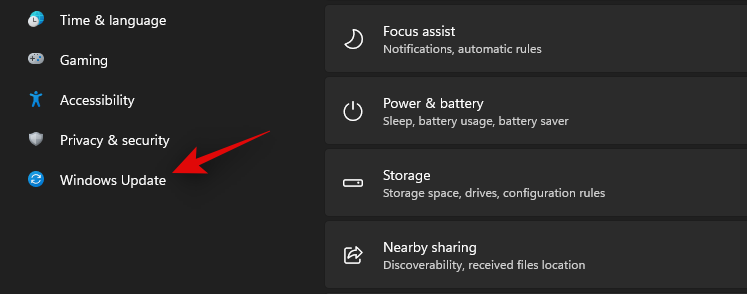
Clique em 'Barra de Tarefas'.
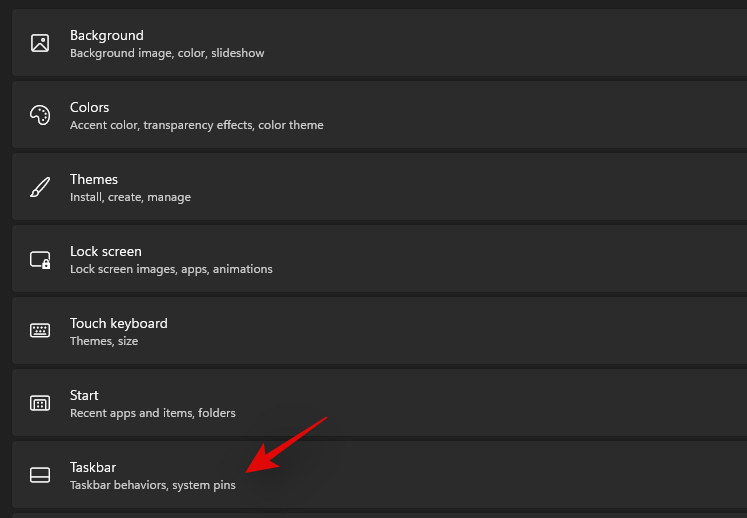
Agora clique em 'Comportamentos da barra de tarefas'.
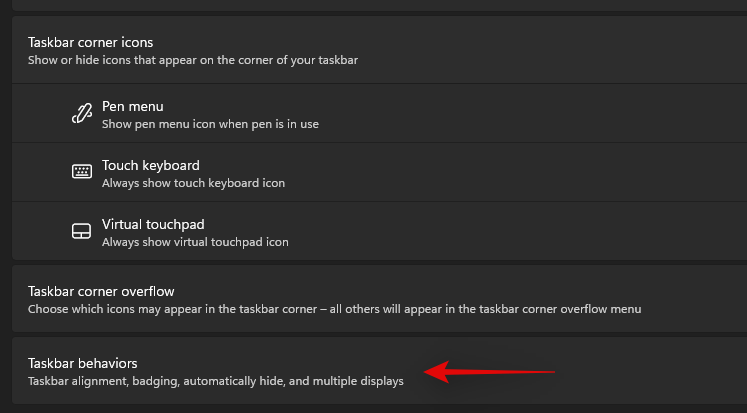
Desmarque a caixa 'Ocultar automaticamente a barra de tarefas'.

Agora feche o aplicativo Configurações e se sua barra de tarefas estava sendo ocultada automaticamente, então agora deve ser desativada em seu sistema.
Correção nº 3: reinicie os serviços necessários
Como mencionado anteriormente, o Windows 11 renovou a barra de tarefas, o que agora significa que ela depende de vários serviços para funcionar corretamente em qualquer sistema. Vamos reiniciar todos esses serviços para garantir que um conflito de segundo plano não esteja impedindo que sua barra de tarefas funcione corretamente em seu sistema.
Pressione Ctrl + Shift + Escem seu sistema para iniciar o Gerenciador de Tarefas. Mude para a guia 'Detalhes' na parte superior.
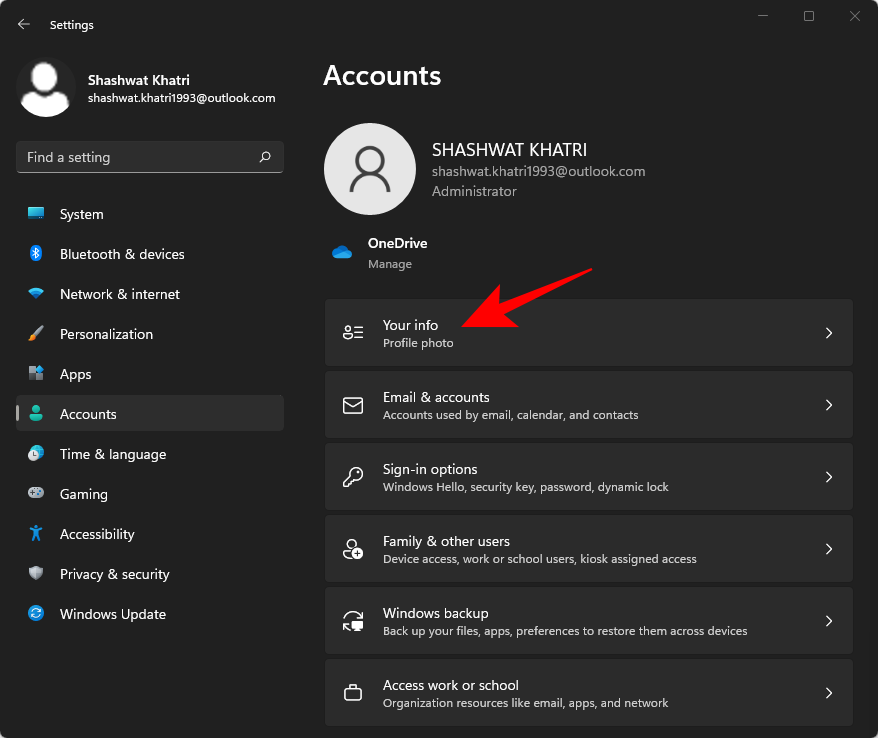
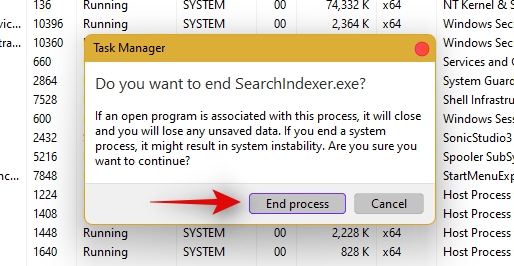
Agora encontre os seguintes serviços em execução e selecione-os clicando neles. Pressione 'Excluir' no teclado e confirme sua escolha selecionando 'Finalizar Processo'.
Vamos reiniciar o Windows Explorer agora. Clique em 'Arquivo' no canto superior esquerdo e selecione 'Executar nova tarefa'.
Digite 'explorer.exe' e pressione Enter no teclado. Você também pode clicar em 'Ok' se necessário.
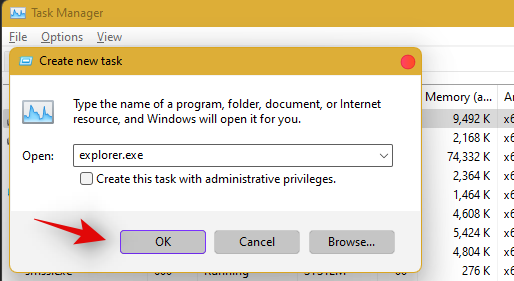
Assim que o explorer for reiniciado, simplesmente reinicie seu PC para reiniciar outros serviços em seu sistema.
A barra de tarefas agora deve ser restaurada se um conflito de serviço em segundo plano foi a causa do problema.
Correção nº 4: exclua IrisService do registro e reinicie
Pressione Ctrl + Shift + Escpara abrir o Gerenciador de Tarefas. Em seguida, clique em Arquivo no canto superior esquerdo.
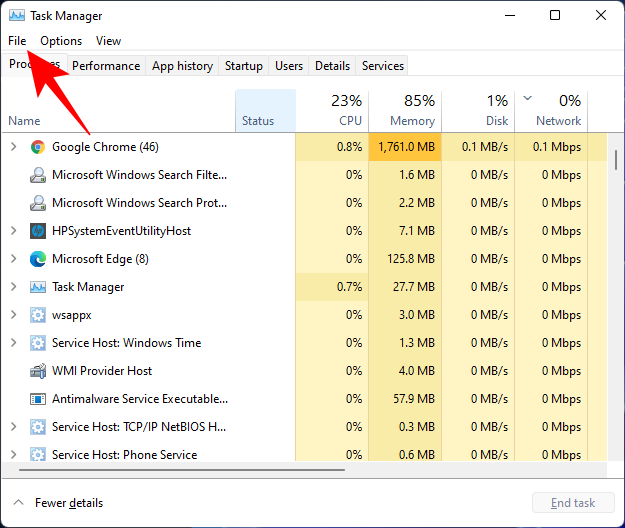
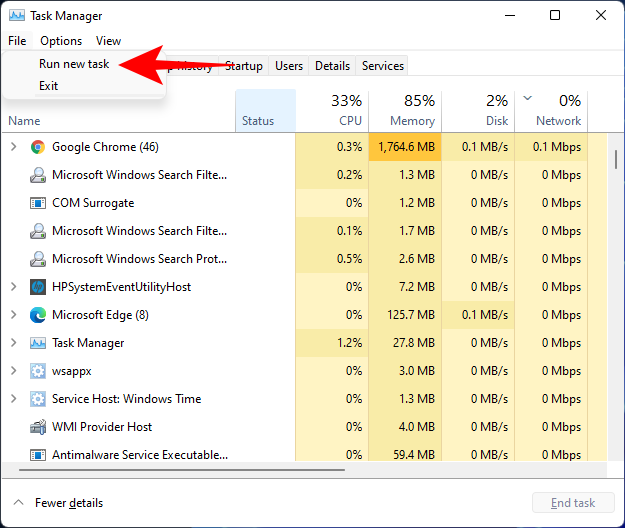
Selecione Executar nova tarefa .
Digite cmd e pressione Enter.
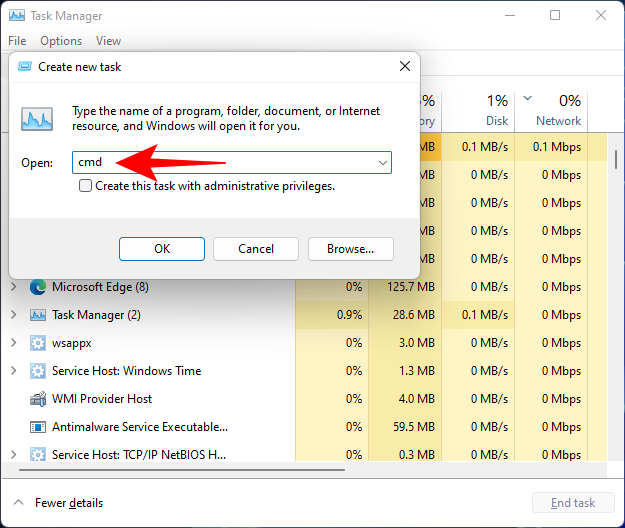
Isso abrirá uma instância elevada do Prompt de Comando. Agora copie o seguinte comando e cole-o no Prompt de Comando:
reg delete HKCU\SOFTWARE\Microsoft\Windows\CurrentVersion\IrisService /f && shutdown -r -t 0

Em seguida, pressione Enter. Assim que você fizer isso, seu PC será reiniciado. Assim que for reiniciado, as coisas devem voltar ao normal, incluindo a barra de tarefas.
Correção nº 5: adicionar UndockingDisabled no registro
Pressione Ctrl + Shift + Escpara abrir o Gerenciador de Tarefas. Em seguida, clique em Arquivo (canto superior esquerdo) e Executar uma nova tarefa .
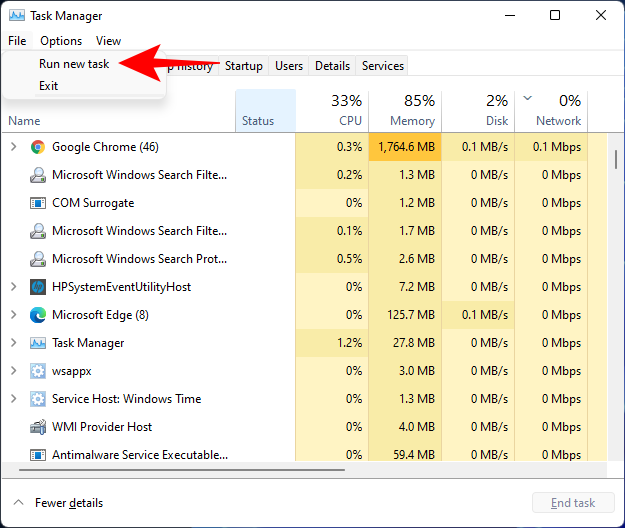
Digite regedit e pressione Enter.
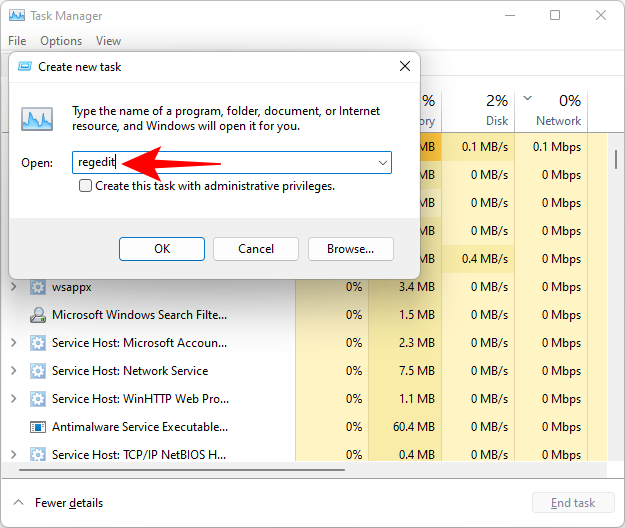
Isso abrirá o Editor do Registro. Agora navegue até o seguinte endereço:
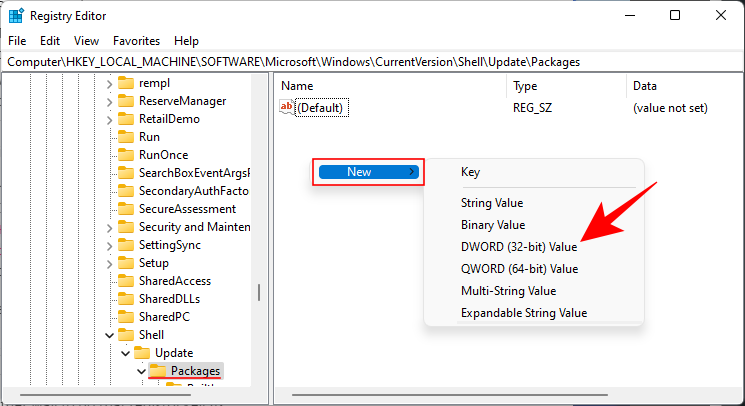
Computer\HKEY_LOCAL_MACHINE\SOFTWARE\Microsoft\Windows\CurrentVersion\Shell\Update\Packages
Como alternativa, basta copiar o texto acima e colá-lo na barra de endereço do Editor do Registro, assim:

Depois de pressionar Enter, você será direcionado para a tecla especificada. À direita, clique com o botão direito no espaço e selecione Novo > Valor DWORD (32 bits) .
Nomeie este DWORD recém-criado como UndockingDisabled .
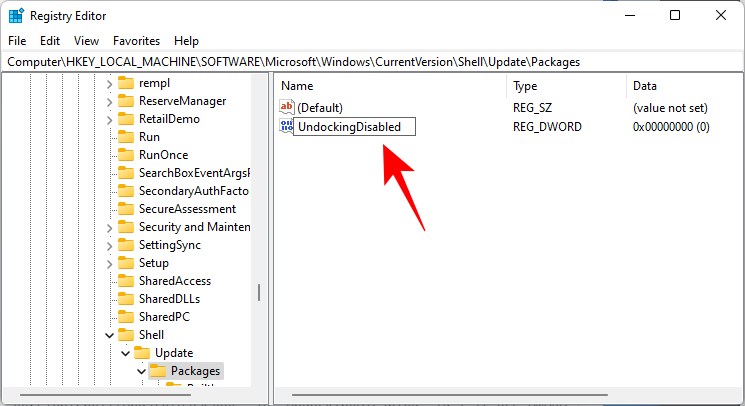
Em seguida, clique duas vezes nele e altere os “Dados do valor” para 1 . Em seguida, clique em OK .
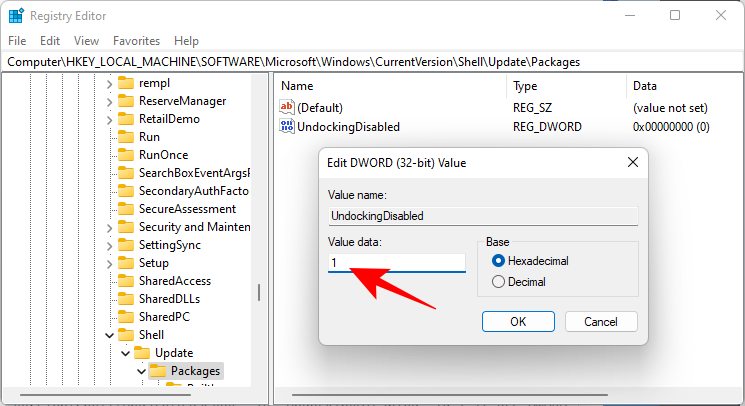
Reinicie o seu PC para que as alterações tenham efeito.
Correção nº 6: execute comandos SFC e DISM
Pressione Iniciar, digite cmd e clique em Executar como administrador .
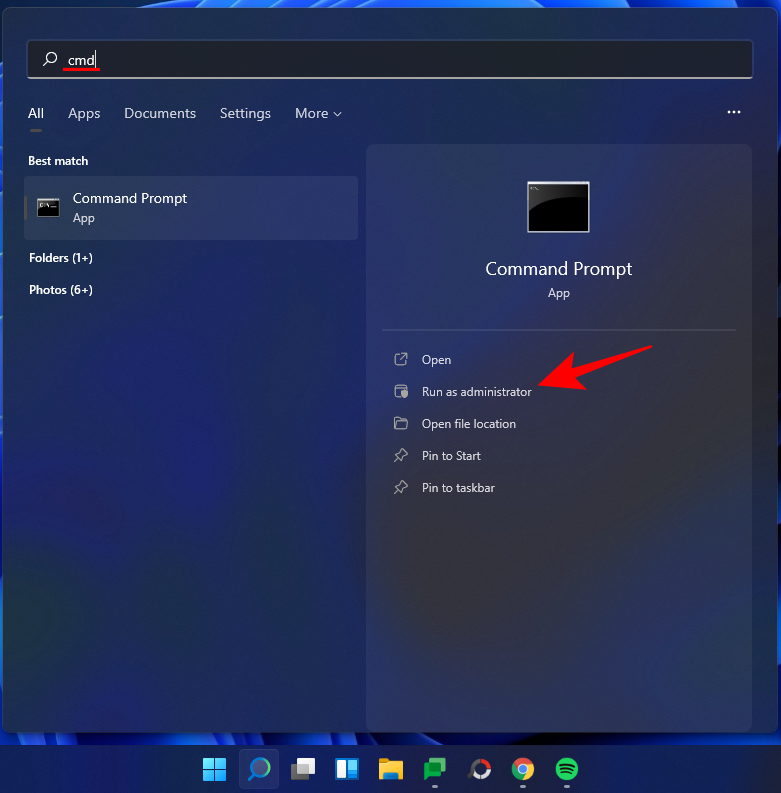
Agora digite o seguinte comando:
sfc /scannow
Pressione Enter. Aguarde até que o SFC termine a digitalização e corrija os problemas encontrados.

Em seguida, execute o seguinte comando DISM para a ferramenta de manutenção e gerenciamento de imagens de implantação:
dism /online /cleanup-image /scanhealth
Em seguida, pressione Enter. Novamente, aguarde a conclusão da varredura.

Agora, execute o seguinte comando DISM:
dism /online /cleanup-image /restorehealth

Pressione Enter. Aguarde até que o DISM restaure a integridade.

Por último, execute o comando chkdsk para executar o utilitário Check Disk:
chkdsk c: /r
Pressione Enter. O prompt de comando exibirá uma mensagem informando que “não é possível bloquear a unidade atual ... porque o volume está sendo usado por outro processo” e pedirá sua permissão para agendar uma verificação antes da próxima inicialização. Digite Ypara cumprir.

And press Enter. Now restart your computer, let the Check Disk tool do its job, and check if the taskbar has resumed normal functioning.
Fix #7: Reinstall UWP
Press Ctrl + Shift + Esc on your keyboard to launch the Task Manager. Click on ‘File’ and select ‘Run new task’.
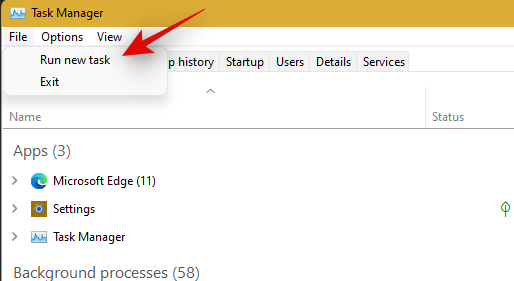
Type in ‘PowerShell’ and press Ctrl + Shift + Enter on your keyboard.

PowerShell will now be launched as an administrator on your system. Type the following command:
Get-AppxPackage -AllUsers | Foreach {Add-AppxPackage -DisableDevelopmentMode -Register “$ ($ _. InstallLocation) \ AppXManifest.xml”}
Press Enter. PowerShell will throw up a running list of messages in red. But don’t worry about it. Just wait for the command to finish executing.

Fix #8: Check UAC and add edit Registry if needed
UAC is a must-have for all modern apps and features including the Start Menu and the taskbar. You should first enable UAC if it is disabled and restart your system. If the Taskbar still fails to work for you, then we recommend you try adding a Xaml Start menu value to your Registry Editor.
Adding this value seems to restart and re-register Taskbar services which seem to get Taskbar working again on most systems. Follow the guide below to get you started.
Check and enable UAC if disabled
Press Ctrl + Shift + Esc on your keyboard to launch the task manager. Now click on ‘File’ in the top left corner of your screen and select ‘Run new task’.

Type in ‘cmd’ and press Ctrl + Shift + Enter on your keyboard.
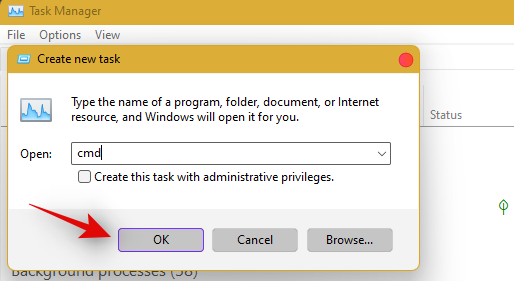
Now type in the following command and press Enter to execute the command.
C:\Windows\System32\cmd.exe /k %windir%\System32\reg.exe ADD HKLM\SOFTWARE\Microsoft\Windows\CurrentVersion\Policies\System /v EnableLUA /t REG_DWORD /d 0 /f
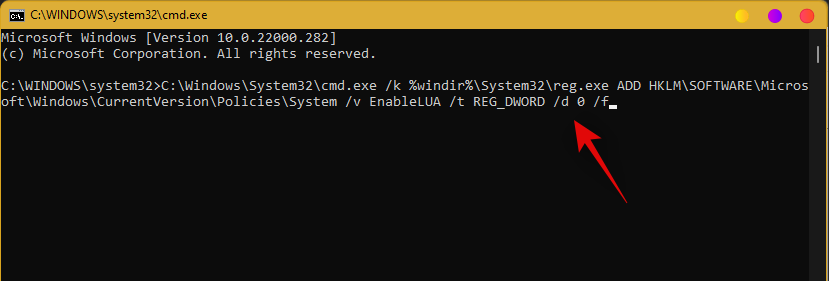
UAC will now be enabled for your system. Restart your PC for the changes to take effect on your system. Once restarted, Taskbar should be up and running on your system if UAC was the issue for you. If not, use the guide below to trigger the taskbar’s functionality on your system.
Add Registry Value
Press Ctrl + Shift + Esc to launch the task manager. Now click on ‘File’ in the top left corner and select ‘Run new task’.

Type in ‘cmd’ and press Ctrl + Shift + Enter on your keyboard.

Now type in the following command and press Enter on your keyboard.
REG ADD "HKCU\Software\Microsoft\Windows\CurrentVersion\Explorer\Advanced" /V EnableXamlStartMenu /T REG_DWORD /D 1 /F
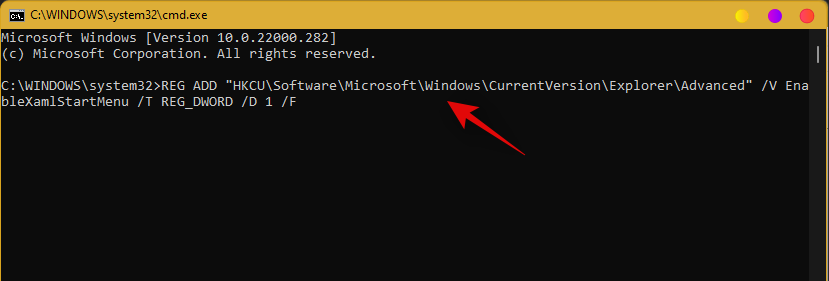
Go back to the task manager now, find Windows Explorer in the list, and right-click on it. Select Restart to restart explorer.exe.
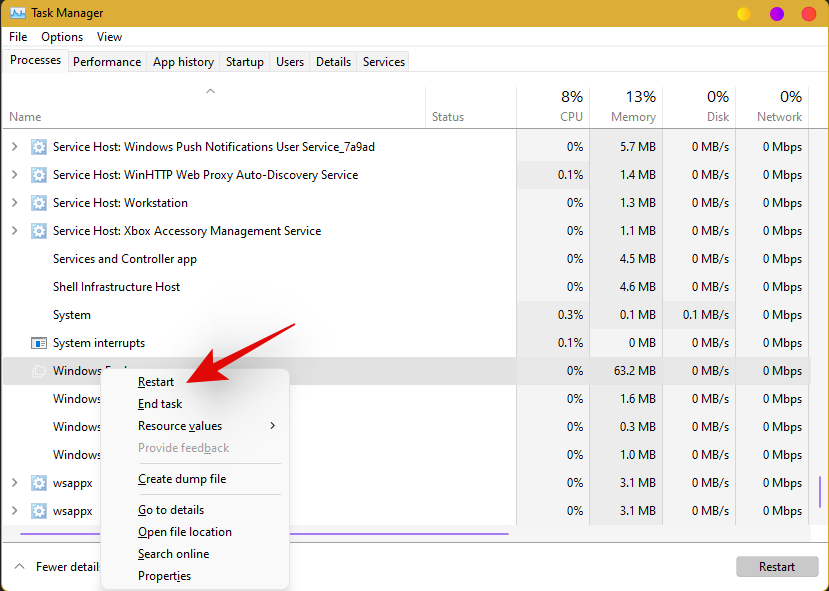
Once restarted, try to access your taskbar. The taskbar should now be available on your system.
Fix #9: Edit date and time to fix Taskbar
Date and Time settings seem to be the major cause of issues with the taskbar in Windows 11. Use the guide below to try out the following time fixes to see which one works the best for you.
Ensure that your time is correctly synchronized with the time server
Press Ctrl + Shift + Esc on your keyboard and click on ‘File’. Select ‘Run new task’.

Type in ‘Control’ and hit Enter on your keyboard.
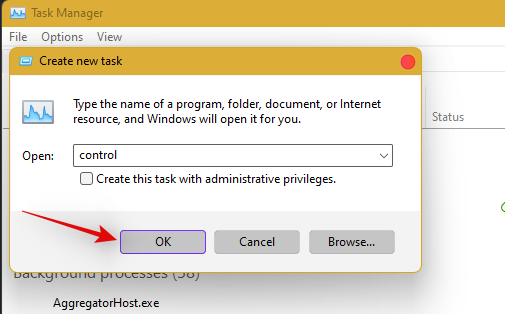
Click on ‘Date and Time’.
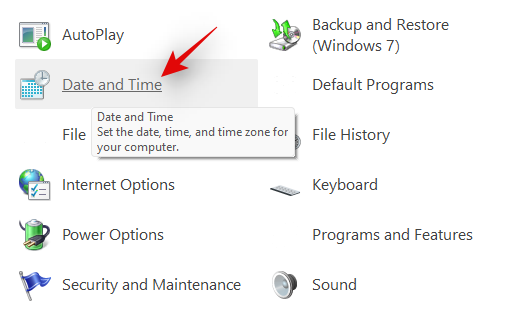
Select ‘Internet Time’ from the top.
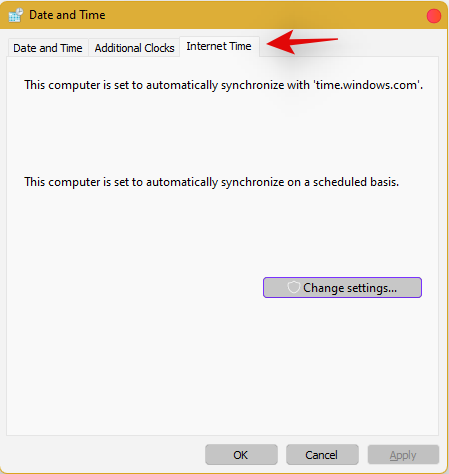
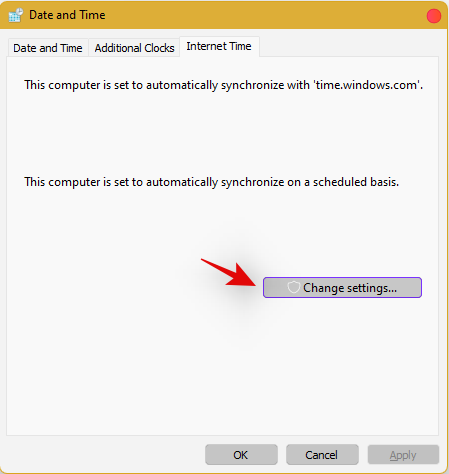
Click on ‘Change Settings’.
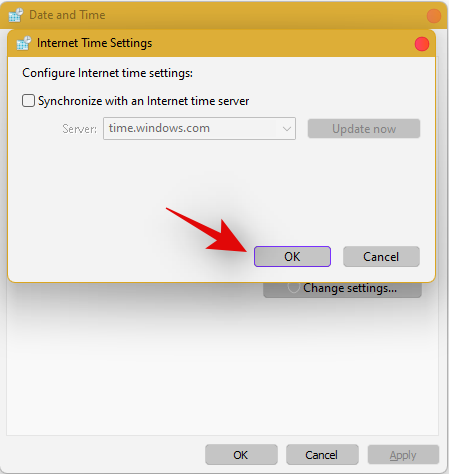
Uncheck the box for ‘Synchronize with an Internet time server’.

Click on ‘Ok’ once you are done.
Restart your PC at this point and check your taskbar. If it is still disabled, do not fret, follow the steps above and enable Synchronization with an Internet Time Server again.
Once enabled, press Ctrl + Shift + Esc on your keyboard, and find Windows Explorer in the list on your screen. Right-click the listing and select ‘Restart’.

Once explorer restarts, try using the Taskbar. If synchronization was your issue, then it should now be fixed on your system. If not, continue with the other time fixes mentioned below.
Change date to 1 day ahead
Open the Task Manager by pressing Ctrl + Shift + Esc simultaneously. Then click on File.
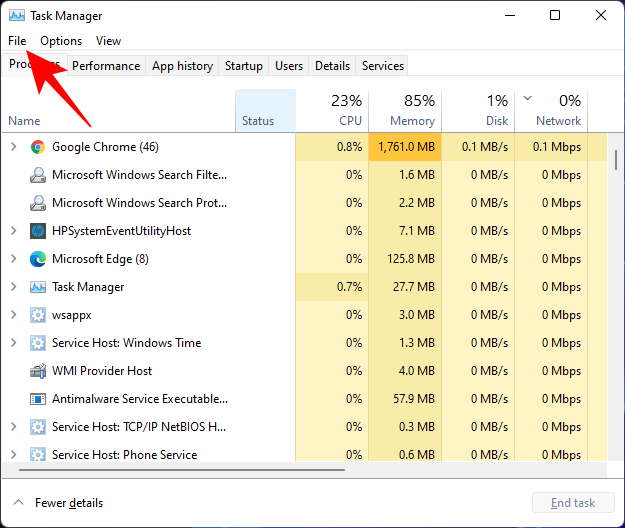
Click on Run new task.
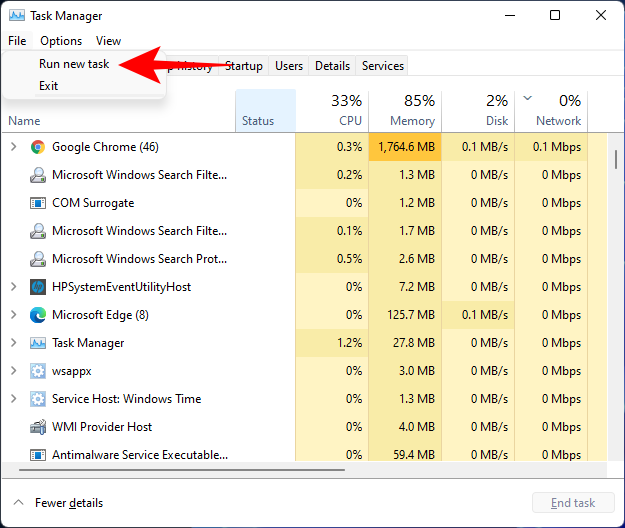
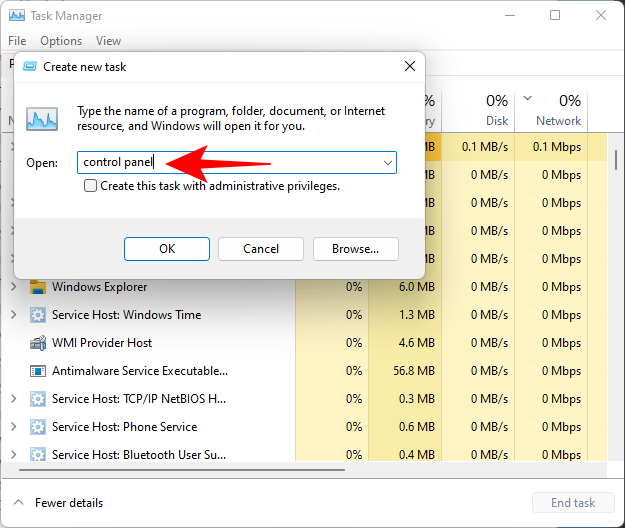
Type control panel and hit Enter.
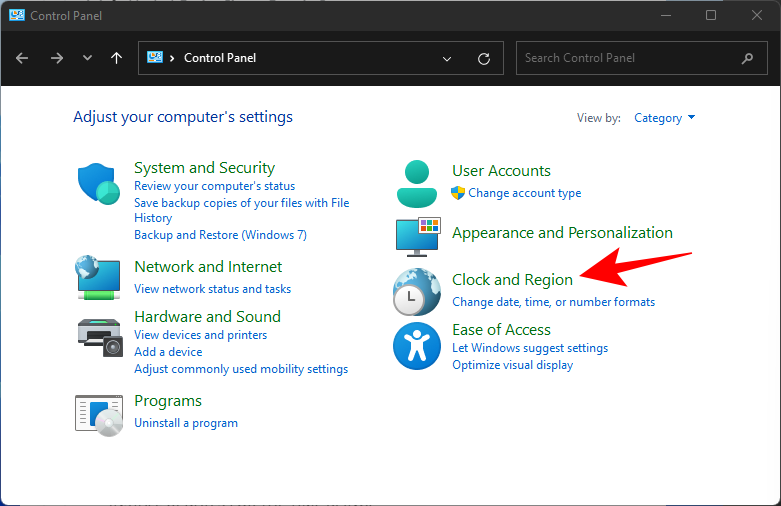
Now click on Clock and Region.
Under “Date and Time”, click on Set the time and date.
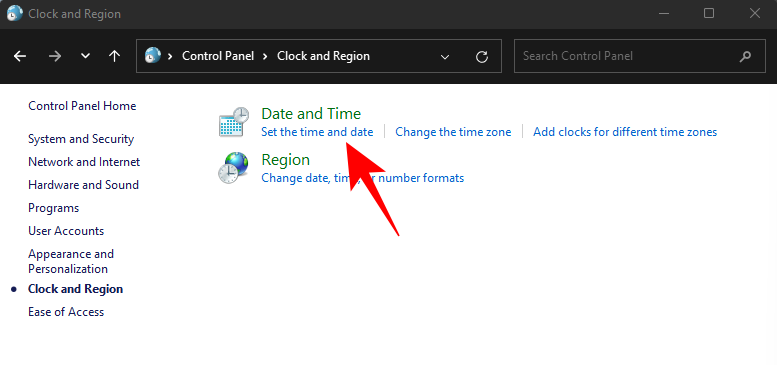
Click on the Internet Time tab to switch to it.
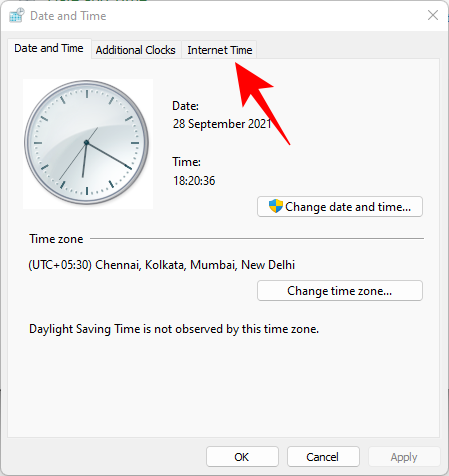
Click on Change settings…
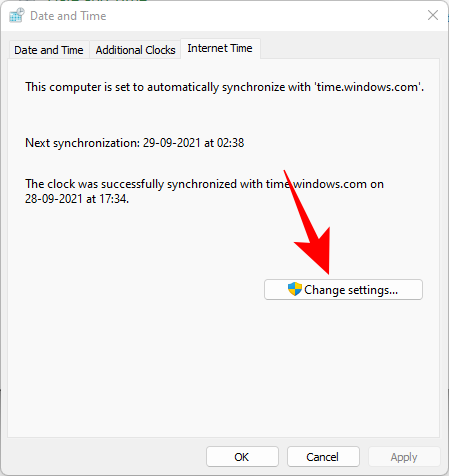
Uncheck Synchronize with an Internet time server, then click OK.

Now click on the Date and Time tab to switch back to it.
Here, click on Change date and time…
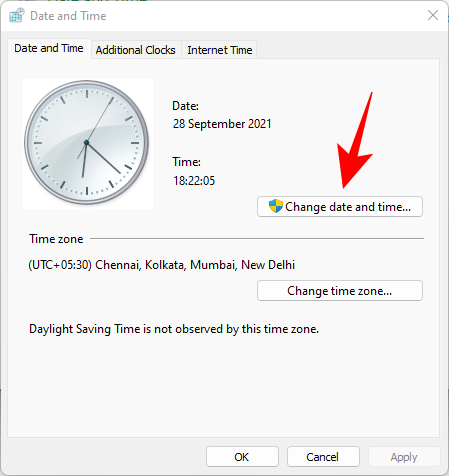
Now change the date and time to reflect tomorrow. As of writing this post, it is the 1st November so we will be changing the date to 2nd November.
Change Dates to last cumulative updates
If you are still unable to get the Taskbar working then you will have to jump through a few hoops to change your date and time multiple times and get the taskbar working on your system. Follow the guide below to get you started.
Press Ctrl + Shift + Esc on your keyboard, click on ‘File’ and select ‘Run new task’.

Type in ‘Control’ and press Enter on your keyboard.

Select ‘Date and Time’.

Switch to ‘Internet time’.

Click on ‘Change Settings’.

Uncheck the box for ‘Synchronize with an Internet Time Server’.

Click on ‘Ok’.

Switch back to ‘Date and Time’. Click on ‘Change Date and Time’ and select your date as 2nd September.
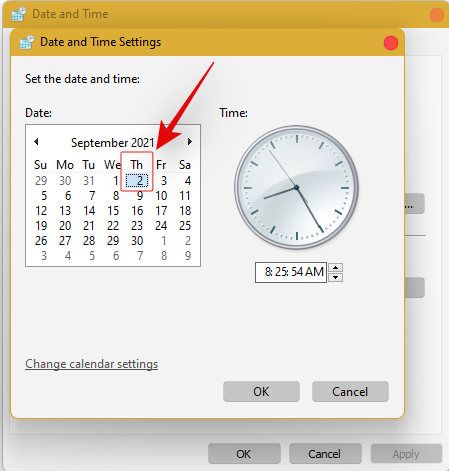
Close all windows and restart your system. Once restarted, open the ‘Date and Time’ dialog box again and change your date to 7th October this time.
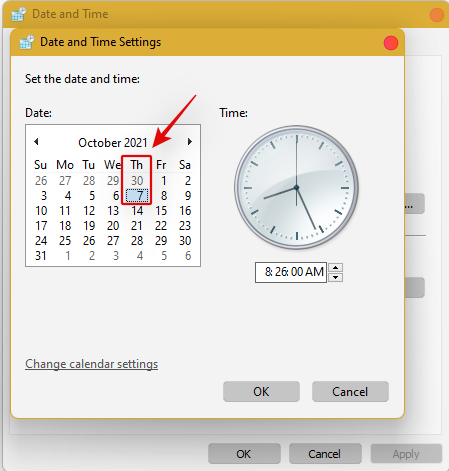
Restart your system again and Taskbar should now be back up and running on your system again. You can now enable synchronization for time again using the steps above on your system.
If synchronizing time does not work, move a month ahead to restore Taskbar
If you are still unable to get Taskbar up and running on your system again you can try the last date change fix. We recommend you use the steps above to change your date and time to a month ahead of your current date. Once changed, restart your system, and the taskbar should be up and running on your system now.
The downside of this fix is that if you revert to your normal date, Taskbar will stop working on your system. Having a mismatched date can cause issues with background syncs for various applications and cause some websites to malfunction. You will also have issues installing and getting the latest Windows Updates, so you will need to check all of these manually when updating in the future.
Fix #10: Uninstall the latest cumulative Windows Update ie: KB5006050
The cumulative update released in September for Windows 11 seems to also cause issues with the taskbar on some desktops and laptops. Use the guide below to uninstall the necessary update from your system.
Press Windows + i and select Windows Update from the left.
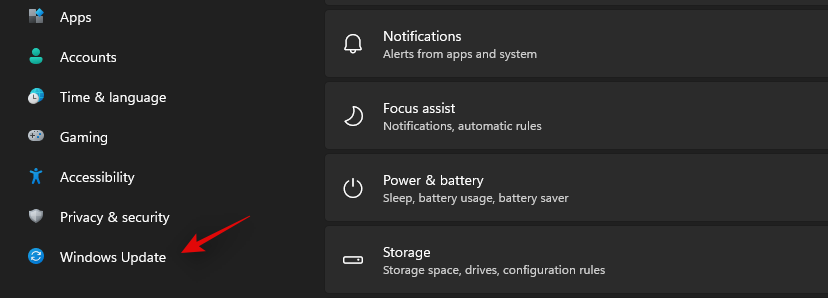
Click on ‘Update history’.
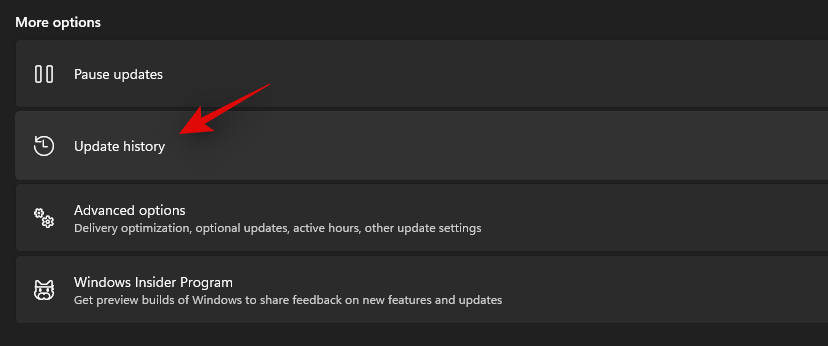
Now select ‘Uninstall updates’.
Click and select Windows Cumulative update KB5006050 from the list.

Now click on ‘Uninstall’ at the top and confirm your choice to uninstall the selected update.
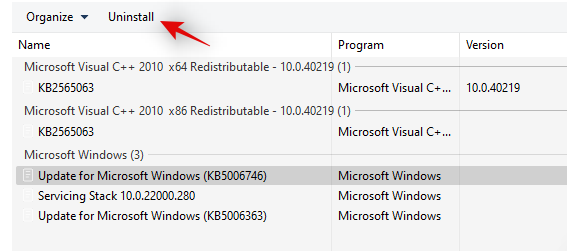
Restart your system and taskbar functionality should now be restored on your system.
Fix #11: Restore PC to a previous restore point
If you had the taskbar working at a previous point in time then we recommend you restore your PC to a previously available restore point on your system. Follow the guide below to get you started.
Press Ctrl + Shift + Esc on your keyboard and click on ‘File’. Select ‘Run new task’ once you are done.

Type in CMD and press Ctrl + Shift + Enter on your keyboard.

Now type in ‘rstrui.exe’ and press Enter on your keyboard.
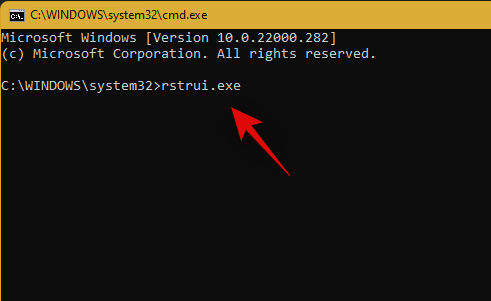
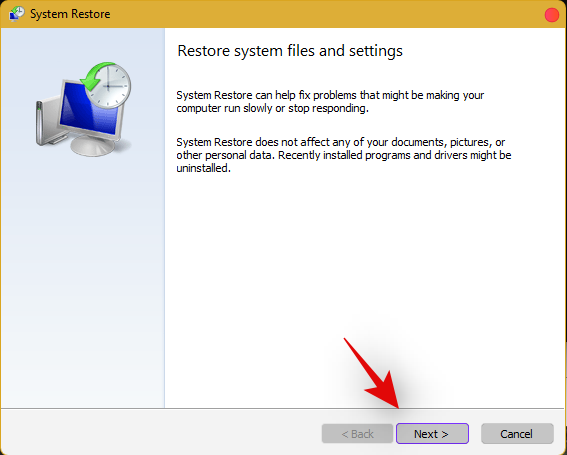
The system restore utility will now launch on your system. Click on ‘Next’.
Select the desired restore point from the list on your screen. Click on ‘Next’ once you are done.
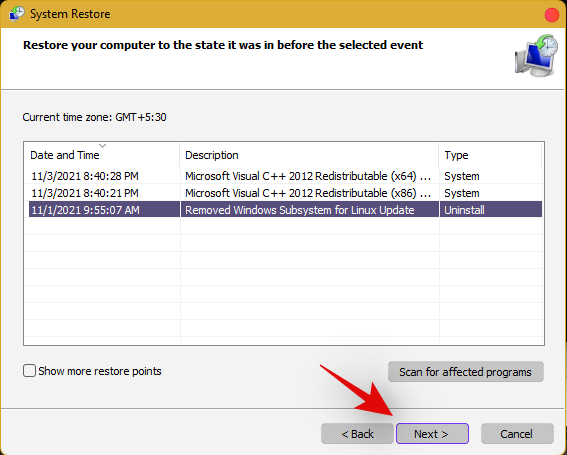
Tip: Click on ‘Scan for affected programs’ to view a list of installed programs that will be removed from your system during the restore process.
Click on ‘Finish’ once the restore finishes and restart your system.
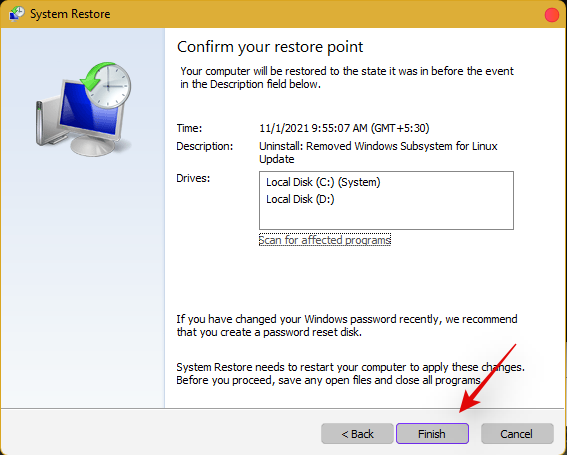
The taskbar should now be back up and running on your system again.
Fix #12: Last Resort: Create a new local admin account and transfer all your data
If by this point Taskbar still fails to work for you then it’s time for some drastic measures. You can create a new local admin account, check if Taskbar is working there, and then transfer all your data to the new account. This will be a tedious process but it is the next best way to get the taskbar working on your system without resetting your PC. Follow the guide below to get you started.
Create a new local admin account
Herre’s how you can create a new local admin account on your system.
Note: Most users facing the taskbar issue are unable to access the Settings app as well. Hence we will be using CMD to add a new local admin account to your PC. However, if the Settings app is available to you then you can use the same to add a new account as well.
Press Ctrl + Shift + Esc on your keyboard, click on ‘File’ and select ‘Run new task’.

Type in ‘cmd’ and press Ctrl + Shift + Enter on your keyboard.

CMD will now be launched as an administrator. Use the command below to add a new local admin account. Replace NAME with the Username of your choice for the new account. You can add a password later once you have confirmed that the taskbar is available in the new account.
net user /add NAME 
Once you have added the new user, use the command below to convert it to an administrator account on your PC. As usual, replace NAME with the Username for the new account you created earlier.
net localgroup Administrators NAME /add

Now type in the following to log out of your current account.
logoff

Once logged out, click on the newly added account to log in to the same. Once logged in, check if the taskbar is available in the new account. If it is, you can use the next section to transfer all your data. However, if the taskbar is still missing then you have no choice but to perform a fresh install of Windows 11 on your PC from a removable USB media drive.
Transfer all your data
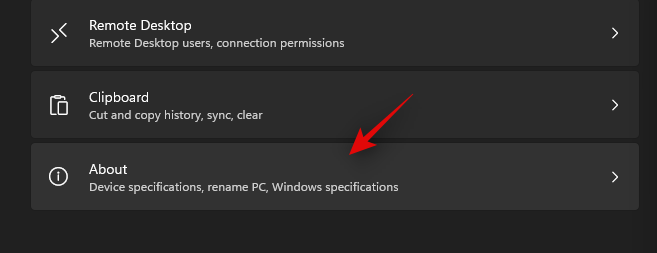
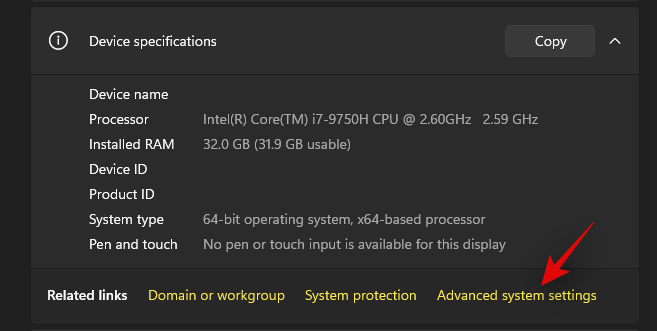
Press Windows + i on your keyboard and click on ‘About’ on your right.
Click on ‘Advanced system settings’.
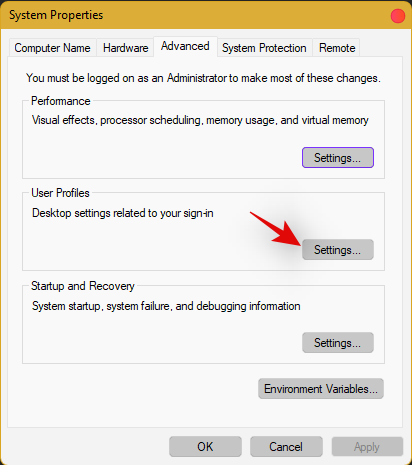
Click on ‘Settings’ under ‘User Profiles’.
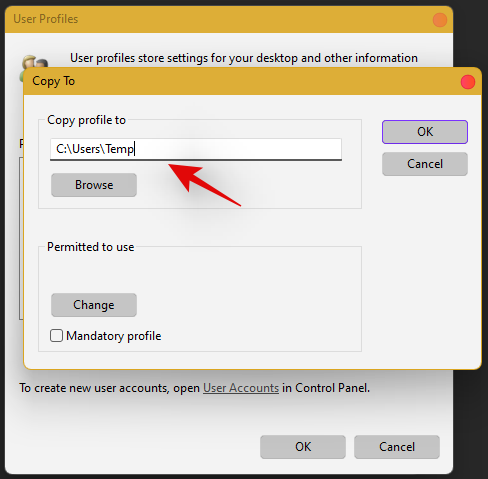
Select your original profile by clicking on it and selecting ‘Copy To’.
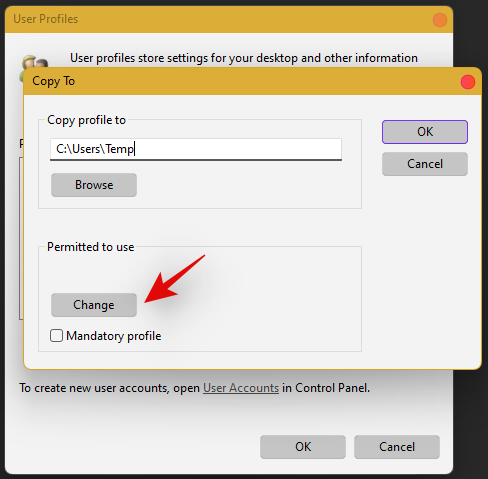
Now enter the following path under ‘Copy profile to’. Rename NAME to the username of your previous profile from where you wish to copy all your data.
C:\Users\NAME
Click on ‘Change’.
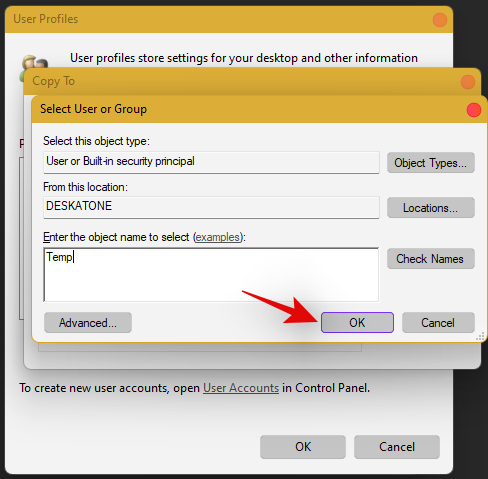
Enter the name for your new user profile and press Enter on your keyboard.
Click on ‘Ok’ once you are done.
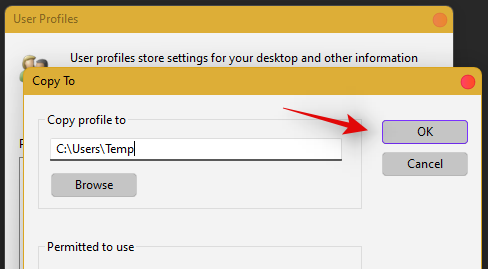
All your data will now be copied over to the new profile where the taskbar is functional on your PC. You can now delete your previous user account and set a password for your new account as well.
Frequently Asked Questions (FAQs):
With so many fixes, you are bound to have a few questions on your mind. Here are some commonly asked ones that should help you get up to speed.
How do I access Windows apps and Settings without a taskbar?
You can use the Task Manager to launch almost any program or Settings page on your system. To launch the desired program, launch the Taskbar > File > Run new task and enter the path to the program you wish to launch. Press Enter if you wish to launch the program normally or press Ctrl + Shift + Enter if you wish to launch the program with administrator privileges.
Is it safe to edit the Registry?
Registry edits are never safe as they have the potential to break your system. Fixes from trusted sources can help you avoid such issues but a good rule of thumb is to always back up your registry before making any edits. This way you can easily restore your Registry values in case some get messed up when editing the Registry.
When will Microsoft fix this issue?
Sadly, Microsoft is yet to release a proper fix for this issue. The company has tried to release a fix in the past cumulative updates to Windows 11 but they have been a hit and miss. We expect Microsoft to completely fix this issue in the upcoming feature update to Windows 11 when the OS gets the ability to run Android apps officially.
Can I update my Windows 11 after fixing the taskbar?
This will depend on the fix that you’re currently using. If you are using a date fix then you won’t be able to install updates until you restore to the current time. This will, however, cause the taskbar to be disabled again and the changes will be carried over after you update your PC. However, if you are using any other fix then you can easily update Windows.
For users with the date fix, you should try updating with the modified time first. If the update gets stuck on ‘Installing 0%’ or ‘Downloading 100%’ then change your date and time to the current date and time and update your PC. Ensure that you do not restart explorer or your PC during this process to keep the current instance of the taskbar alive on your system during the update process. This should help fix the issue for you once Microsoft officially releases an update to fix the issue.
We hope you were able to easily get the taskbar back up and running on your system using the guide above. If you face any more issues, feel free to reach out to us using the comments section below.
Related:
Um tutorial para ajudar com problemas onde planilhas do Microsoft Excel não estão calculando com precisão.
Aprenda como remover ou substituir o arquivo appraiserres.dll para contornar o erro de instalação ao instalar o Windows 11, garantindo que seu PC possa ser atualizado com sucesso.
Aprenda como corrigir a incapacidade de digitar no Microsoft Word com soluções efetivas. Não deixe que problemas técnicos atrapalhem sua produtividade!
O bate-papo de texto ou voz do Roblox não funciona no seu PC com Windows 10 ou 11? Aqui estão algumas dicas que ajudarão a corrigir o problema subjacente.
Enfrentando o problema do software AMD Adrenalin não funcionar ou abrir no Windows? Verifique nosso guia para colocar seu software em funcionamento sem problemas.
O Explorador de Arquivos não está funcionando no Windows 11? Confira essas correções de solução de problemas para resolver o problema.
Na primeira semana de outubro de 2021, a Microsoft lançou oficialmente a compilação estável do Windows 11. Todos os novos produtos lançados após o lançamento rodarão o Windows 11 imediatamente após o lançamento da caixa e o Windows ...
O Google Meet está se esforçando para corresponder aos grandes aplicativos de videoconferência da época, mas parece estar aquém. Embora suas opções de personalização ainda estejam longe do que esperamos, um grande ...
A única tela que os usuários do Windows temem coletivamente é a Tela Azul da Morte. O BSOD já existe há décadas, mudando muito pouco ao longo dos anos, mas ainda é potente o suficiente para ca…
Então você está inscrito no canal Dev do Windows Insider Preview, finalmente recebeu a versão de visualização do Windows 11 e as atualizações estão em andamento. Mas quanto tempo você tem que esperar pelo ...
O Microsoft Teams é uma ferramenta abrangente que se tornou bastante popular recentemente devido aos recursos de colaboração de sua equipe. O serviço permite que você crie equipes específicas para sua organização, convide di…
Os usuários do Windows 11 têm enfrentado um pequeno enigma recentemente com as práticas questionáveis da Microsoft quando se trata de Edge e resultados da web no novo sistema operacional. Agora parece que a empresa tem bund…
O Windows 11 está lentamente ganhando uma má reputação entre as pessoas por apresentar baixo desempenho em comparação com seu antecessor. Primeiro, havia os novos requisitos para Secure Boot e TPM 2.0, depois foi diminuído ...
A Microsoft trabalhou muito no Windows 11, usando vários elementos de design - antigos e novos - para trazê-lo à vida. O Windows File Explorer padrão também foi abençoado com uma nova aparência,…
Quando o Windows 11 foi revelado ao mundo, os Snap Layouts foram a primeira coisa que chamou a atenção de todos. Eles foram inovadores, novos e realmente úteis ao trabalhar em um sistema Windows ...
A versão do desenvolvedor para o Windows 11 foi lançada e entusiastas ao redor do mundo estão testando a versão pré-beta. No entanto, como esperado, existem muitos pequenos bugs presentes nisso ...
O Windows 11, que é a última adição à famosa linha do sistema operacional Windows, conseguiu chamar a atenção de muitos até mesmo na visualização do desenvolvedor. Muitos entusiastas estão correndo ...
O Windows 11 teve muita controvérsia em torno do suporte para certas CPUs desde que o sistema operacional foi divulgado em julho. A versão oficial do sistema operacional já foi lançada ao público com inúmeras mudanças ...
O Windows 11 é a versão nova e atualizada do Windows para a próxima década, com algumas mudanças importantes sob o capô e também acima do capô. Você obtém uma nova estética com tema de vidro com cantos arredondados ...
A Microsoft trabalhou extensivamente em seus aplicativos móveis, mas de vez em quando você pode encontrar algumas falhas ocasionais. Ao navegar ou abrir o aplicativo das equipes da Microsoft pela primeira vez, você pode…
Preso em um ciclo frustrante de recuperação da chave BitLocker no Windows 11? Descubra soluções passo a passo para contornar as solicitações intermináveis, recuperar sua unidade e voltar ao normal. Sem necessidade de conhecimentos técnicos — soluções simples e eficazes aqui.
Está com dificuldades para jogar seus jogos locais com o Firewall do Windows 11? Descubra soluções comprovadas para desbloquear a diversão multiplayer e restaurar uma experiência de jogo perfeita. Guia passo a passo para jogar sem complicações.
Está com dificuldades para jogar no Windows 11 com lentidão devido ao VBS e HVCI? Descubra etapas comprovadas de solução de problemas para otimizar o desempenho, reduzir travamentos e aumentar o FPS sem comprometer a segurança. Soluções fáceis para jogadores.
Está com dificuldades para posicionar corretamente o tema do Rainmeter no Windows 11? Descubra soluções comprovadas, passo a passo, para restaurar a perfeição da sua área de trabalho. Atualizado com os ajustes mais recentes para uma personalização impecável.
Está com dificuldades com um Windows 11 lento? Aprenda passos comprovados para corrigir o inchaço do registro, otimizar a velocidade e recuperar o desempenho do seu PC.
Está com dificuldades para resolver erros nos comandos wget e curl do Windows 11? Este guia passo a passo aborda problemas comuns, soluções rápidas e dicas profissionais para solucioná-los com eficiência. Recupere o controle de seus downloads e chamadas de API hoje mesmo.
Está com dificuldades para resolver o erro de memória gráfica integrada no Windows 11? Descubra soluções comprovadas para resolver problemas de pouca memória, otimizar seu sistema e restaurar o desempenho sem precisar atualizar o hardware. Soluções passo a passo para jogos e multitarefa perfeitos.
Frustrado com o Windows 11 travado no logotipo de inicialização? Este guia completo de solução de problemas para 2026 abrange soluções comprovadas, desde o modo de segurança até reparos avançados, ajudando você a resolver o problema de forma rápida e fácil.
Está com dificuldades para redefinir o PIN do Windows Hello no Windows 11? Descubra etapas comprovadas de solução de problemas para resolver esse problema rapidamente e recuperar o acesso seguro ao seu dispositivo. Atualizado com as correções mais recentes.
Está com dificuldades para resolver o erro "Driver de precisão ausente" no Windows 11? Descubra soluções comprovadas para restaurar a precisão do seu touchpad e mouse. Guia passo a passo para uma solução de problemas sem complicações.


![Como corrigir erro de tela verde do Windows 11 [8 maneiras] Como corrigir erro de tela verde do Windows 11 [8 maneiras]](https://cloudo3.com/resources8/images31/image-5564-0105182715287.png)


