Черный миф: Укун разрушает – Попробуйте исправления
Узнайте, как справиться с сбоями в Черном мифе: Укун, чтобы наслаждаться этой увлекательной экшен-RPG без перерывов.

Панель задач Windows была в центре внимания с тех пор, как с выпуском Windows 11 она приобрела обновленный вид. Теперь вы можете центрировать панель задач, пользоваться новым центром действий, изменять его выравнивание и размещать по обе стороны экрана. К сожалению, развертывание этой функции было менее чем успешным, поскольку все больше и больше пользователей изо всех сил пытались заставить свою панель задач работать в Windows 11 в течение нескольких месяцев.
Хотя Microsoft признала проблему, предложила обходной путь и в настоящее время работает над исправлением, пользователи, похоже, по-прежнему не могут снова заставить панель задач работать. Если вы находитесь в одной лодке, то мы составили список всех доступных исправлений, чтобы ваша панель задач снова заработала и снова заработала в Windows 11. Следуйте приведенному ниже руководству, чтобы начать работу.
СОДЕРЖАНИЕ
Почему моя панель задач не отображается?
Панель задач Windows 11 имеет новый внешний вид, основанный на обновленном подходе к ее функционированию. Панель задач теперь зависит от нескольких служб и самого меню «Пуск» для правильной работы. Кажется, что процесс обновления с Windows 10 до Windows 11, похоже, портит панель задач в зависимости от того, какую версию Windows 10 вы установили в своей системе и какую версию Windows 11 вы обновляете.
Кроме того, недавнее обновление Windows, выпущенное в прошлом месяце, также, похоже, вызывает эту проблему для некоторых пользователей, в то время как другие сталкиваются с тем же из-за несоответствия системного времени, несмотря на то, что все настроено правильно. Есть много способов исправить вашу панель задач, и мы рекомендуем вам начать с исправлений, перечисленных ниже, один за другим.
12 способов исправить проблемы с панелью задач в Windows 11
Используйте приведенные ниже методы, чтобы начать исправлять панель задач в Windows 11. Если вы уже пытались перезагрузить систему, вы можете пропустить первый метод.
Исправление №1: перезагрузите компьютер.
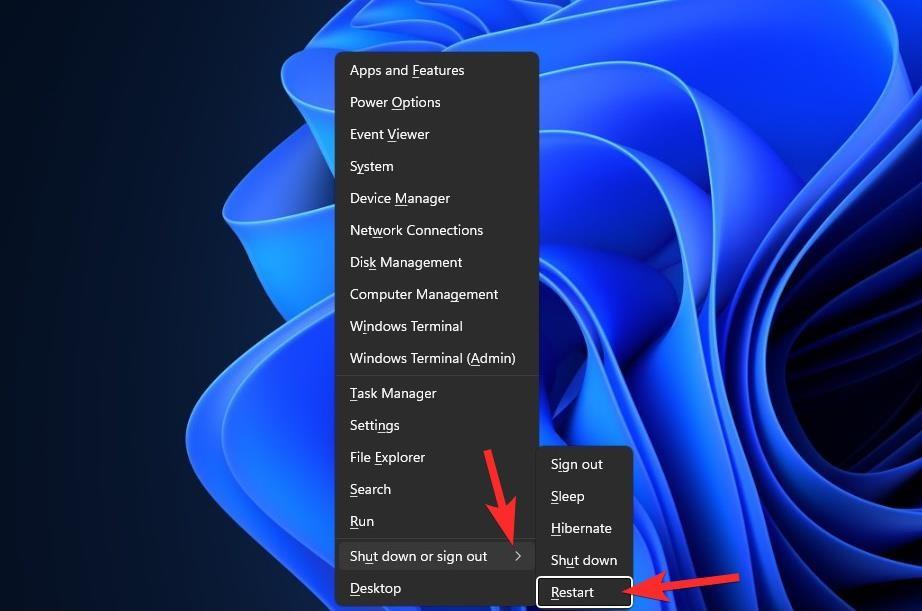
Прежде чем пробовать что-нибудь необычное, неплохо попробовать более простые меры, такие как перезагрузка ПК или проводника Windows (см. Ниже). Это приведет к мягкому сбросу вашей системы, что позволит перезагрузить данные и, возможно, решит проблемы с панелью задач и меню «Пуск».
Исправление №2: убедитесь, что параметр «Автоматически скрывать панель задач» отключен.
Нажмите Windows + iна клавиатуре и нажмите «Персонализация» слева.
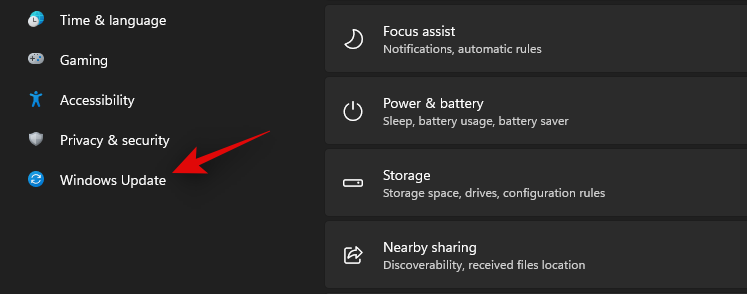
Щелкните «Панель задач».
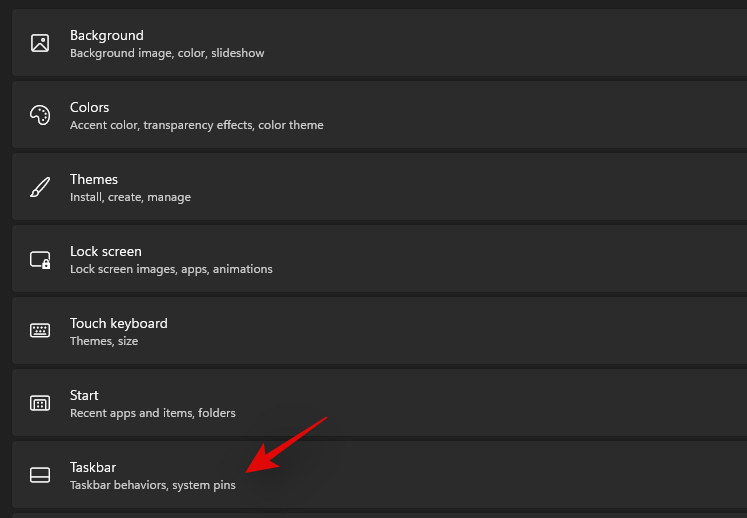
Теперь нажмите «Поведение панели задач».
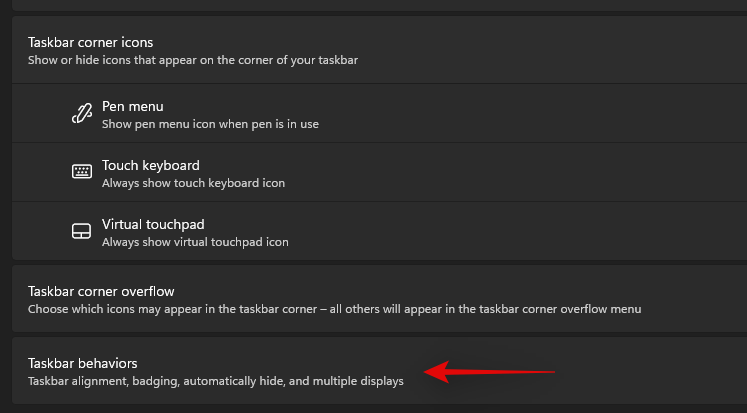
Снимите флажок «Автоматически скрывать панель задач».

Теперь закройте приложение «Настройки», и если ваша панель задач автоматически скрывалась, то теперь она должна быть отключена в вашей системе.
Исправление №3: перезапустите необходимые службы.
Как упоминалось ранее, Windows 11 обновила панель задач, что теперь означает, что она полагается на несколько служб для правильной работы в любой системе. Давайте перезапустим все эти службы, чтобы убедиться, что фоновый конфликт не мешает вашей панели задач правильно работать в вашей системе.
Нажмите Ctrl + Shift + Escна вашей системе, чтобы запустить диспетчер задач. Перейдите на вкладку "Подробности" вверху.
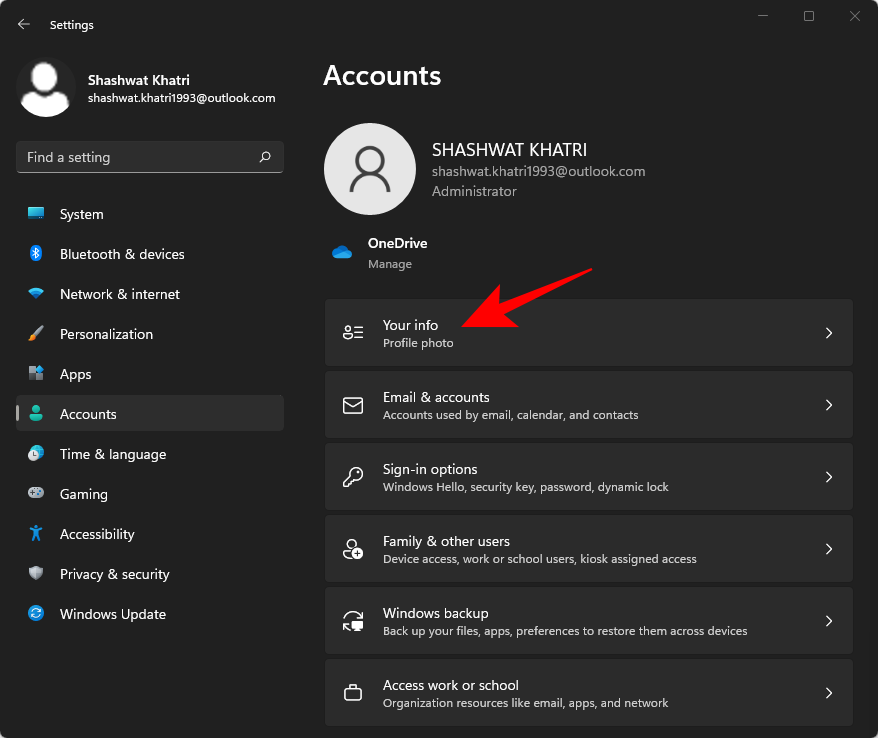
Теперь найдите следующие запущенные службы и выберите их, щелкнув по ним. Нажмите «Удалить» на клавиатуре и подтвердите свой выбор, выбрав «Завершить процесс».
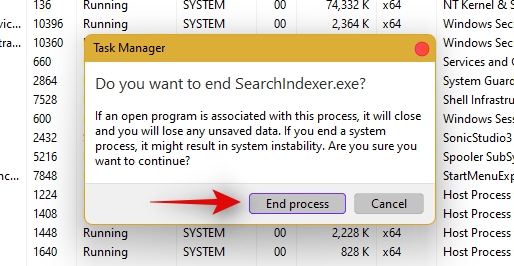
Теперь перезапустим проводник Windows. Нажмите «Файл» в верхнем левом углу и выберите «Запустить новую задачу».
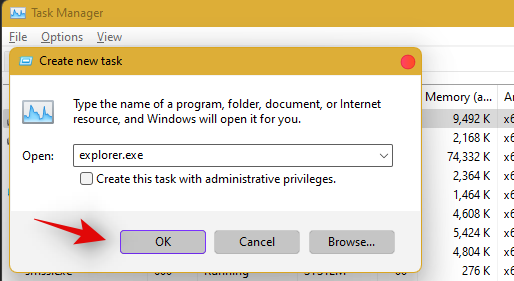
Введите explorer.exe и нажмите Enter на клавиатуре. При необходимости вы также можете нажать «ОК».
После перезапуска проводника просто перезагрузите компьютер, чтобы перезапустить другие службы в вашей системе.
Панель задач теперь должна быть восстановлена, если причиной проблемы был конфликт фоновой службы.
Исправление №4: удалите IrisService в реестре и перезапустите
Нажмите, Ctrl + Shift + Escчтобы открыть диспетчер задач. Затем нажмите « Файл» в верхнем левом углу.
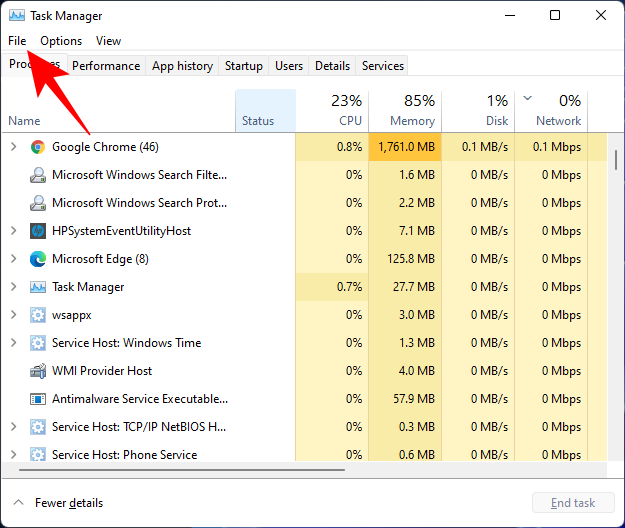
Выберите Запустить новую задачу .
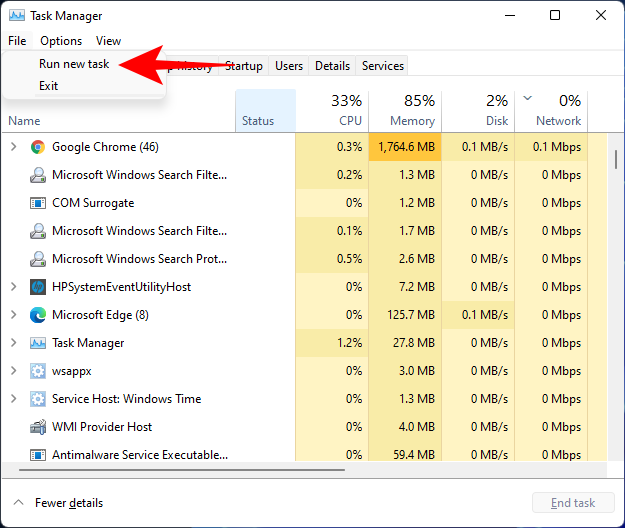
Введите cmd и нажмите Enter.
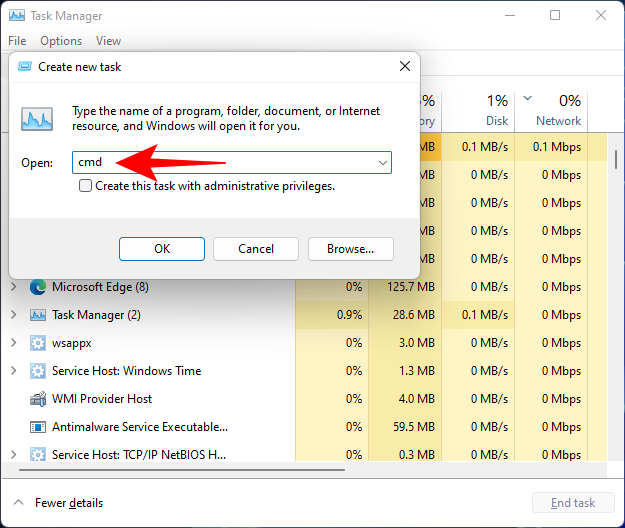
Это откроет экземпляр командной строки с повышенными правами. Теперь скопируйте следующую команду и вставьте ее в командную строку:
reg delete HKCU\SOFTWARE\Microsoft\Windows\CurrentVersion\IrisService /f && shutdown -r -t 0

Затем нажмите Enter. Как только вы это сделаете, ваш компьютер перезагрузится. После запуска резервного копирования все должно вернуться в нормальное состояние, включая панель задач.
Исправление № 5: Добавить UndockingDisabled в реестр
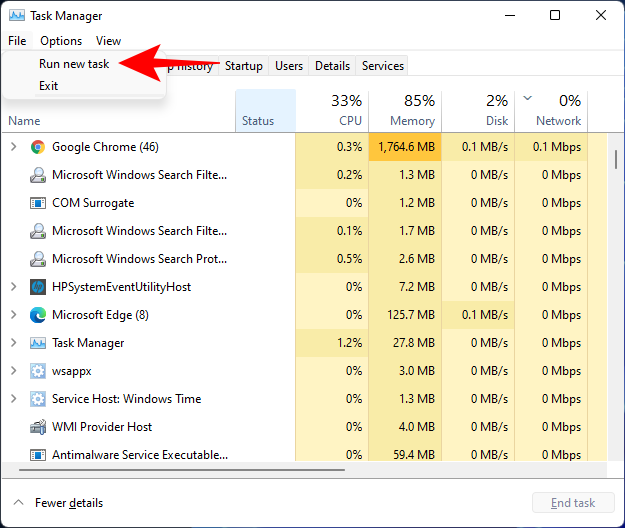
Нажмите, Ctrl + Shift + Escчтобы открыть диспетчер задач. Затем нажмите « Файл» (в верхнем левом углу) и « Запустить новую задачу» .
Введите regedit и нажмите Enter.
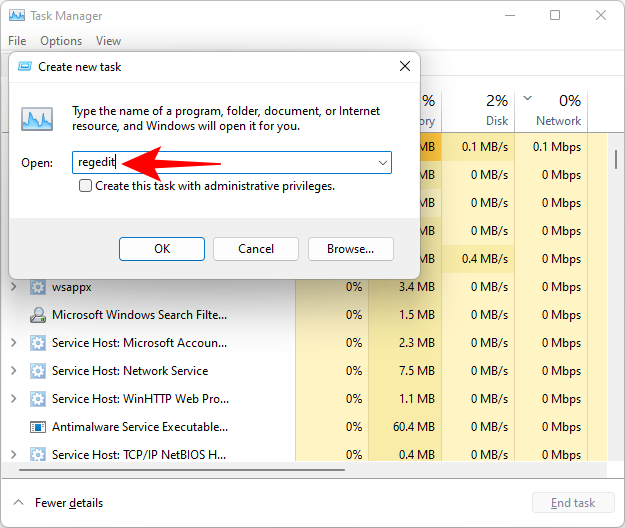
Откроется редактор реестра. Теперь перейдите по следующему адресу:
Computer\HKEY_LOCAL_MACHINE\SOFTWARE\Microsoft\Windows\CurrentVersion\Shell\Update\Packages
В качестве альтернативы просто скопируйте приведенное выше и вставьте его в адресную строку редактора реестра, например:

После того, как вы нажмете Enter, вы будете перенаправлены к указанному ключу. Справа щелкните пробел правой кнопкой мыши и выберите « Создать» > «Значение DWORD (32-разрядное)» .
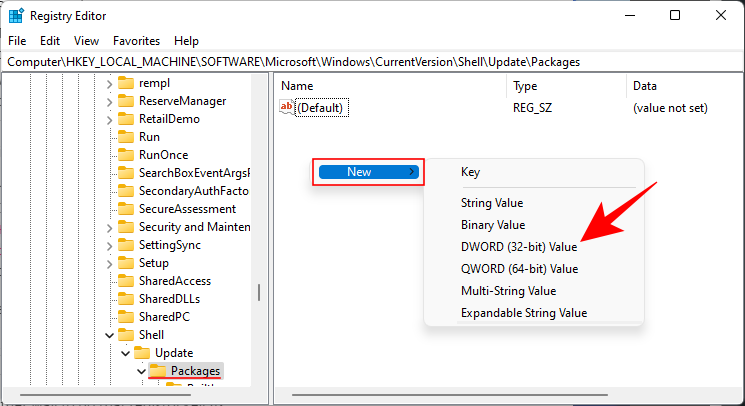
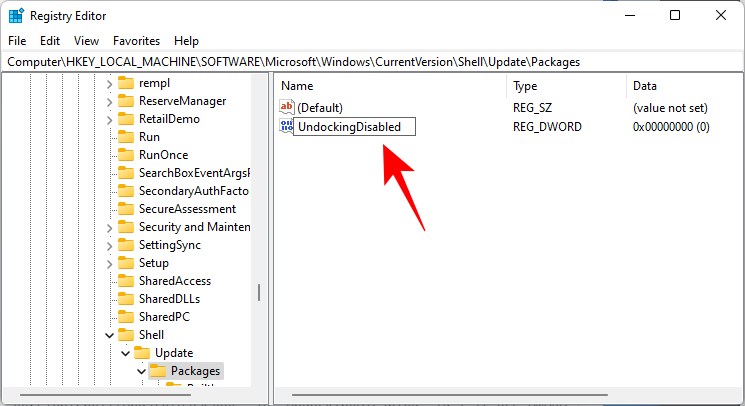
Назовите этот вновь созданный DWORD UndockingDisabled .
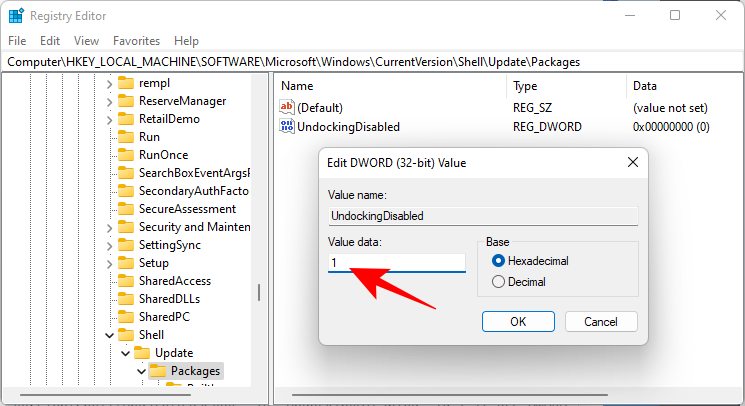
Затем дважды щелкните по нему и измените «Значение данных» на 1 . Затем нажмите ОК .
Перезагрузите компьютер, чтобы изменения вступили в силу.
Исправление # 6: запускать команды SFC и DISM
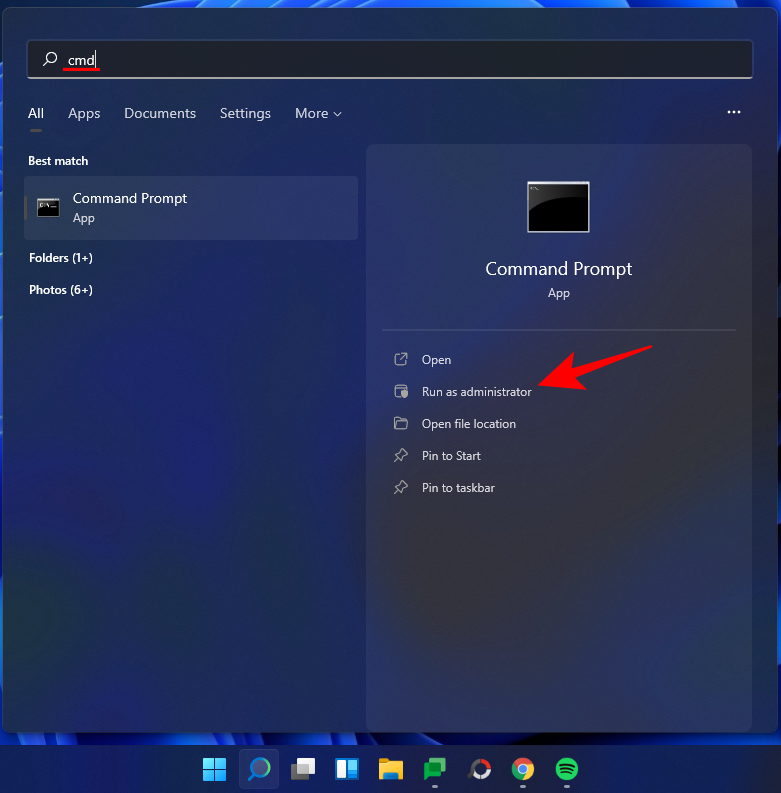
Нажмите «Пуск», введите cmd и нажмите « Запуск от имени администратора» .
Теперь введите следующую команду:
sfc /scannow
Нажмите Ввод. Подождите, пока SFC завершит сканирование, и исправьте все обнаруженные проблемы.

Затем запустите следующую команду DISM для средства обслуживания образов развертывания и управления ими:
dism /online /cleanup-image /scanhealth
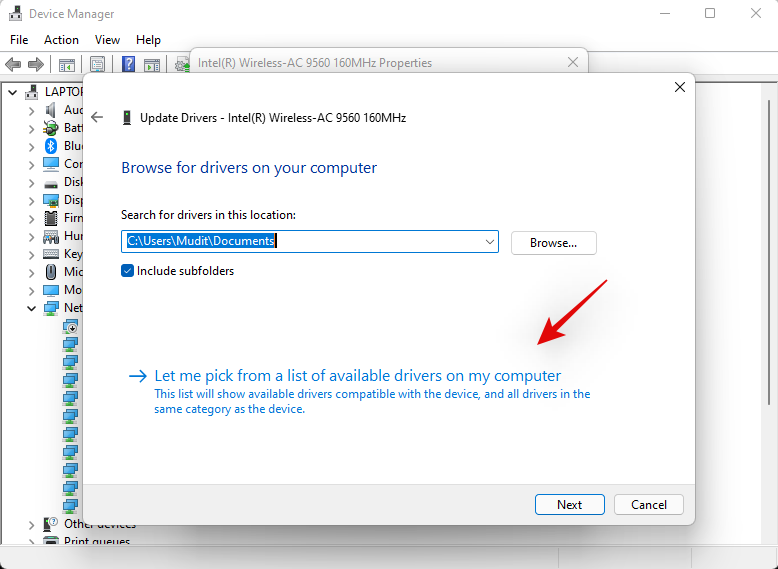
Затем нажмите Enter. Опять же, дождитесь завершения сканирования.

Теперь запустите следующую команду DISM:
dism /online /cleanup-image /restorehealth

Нажмите Ввод. Подождите, пока DISM восстановит работоспособность.

Наконец, запустите команду chkdsk, чтобы запустить утилиту Check Disk:
chkdsk c: /r
Нажмите Ввод. Командная строка выдаст сообщение о том, что «не может заблокировать текущий диск… потому что том используется другим процессом», и попросит вашего разрешения запланировать сканирование перед следующей загрузкой. Тип Yдля соответствия.

And press Enter. Now restart your computer, let the Check Disk tool do its job, and check if the taskbar has resumed normal functioning.
Fix #7: Reinstall UWP
Press Ctrl + Shift + Esc on your keyboard to launch the Task Manager. Click on ‘File’ and select ‘Run new task’.
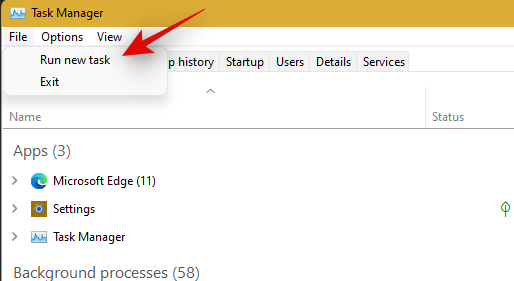
Type in ‘PowerShell’ and press Ctrl + Shift + Enter on your keyboard.

PowerShell will now be launched as an administrator on your system. Type the following command:
Get-AppxPackage -AllUsers | Foreach {Add-AppxPackage -DisableDevelopmentMode -Register “$ ($ _. InstallLocation) \ AppXManifest.xml”}
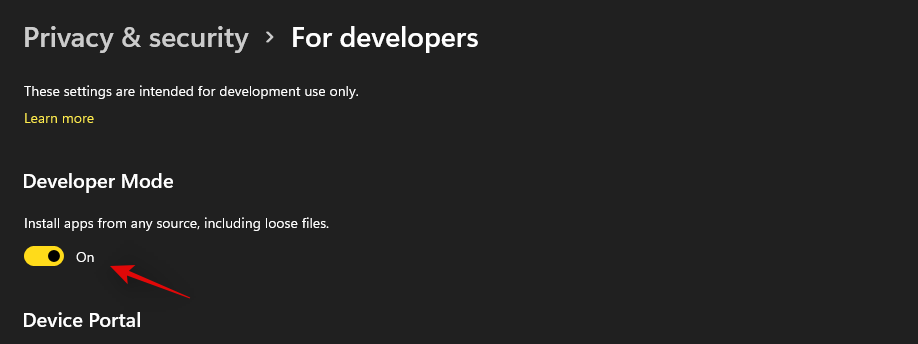
Press Enter. PowerShell will throw up a running list of messages in red. But don’t worry about it. Just wait for the command to finish executing.

Fix #8: Check UAC and add edit Registry if needed
UAC is a must-have for all modern apps and features including the Start Menu and the taskbar. You should first enable UAC if it is disabled and restart your system. If the Taskbar still fails to work for you, then we recommend you try adding a Xaml Start menu value to your Registry Editor.
Adding this value seems to restart and re-register Taskbar services which seem to get Taskbar working again on most systems. Follow the guide below to get you started.
Check and enable UAC if disabled
Press Ctrl + Shift + Esc on your keyboard to launch the task manager. Now click on ‘File’ in the top left corner of your screen and select ‘Run new task’.

Type in ‘cmd’ and press Ctrl + Shift + Enter on your keyboard.
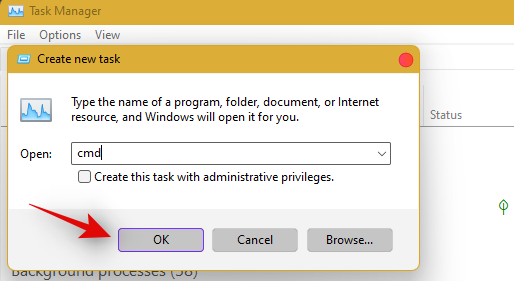
Now type in the following command and press Enter to execute the command.
C:\Windows\System32\cmd.exe /k %windir%\System32\reg.exe ADD HKLM\SOFTWARE\Microsoft\Windows\CurrentVersion\Policies\System /v EnableLUA /t REG_DWORD /d 0 /f
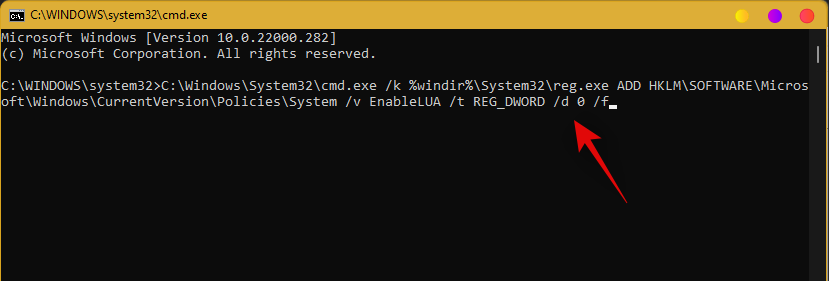
UAC will now be enabled for your system. Restart your PC for the changes to take effect on your system. Once restarted, Taskbar should be up and running on your system if UAC was the issue for you. If not, use the guide below to trigger the taskbar’s functionality on your system.
Add Registry Value
Press Ctrl + Shift + Esc to launch the task manager. Now click on ‘File’ in the top left corner and select ‘Run new task’.

Type in ‘cmd’ and press Ctrl + Shift + Enter on your keyboard.

Now type in the following command and press Enter on your keyboard.
REG ADD "HKCU\Software\Microsoft\Windows\CurrentVersion\Explorer\Advanced" /V EnableXamlStartMenu /T REG_DWORD /D 1 /F
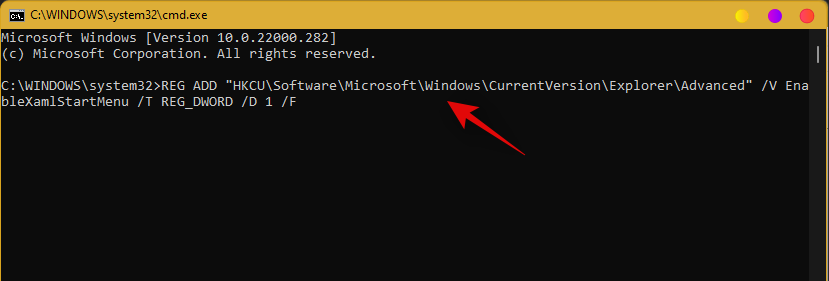
Go back to the task manager now, find Windows Explorer in the list, and right-click on it. Select Restart to restart explorer.exe.
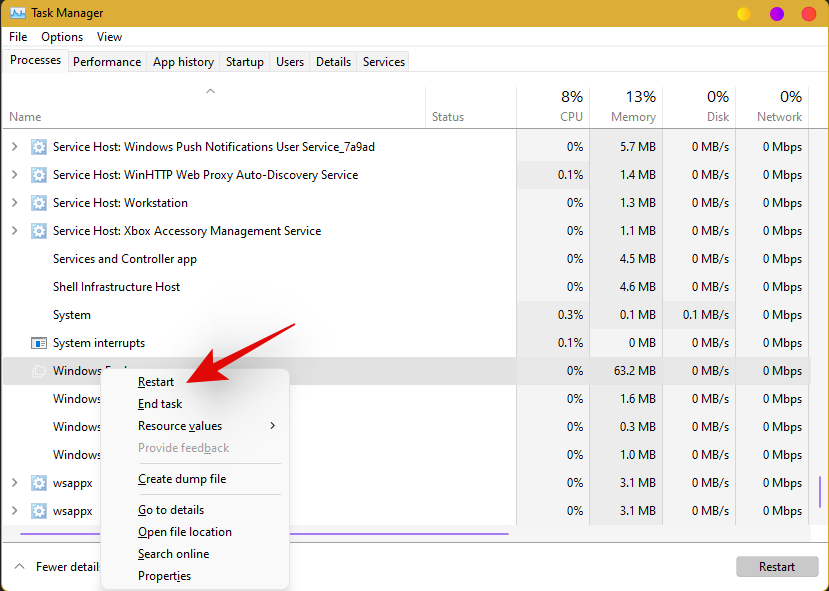
Once restarted, try to access your taskbar. The taskbar should now be available on your system.
Fix #9: Edit date and time to fix Taskbar
Date and Time settings seem to be the major cause of issues with the taskbar in Windows 11. Use the guide below to try out the following time fixes to see which one works the best for you.
Ensure that your time is correctly synchronized with the time server
Press Ctrl + Shift + Esc on your keyboard and click on ‘File’. Select ‘Run new task’.

Type in ‘Control’ and hit Enter on your keyboard.
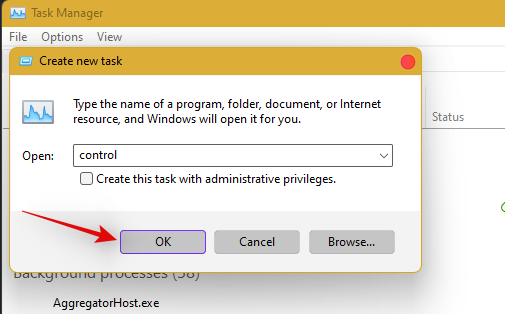
Click on ‘Date and Time’.
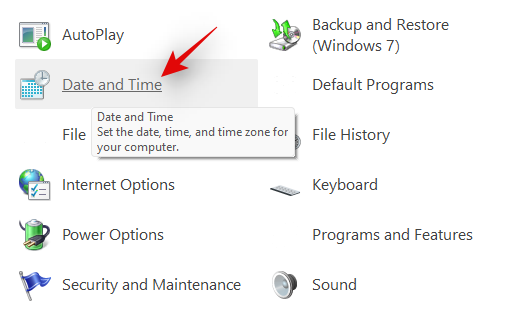
Select ‘Internet Time’ from the top.
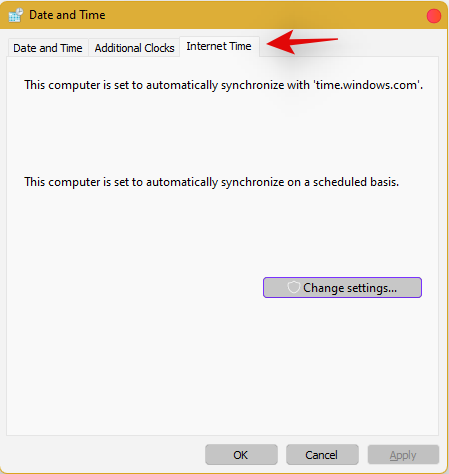
Click on ‘Change Settings’.
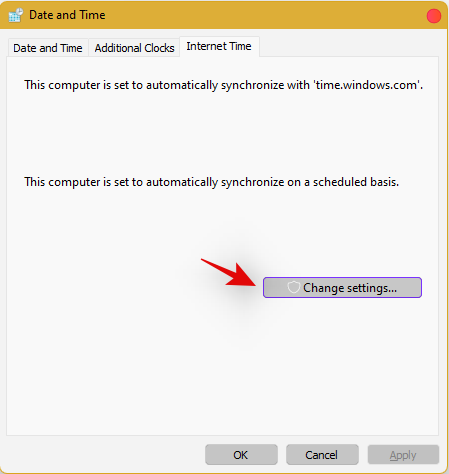
Uncheck the box for ‘Synchronize with an Internet time server’.

Click on ‘Ok’ once you are done.
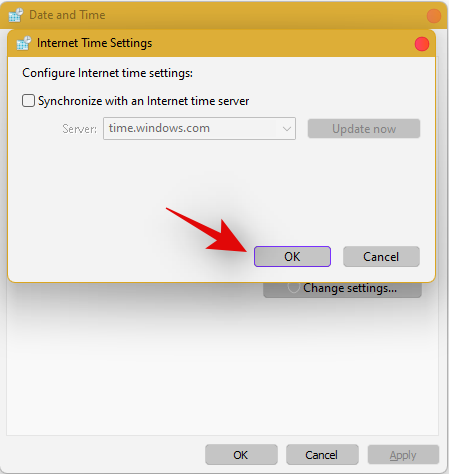
Restart your PC at this point and check your taskbar. If it is still disabled, do not fret, follow the steps above and enable Synchronization with an Internet Time Server again.
Once enabled, press Ctrl + Shift + Esc on your keyboard, and find Windows Explorer in the list on your screen. Right-click the listing and select ‘Restart’.

Once explorer restarts, try using the Taskbar. If synchronization was your issue, then it should now be fixed on your system. If not, continue with the other time fixes mentioned below.
Change date to 1 day ahead
Open the Task Manager by pressing Ctrl + Shift + Esc simultaneously. Then click on File.
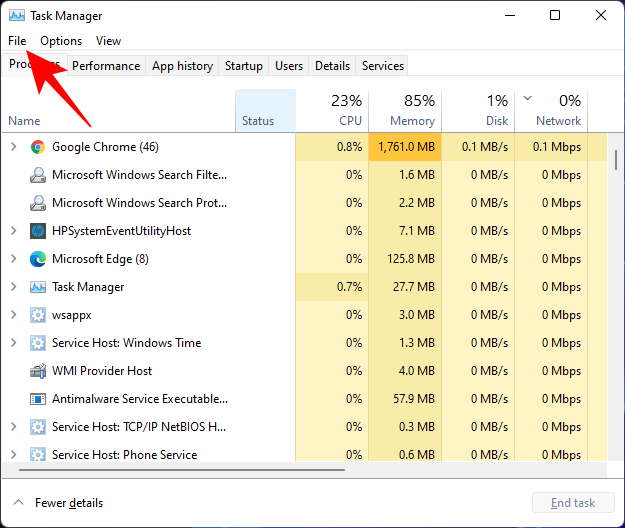
Click on Run new task.
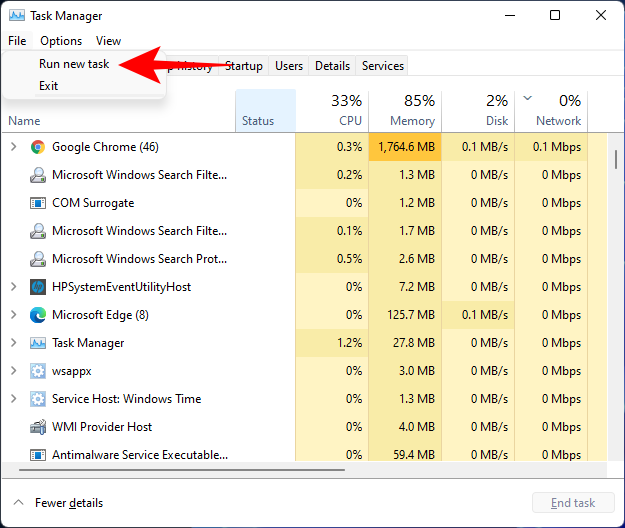
Type control panel and hit Enter.
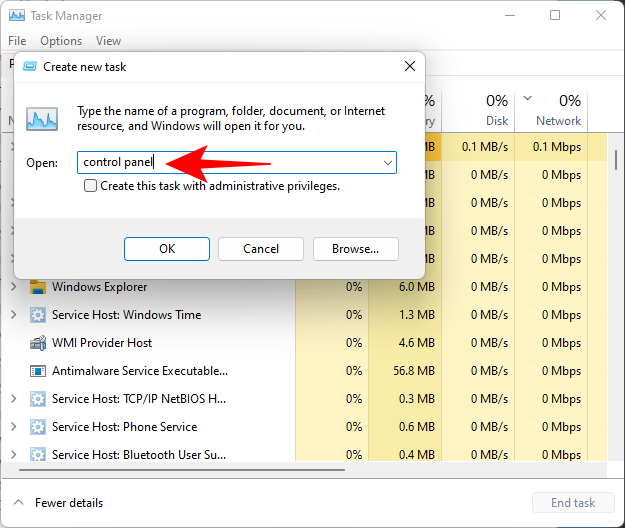
Now click on Clock and Region.
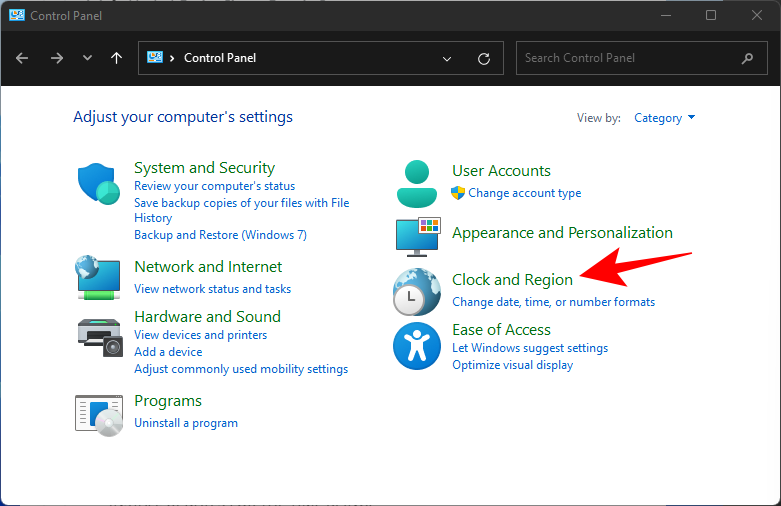
Under “Date and Time”, click on Set the time and date.
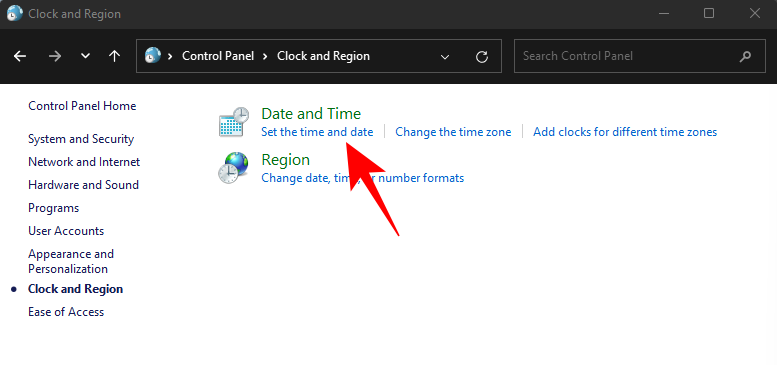
Click on the Internet Time tab to switch to it.
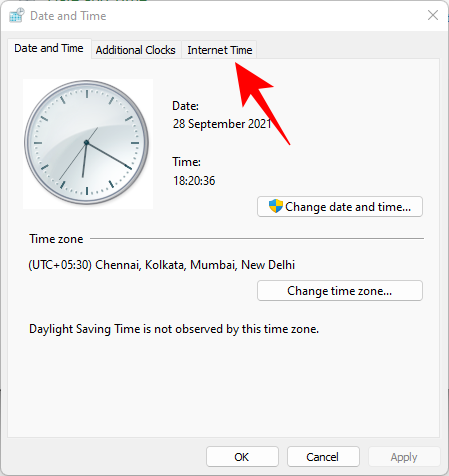
Click on Change settings…
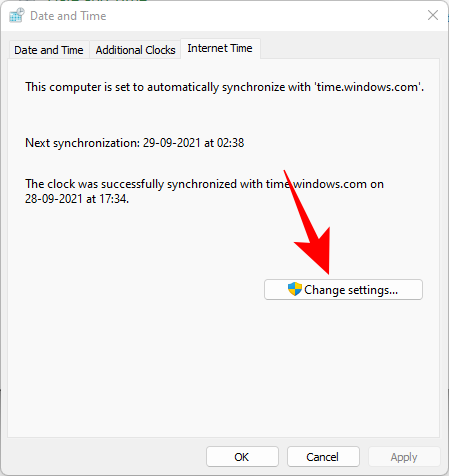
Uncheck Synchronize with an Internet time server, then click OK.
Now click on the Date and Time tab to switch back to it.
Here, click on Change date and time…
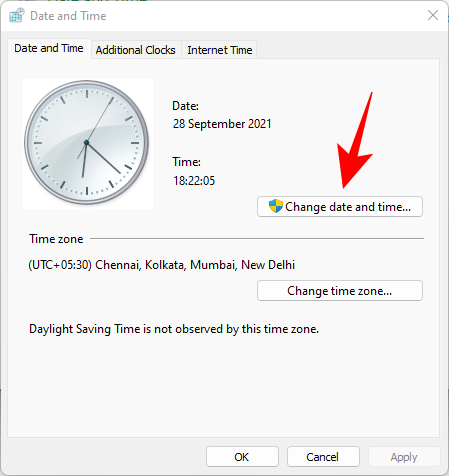
Now change the date and time to reflect tomorrow. As of writing this post, it is the 1st November so we will be changing the date to 2nd November.
Change Dates to last cumulative updates
If you are still unable to get the Taskbar working then you will have to jump through a few hoops to change your date and time multiple times and get the taskbar working on your system. Follow the guide below to get you started.
Press Ctrl + Shift + Esc on your keyboard, click on ‘File’ and select ‘Run new task’.

Type in ‘Control’ and press Enter on your keyboard.

Select ‘Date and Time’.

Switch to ‘Internet time’.

Click on ‘Change Settings’.

Uncheck the box for ‘Synchronize with an Internet Time Server’.

Click on ‘Ok’.

Switch back to ‘Date and Time’. Click on ‘Change Date and Time’ and select your date as 2nd September.
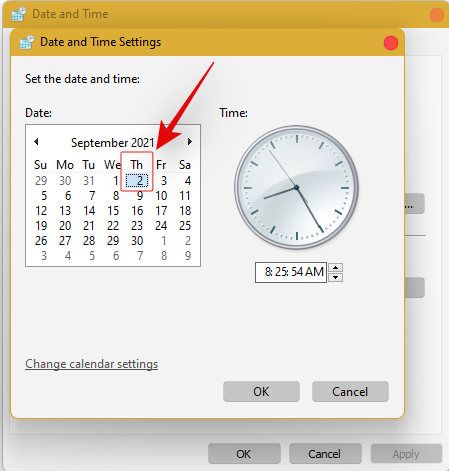
Close all windows and restart your system. Once restarted, open the ‘Date and Time’ dialog box again and change your date to 7th October this time.
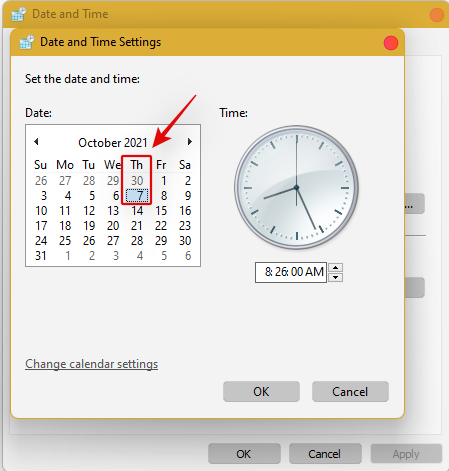
Restart your system again and Taskbar should now be back up and running on your system again. You can now enable synchronization for time again using the steps above on your system.
If synchronizing time does not work, move a month ahead to restore Taskbar
If you are still unable to get Taskbar up and running on your system again you can try the last date change fix. We recommend you use the steps above to change your date and time to a month ahead of your current date. Once changed, restart your system, and the taskbar should be up and running on your system now.
The downside of this fix is that if you revert to your normal date, Taskbar will stop working on your system. Having a mismatched date can cause issues with background syncs for various applications and cause some websites to malfunction. You will also have issues installing and getting the latest Windows Updates, so you will need to check all of these manually when updating in the future.
Fix #10: Uninstall the latest cumulative Windows Update ie: KB5006050
The cumulative update released in September for Windows 11 seems to also cause issues with the taskbar on some desktops and laptops. Use the guide below to uninstall the necessary update from your system.
Press Windows + i and select Windows Update from the left.
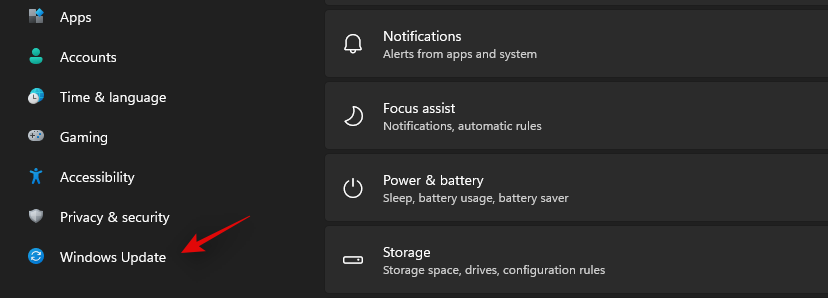
Click on ‘Update history’.
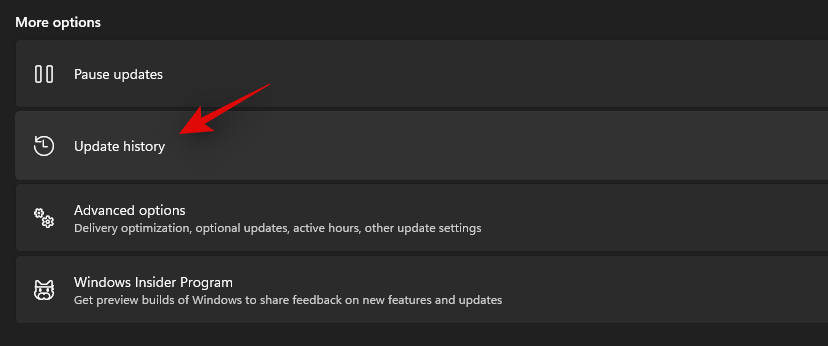
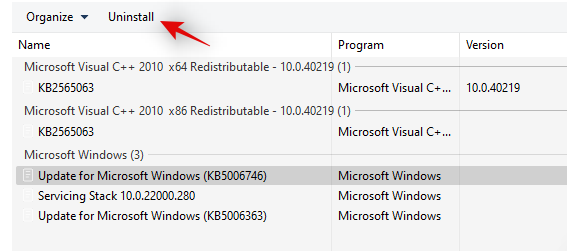
Now select ‘Uninstall updates’.
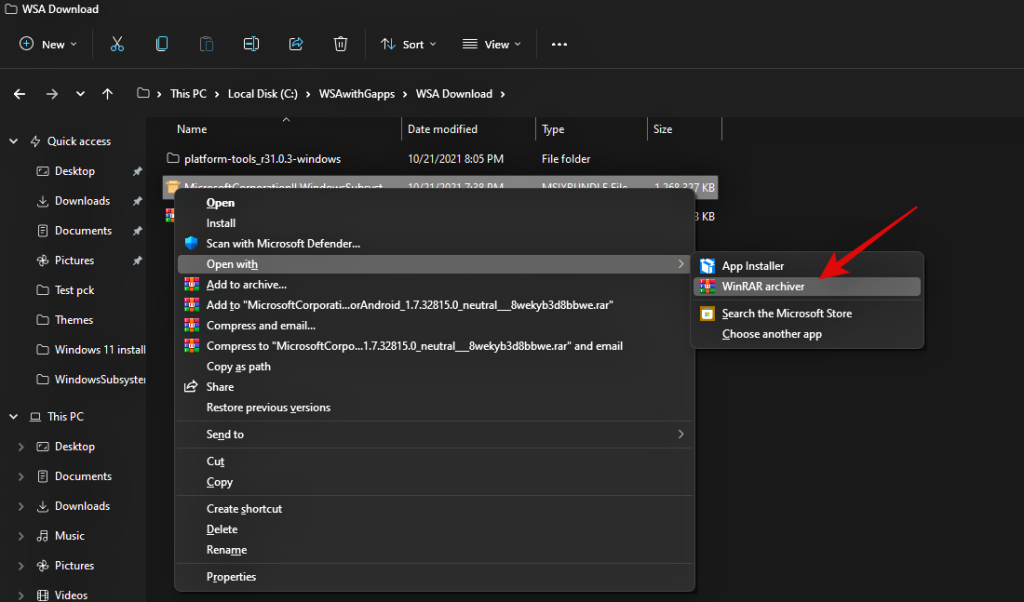
Click and select Windows Cumulative update KB5006050 from the list.

Now click on ‘Uninstall’ at the top and confirm your choice to uninstall the selected update.
Restart your system and taskbar functionality should now be restored on your system.
Fix #11: Restore PC to a previous restore point
If you had the taskbar working at a previous point in time then we recommend you restore your PC to a previously available restore point on your system. Follow the guide below to get you started.
Press Ctrl + Shift + Esc on your keyboard and click on ‘File’. Select ‘Run new task’ once you are done.

Type in CMD and press Ctrl + Shift + Enter on your keyboard.

Now type in ‘rstrui.exe’ and press Enter on your keyboard.
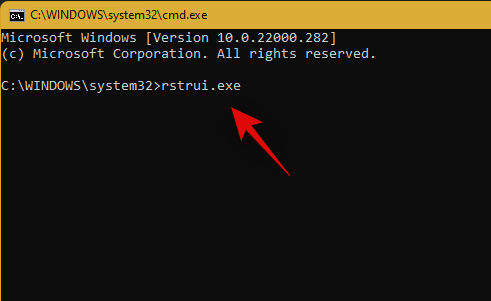
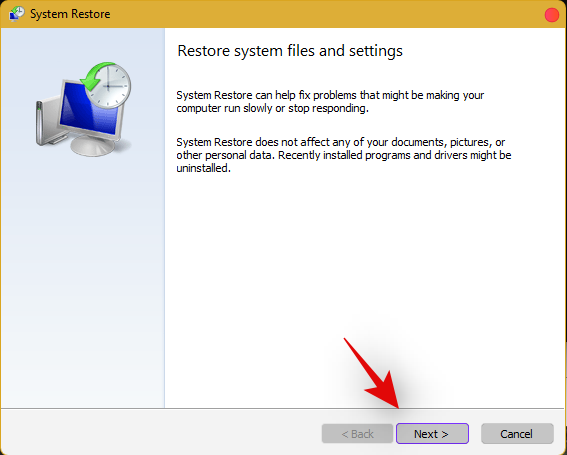
The system restore utility will now launch on your system. Click on ‘Next’.
Select the desired restore point from the list on your screen. Click on ‘Next’ once you are done.
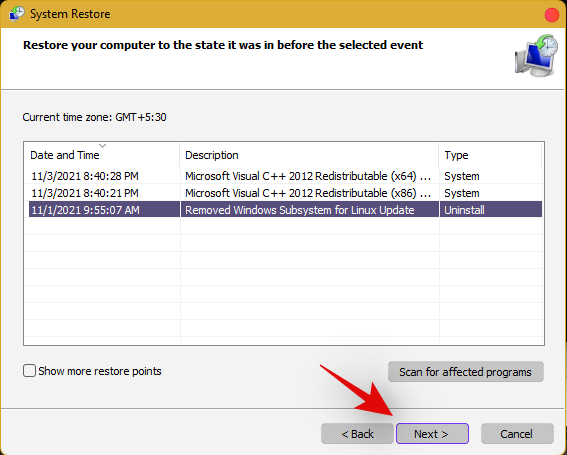
Tip: Click on ‘Scan for affected programs’ to view a list of installed programs that will be removed from your system during the restore process.
Click on ‘Finish’ once the restore finishes and restart your system.
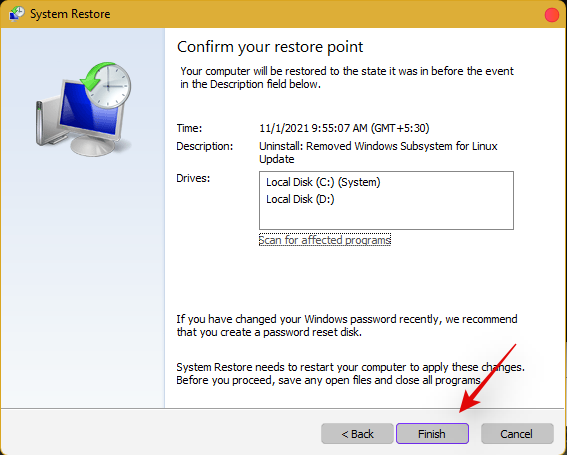
The taskbar should now be back up and running on your system again.
Fix #12: Last Resort: Create a new local admin account and transfer all your data
If by this point Taskbar still fails to work for you then it’s time for some drastic measures. You can create a new local admin account, check if Taskbar is working there, and then transfer all your data to the new account. This will be a tedious process but it is the next best way to get the taskbar working on your system without resetting your PC. Follow the guide below to get you started.
Create a new local admin account
Herre’s how you can create a new local admin account on your system.
Note: Most users facing the taskbar issue are unable to access the Settings app as well. Hence we will be using CMD to add a new local admin account to your PC. However, if the Settings app is available to you then you can use the same to add a new account as well.
Press Ctrl + Shift + Esc on your keyboard, click on ‘File’ and select ‘Run new task’.

Type in ‘cmd’ and press Ctrl + Shift + Enter on your keyboard.

CMD will now be launched as an administrator. Use the command below to add a new local admin account. Replace NAME with the Username of your choice for the new account. You can add a password later once you have confirmed that the taskbar is available in the new account.
net user /add NAME 
Once you have added the new user, use the command below to convert it to an administrator account on your PC. As usual, replace NAME with the Username for the new account you created earlier.
net localgroup Administrators NAME /add

Now type in the following to log out of your current account.
logoff

Once logged out, click on the newly added account to log in to the same. Once logged in, check if the taskbar is available in the new account. If it is, you can use the next section to transfer all your data. However, if the taskbar is still missing then you have no choice but to perform a fresh install of Windows 11 on your PC from a removable USB media drive.
Transfer all your data
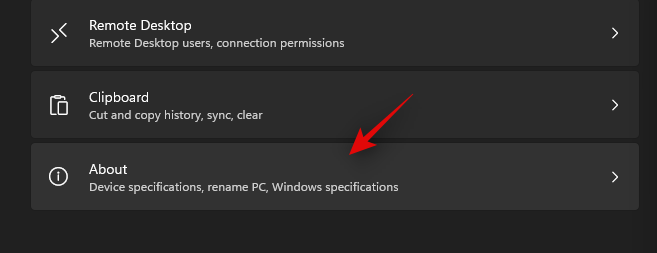
Press Windows + i on your keyboard and click on ‘About’ on your right.
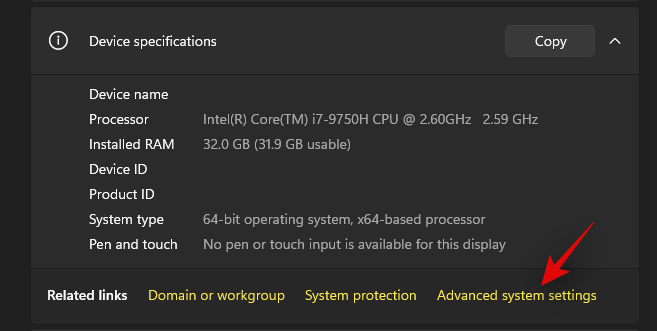
Click on ‘Advanced system settings’.
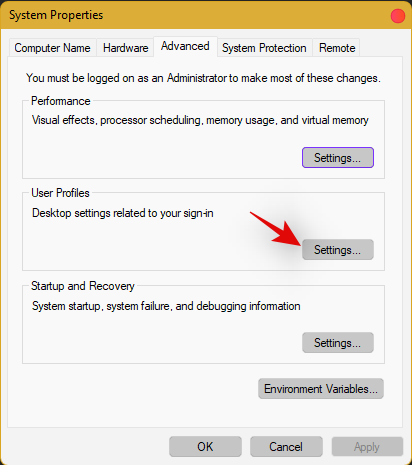
Click on ‘Settings’ under ‘User Profiles’.
Select your original profile by clicking on it and selecting ‘Copy To’.
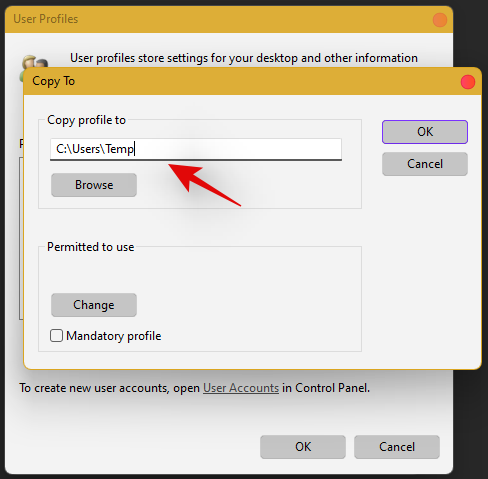
Now enter the following path under ‘Copy profile to’. Rename NAME to the username of your previous profile from where you wish to copy all your data.
C:\Users\NAME
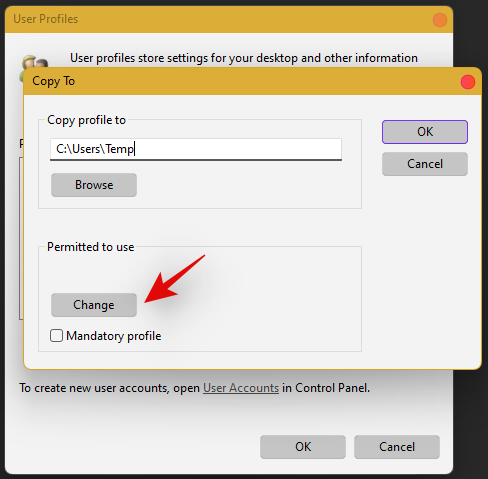
Click on ‘Change’.
Enter the name for your new user profile and press Enter on your keyboard.
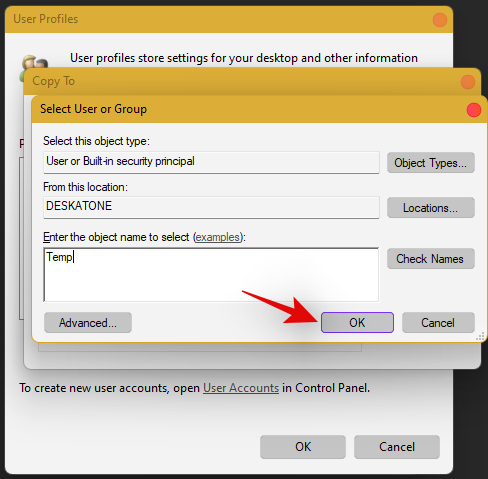
Click on ‘Ok’ once you are done.
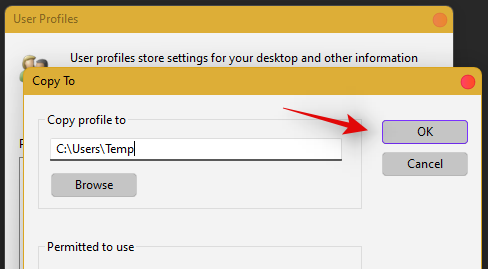
All your data will now be copied over to the new profile where the taskbar is functional on your PC. You can now delete your previous user account and set a password for your new account as well.
Frequently Asked Questions (FAQs):
With so many fixes, you are bound to have a few questions on your mind. Here are some commonly asked ones that should help you get up to speed.
How do I access Windows apps and Settings without a taskbar?
You can use the Task Manager to launch almost any program or Settings page on your system. To launch the desired program, launch the Taskbar > File > Run new task and enter the path to the program you wish to launch. Press Enter if you wish to launch the program normally or press Ctrl + Shift + Enter if you wish to launch the program with administrator privileges.
Is it safe to edit the Registry?
Registry edits are never safe as they have the potential to break your system. Fixes from trusted sources can help you avoid such issues but a good rule of thumb is to always back up your registry before making any edits. This way you can easily restore your Registry values in case some get messed up when editing the Registry.
When will Microsoft fix this issue?
Sadly, Microsoft is yet to release a proper fix for this issue. The company has tried to release a fix in the past cumulative updates to Windows 11 but they have been a hit and miss. We expect Microsoft to completely fix this issue in the upcoming feature update to Windows 11 when the OS gets the ability to run Android apps officially.
Can I update my Windows 11 after fixing the taskbar?
This will depend on the fix that you’re currently using. If you are using a date fix then you won’t be able to install updates until you restore to the current time. This will, however, cause the taskbar to be disabled again and the changes will be carried over after you update your PC. However, if you are using any other fix then you can easily update Windows.
For users with the date fix, you should try updating with the modified time first. If the update gets stuck on ‘Installing 0%’ or ‘Downloading 100%’ then change your date and time to the current date and time and update your PC. Ensure that you do not restart explorer or your PC during this process to keep the current instance of the taskbar alive on your system during the update process. This should help fix the issue for you once Microsoft officially releases an update to fix the issue.
We hope you were able to easily get the taskbar back up and running on your system using the guide above. If you face any more issues, feel free to reach out to us using the comments section below.
Related:
Узнайте, как справиться с сбоями в Черном мифе: Укун, чтобы наслаждаться этой увлекательной экшен-RPG без перерывов.
Урок, помогающий решить проблемы, когда электронные таблицы Microsoft Excel не рассчитываются корректно.
Microsoft Teams - отличная коммуникационная утилита для пользователей на всех платформах, но как только вы закончите ее использовать, приложение начинает раздражать. Если вы не используете Te…
Windows 11 постепенно приобретает плохую репутацию среди людей из-за низкой производительности по сравнению с ее предшественницей. Во-первых, появились новые требования к безопасной загрузке и TPM 2.0, затем их уменьшили ...
Google Meet стремится соответствовать современным приложениям для видеоконференцсвязи, но, похоже, ему этого не хватает. Хотя их параметры настройки все еще далеки от того, что мы ожидаем, одна большая…
Единственный экран, которого пользователи Windows коллективно опасаются, - это Синий экран смерти. BSOD существует уже несколько десятилетий, очень мало изменившись за эти годы, но все же достаточно мощный, чтобы ...
Итак, вы зарегистрированы в канале разработчиков Windows Insider Preview, наконец-то получили предварительную сборку Windows 11, и обновления продолжаются. Но как долго вам придется ждать…
Microsoft проделала большую работу над Windows 11, используя множество элементов дизайна - как старых, так и новых - чтобы воплотить ее в жизнь. Проводник Windows по умолчанию также получил свежий вид…
Была выпущена сборка для разработчиков для Windows 11, и энтузиасты по всему миру пробуют использовать предварительную бета-версию. Однако, как и ожидалось, на этом есть много мелких ошибок ...
Windows 11 недавно стала достоянием общественности, и все во всем мире спешили установить новую ОС на виртуальную машину с помощью таких инструментов, как VirtualBox. Windows 11 приходит…
Microsoft много работала над своими мобильными приложениями, но время от времени вы можете столкнуться с ошибками. При первом просмотре или открытии приложения групп Microsoft вы можете…
С момента выпуска Windows 11 прошло несколько месяцев, и с тех пор пользователи переходят на новую ОС. По мере того как все больше и больше пользователей пробуют новые проблемы с Windows 11, ошибки и настройки удаляются…
В течение многих лет Windows рекламировала множество новых функций и улучшений, утверждая, что они находятся всего в одном щелчке меню «Пуск». Но что, если меню «Пуск» перестает открываться для вас? Что ж…
Google Meet - это новый городской инструмент для удаленной совместной работы, который предлагает возможности видеоконференцсвязи и аудиоконференцсвязи наряду с такими интересными функциями, как сквозное шифрование, HD-аудио, HD-видео и многое другое.
В первую неделю октября 2021 года Microsoft официально выпустила стабильную сборку Windows 11. Все новые продукты, выпущенные после анонса, будут работать под управлением Windows 11 прямо из коробки, а Window…
Благодаря удобному пользовательскому интерфейсу и серьезному подходу Google Meet с комфортом зарекомендовал себя как одно из ведущих решений для видеоконференцсвязи. Благодаря интеграции с GSuite Meet предлагает отличные…
Windows 11, которая является последним дополнением к знаменитой линейке операционных систем Windows, смогла привлечь много внимания даже в предварительной версии для разработчиков. Очень много энтузиастов кидаются…
Когда Windows 11 была представлена миру, Snap Layouts были первым, что привлекло всеобщее внимание. Они были новаторскими, новыми и действительно полезными при работе в системе Windows ...
Драйверы устройств помогают исправлять ошибки, повышать совместимость периферийных устройств и компонентов с текущими и новыми обновлениями ОС. Если вы установили Windows 11 (или планируете это сделать), но теперь видите…
Windows 11 была выпущена для широкой публики после того, как в июне этого года произошла спорная утечка информации. С тех пор в ОС было внесено множество изменений, среди которых были очень долгожданные заморозки ...
Возникли проблемы с ошибкой «Отсутствует драйвер Precision в Windows 11»? Узнайте о проверенных способах восстановления точности сенсорной панели и мыши. Пошаговое руководство для простого устранения неполадок.
Застряли в надоедливом цикле восстановления с помощью ключа BitLocker в Windows 11? Узнайте пошаговые инструкции, как обойти бесконечные запросы, восстановить диск и вернуться к нормальной работе. Никаких технических знаний не требуется — простые и эффективные решения внутри.
Возникли проблемы с ошибкой обновления Windows 11 0x80073712? Узнайте о проверенных пошаговых решениях для обновления до 2026 года, включая советы по устранению неполадок, которые помогут вам обновить систему без проблем и безопасно. Больше никаких головных болей с обновлениями!
Возникли проблемы с ошибкой каталога обновлений Windows 11? Узнайте о проверенных пошаговых решениях для беспроблемного восстановления обновлений. Быстро верните свою систему в рабочее состояние — никаких технических знаний не требуется!
Проблемы с медленной работой Windows 11? Узнайте пошаговые решения для плана Ultimate Performance Plan, чтобы повысить производительность вашего ПК.
Проблемы с приглушенным звуком встроенного микрофона в Windows 11? Откройте для себя проверенные пошаговые решения для восстановления кристально чистого качества звука без лишних хлопот. Верните своему микрофону безупречную работу уже сегодня!
Возникли проблемы с Classic Shell или ошибками Start11 в Windows 11? Узнайте о пошаговых решениях проблем со сбоями, совместимостью и многом другом, чтобы восстановить работоспособность вашего персонализированного меню «Пуск». Обновлено с учетом последних советов по устранению неполадок.
Проблемы с задержками в играх на Windows 11 из-за VBS и HVCI? Узнайте о проверенных шагах по устранению неполадок, которые помогут оптимизировать производительность, уменьшить зависания и повысить FPS без ущерба для безопасности. Простые решения для геймеров.
Возникли проблемы со сбросом PIN-кода Windows Hello в Windows 11? Ознакомьтесь с проверенными шагами по устранению неполадок, чтобы быстро решить эту проблему и восстановить безопасный доступ к вашему устройству. Обновлено с учетом последних исправлений.
Возникли проблемы с отображением эффектов «Акрил» и «Слюда» в Windows 11? Узнайте о проверенных способах восстановления этих потрясающих визуальных эффектов и легкого улучшения работы с рабочим столом.




![Как исправить ошибку зеленого экрана в Windows 11 [8 способов] Как исправить ошибку зеленого экрана в Windows 11 [8 способов]](https://cloudo3.com/resources8/images31/image-5564-0105182715287.png)


