麥克風在 Google Meet 中無法使用?嘗試這些常見的修復

發現解決 Google Meet 麥克風問題的有效方法,包括音頻設置、驅動程序更新等技巧。

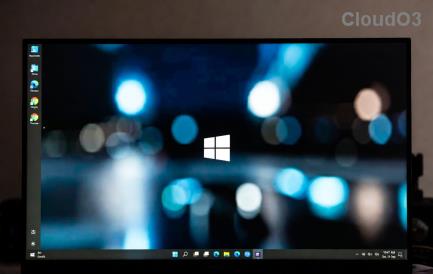
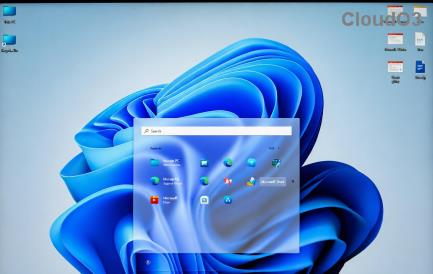
多年來, Windows一直在吹捧它的許多新功能和改進,聲稱只需單擊“開始”菜單即可。但是如果開始菜單停止為您打開怎麼辦?好吧,Windows 11上的“開始”菜單可能突然停止為您工作,從而使執行常規任務變得有點繁重。
如果 Windows 11 上的“開始”菜單未為您打開,那麼我們可以提供盡可能多的修復程序來幫助您解決問題。
注意:如果下面給出的 17(!) 常規修復對您來說失敗,那麼請嘗試在“最後的手段”部分下給出的修復 #18,該部分討論了通過命令行創建新用戶。這有助於您使用 CMD 創建新用戶,因此無需訪問可能對您不起作用的“設置”應用程序或“開始”菜單。也就是說,關於由“Windows 更新 KB5004300”引起的問題的修復 #1 是一個新的補充,所以也許先檢查一下。
內容
我們總共包含了 20 個 (!) 修復程序來解決以下 Windows 11 上開始菜單的問題。其中 3 個是一般性修復,只有在您確定 17 個主要修復沒有幫助後才應嘗試。
17 個主要修復
在嘗試 3 個一般修復(也在下面給出)之前先嘗試這些修復。
修復 #1:卸載並重新安裝 Windows 更新 KB5004300
眼尖的用戶最近發現的一個修復程序似乎可以輕鬆修復新 Windows 11 升級的開始菜單。以 KB5004300 名稱發布的 Windows 更新似乎導致了此問題。在您的 PC 上卸載並重新安裝相同的內容將為您修復開始菜單和任務欄。請按照以下指南開始。
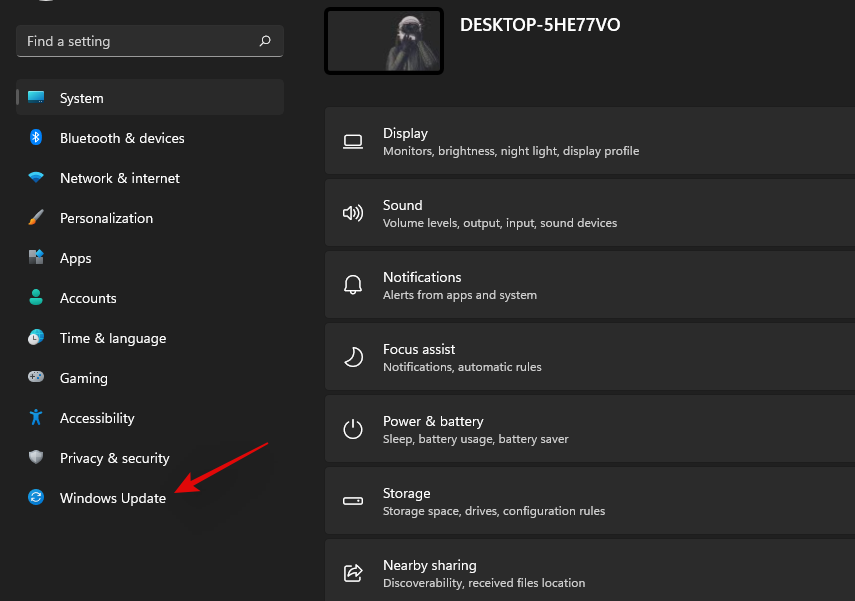
按下Windows + i鍵盤上的以打開“設置”應用。單擊左側的“Windows 更新”。
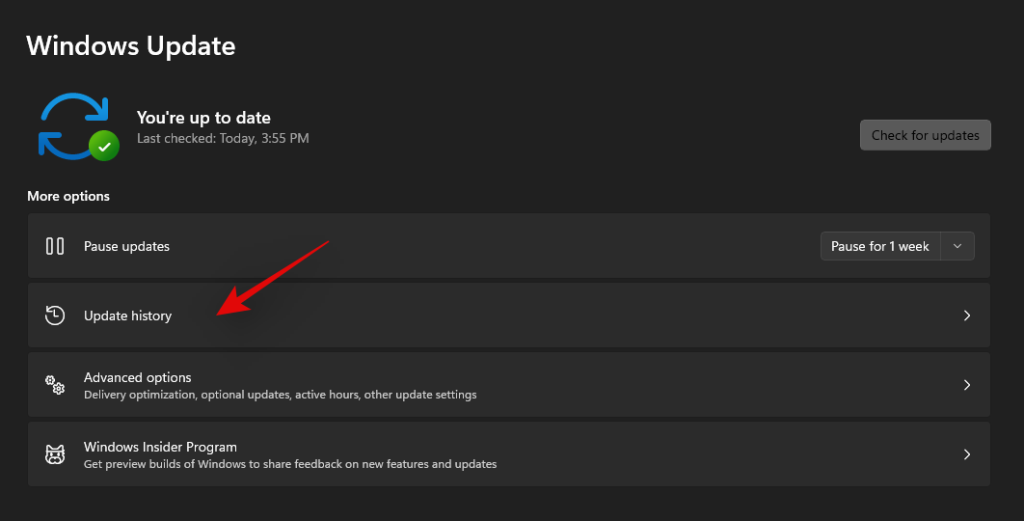
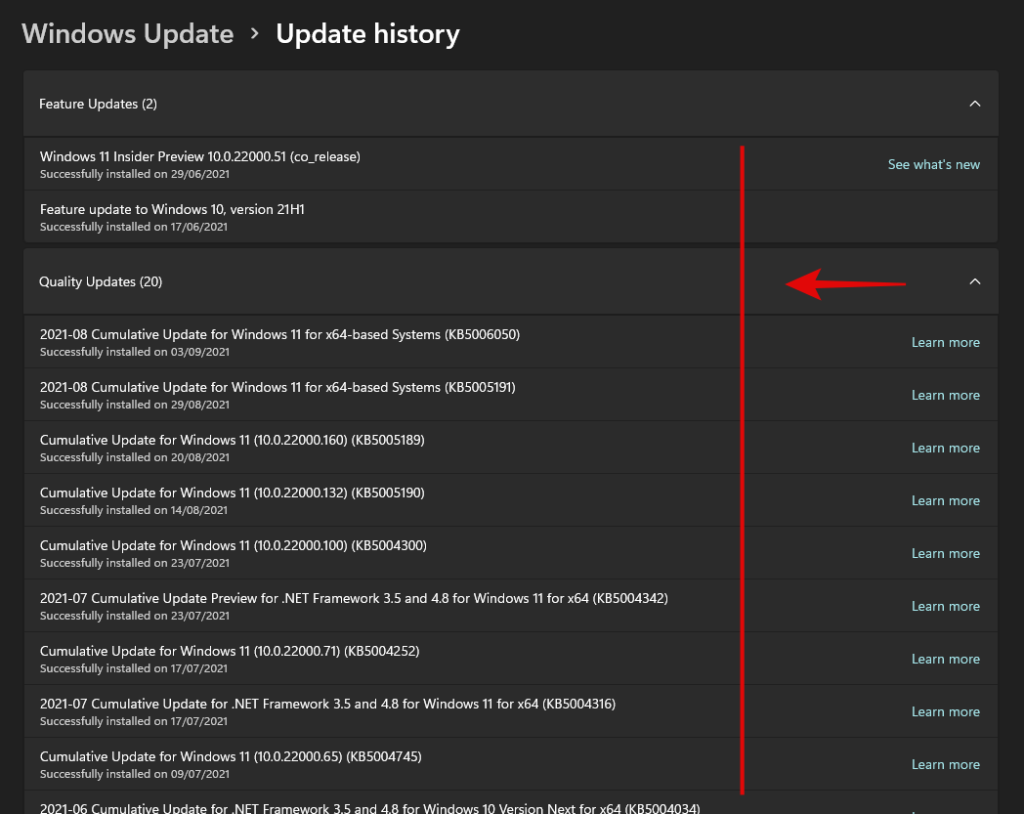
現在單擊“更新歷史記錄”。
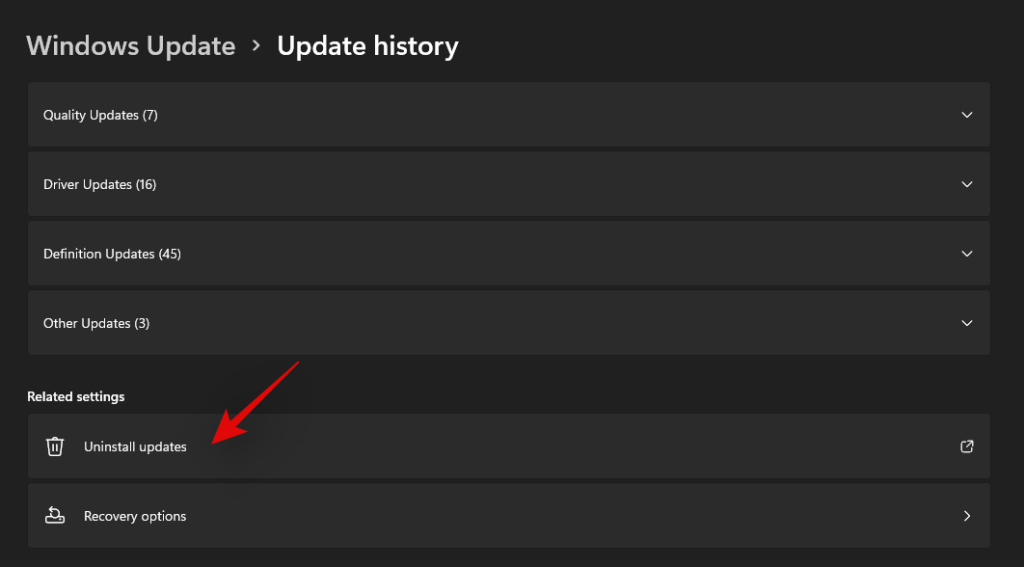
單擊“卸載更新”。
您現在將被重定向到控制中心。在列表中找到相關的 KB5004300 更新並單擊並選擇它。
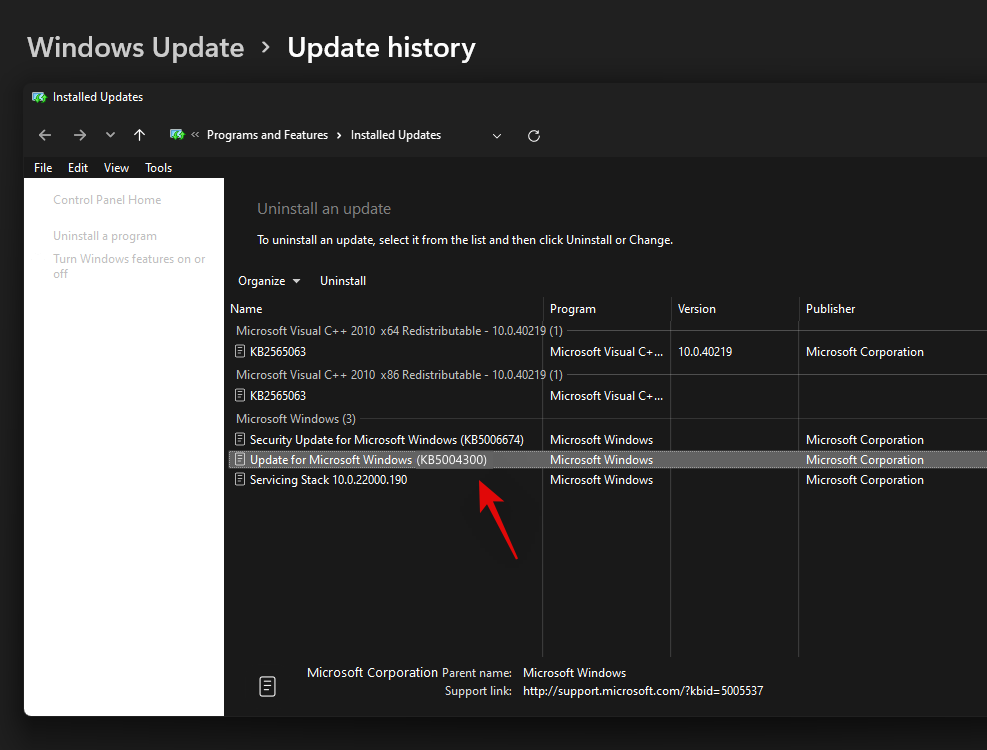
現在點擊頂部的“卸載”。
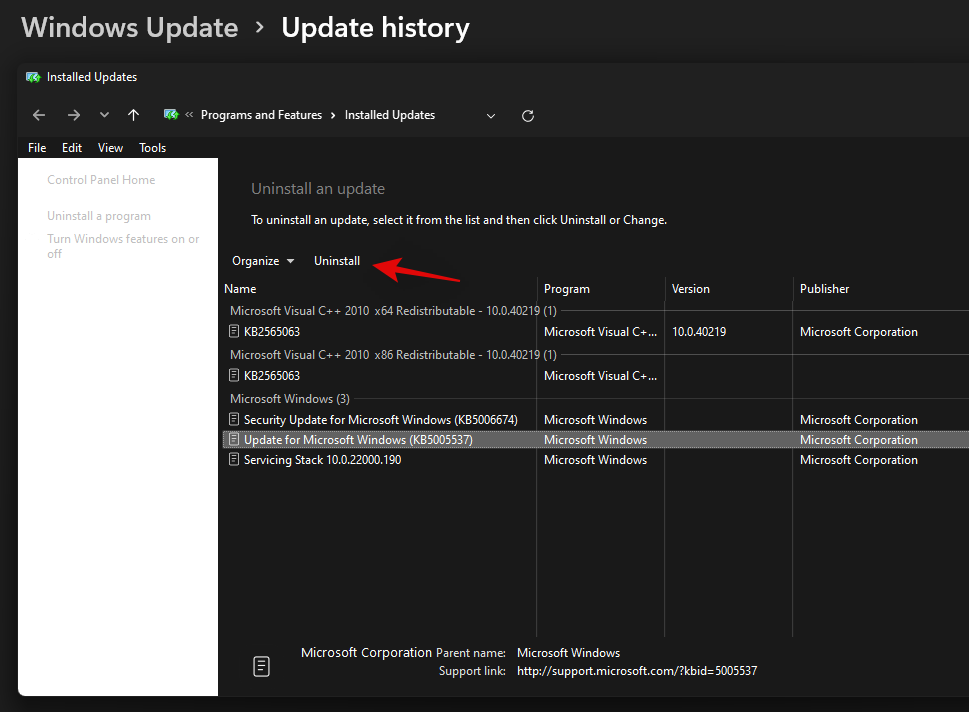
按照屏幕上的說明從 PC 中刪除更新。更新後,重新啟動您的 PC 以進行良好的測量。
現在Windows + i,在您的 PC 重新啟動後再次按下並再次選擇 Windows 更新。

檢查更新,您現在應該可以選擇再次在您的 PC 上安裝 Windows Update KB 5004300。
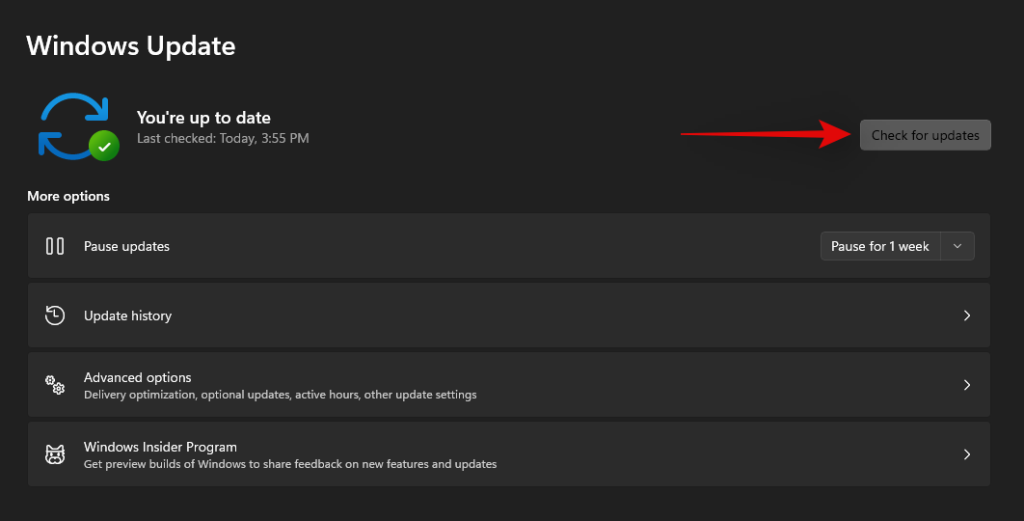
下載並安裝更新,任務欄和開始菜單功能現在應該會在 Windows 11 中恢復。
修復 #2:強制重啟 Iris 服務
微軟最近對內部版本的更新導致許多用戶的任務欄和開始菜單出現重大問題。如果您也訂閱了 Insider 頻道並且在更新到內部版本號 22449 或更高版本時遇到問題,那麼您可以使用下面提到的修復程序。
此方法將刪除 Iris 服務的註冊表值,該值應在重新啟動時強制重新安裝。對於大多數用戶來說,重新安裝似乎有助於解決此問題。即使您不在同一版本中,此修復程序也值得一試。請按照以下指南開始。
注意: 此命令將立即重新啟動您的 PC。如果您在後台有任何正在進行的工作,請確保在繼續本指南之前將其保存。
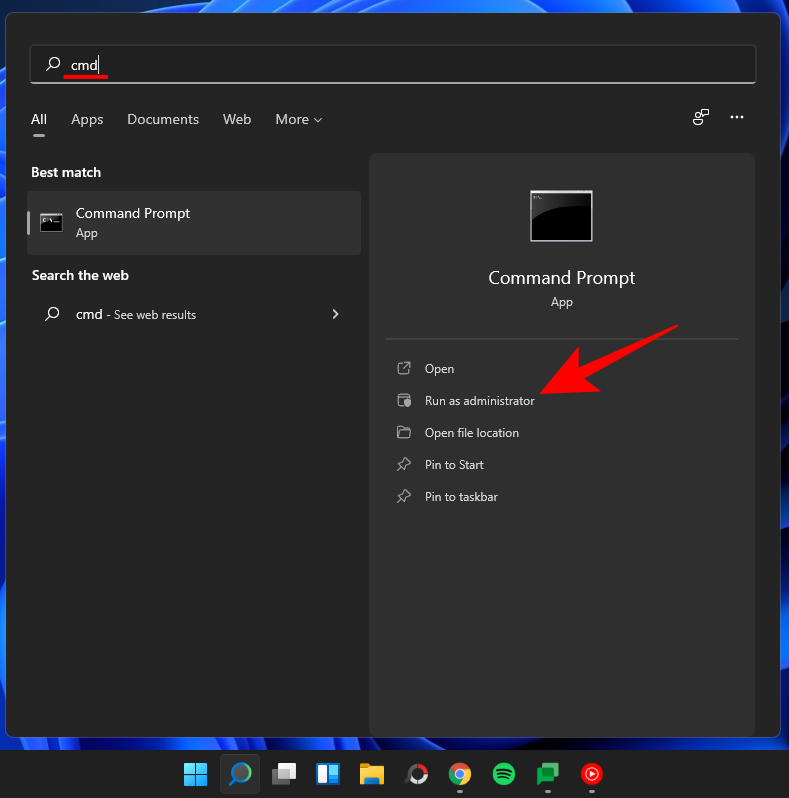
按下 Windows + S 鍵盤並蒐索 CMD。單擊“以管理員身份運行”或按Ctrl + Shift + Enter 鍵盤上的按鈕 。
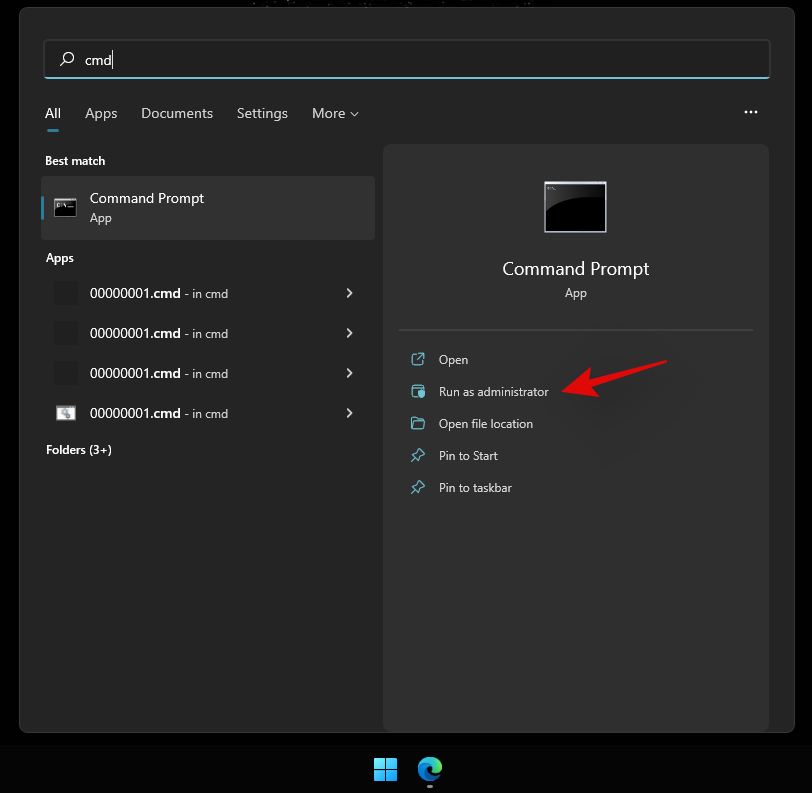
輸入以下命令,然後按鍵盤上的 Enter。
reg delete HKCU\SOFTWARE\Microsoft\Windows\CurrentVersion\IrisService /f && shutdown -r -t 0

您的 PC 現在將重新啟動。像往常一樣登錄到您的 PC,現在應該在您的系統上恢復“開始”菜單功能。
修復 #3:重新啟動您的 PC
這是迄今為止在嘗試修復 Windows 11 PC 上的大多數問題時想到的最直接的方法。通常,當您重新啟動系統時,實際上是強制所有進程(包括 Windows)重新啟動其所有服務和進程。這也會重新啟動“開始”菜單的進程,這將有助於解決問題。
如果不明顯,請按照以下步驟重新啟動 PC。
確保關閉所有應用程序和文件。或者,只需同時按下即可進入桌面屏幕 Windows key + D 。現在,同時按下 Alt + F4 鍵盤上的按鍵以顯示“關閉 Windows”屏幕。
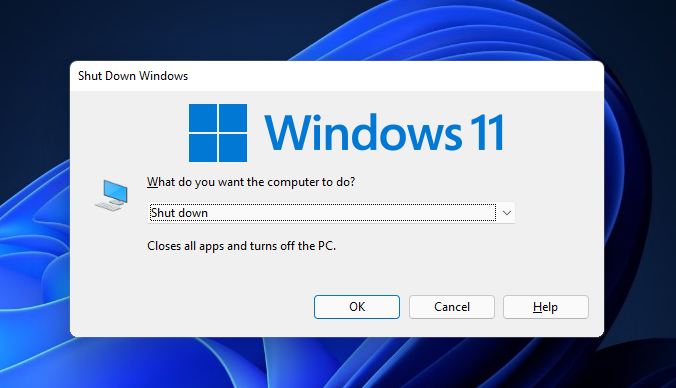
單擊下拉菜單,選擇“重新啟動”,然後按“確定”按鈕。
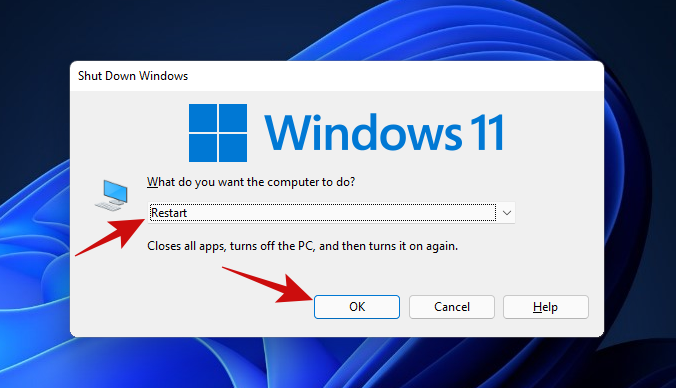
一旦您的 PC 重新啟動,您應該能夠再次使用“開始”菜單。如果仍然不能,請嘗試下一個方法。
修復 #4:使用任務管理器重新啟動 Windows 資源管理器
凍結開始菜單的下一個簡單修復使用任務管理器。任務管理器可以成為管理 Windows PC 上任何正在運行的進程的完美工具。
如果您的“開始”菜單不想響應您的點擊,請按照下面提到的步驟查看它是否能解決您的問題。
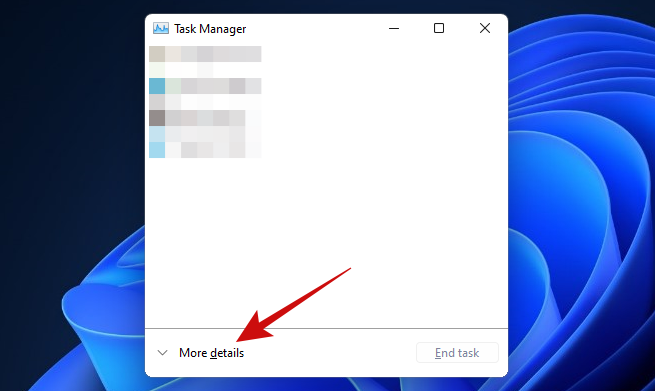
按下 Ctrl + Shift + Esc 按鍵來觸發任務管理器。如果您的任務管理器看起來像這樣,請單擊“更多詳細信息”按鈕以訪問詳細視圖。
進入任務管理器後,滾動進程列表以找到“Windows 資源管理器”進程。右鍵單擊該進程,然後單擊“重新啟動”選項。
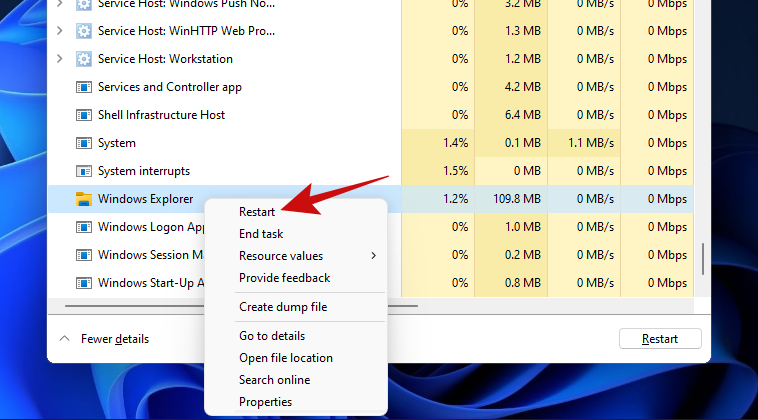
單擊後,Windows 應立即重新啟動 Windows 資源管理器進程,這將修復您的開始菜單。
重新啟動 Windows 資源管理器進程與重新啟動 PC 非常相似。唯一的區別是,在這裡,您只重新啟動一個進程,而在重新啟動時,您將重新啟動所有進程。另外,過去很多人都用這種方法成功修復了他們的開始菜單,這值得一試。
修復 #5:檢查 Windows 的更新
如果您仍然無法打開“開始”菜單,則應該嘗試使用 Windows Update。這個問題可能比你想像的更普遍,微軟可能已經發布了一個修補程序來修補無響應的“開始”菜單。
以下是您如何做到這一點。
一起打開設置應用程序 Win key + i 。打開後,單擊“Windows 更新”選項。
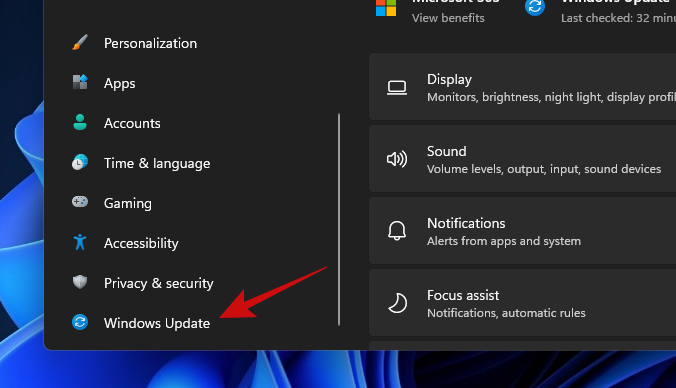
單擊大的“檢查更新”按鈕開始檢查適用於您 PC 的 Windows 的任何可用更新。如果可用,讓 Windows 安裝所有更新。
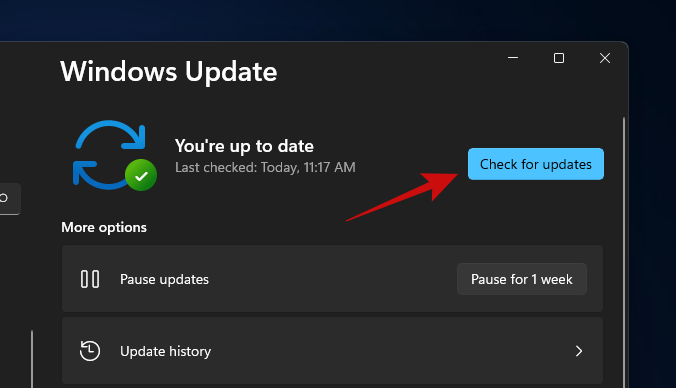
當 Windows 完成更新您的 PC 後,只需重新啟動它並嘗試打開“開始”菜單。如果您仍然無法打開“開始”菜單,我們認為是時候進行更高級的修復了。
修復 #6:運行 DISM 和 SFC
DISM(部署映像服務和管理)和 SFC(系統文件檢查器)是識別和修復損壞的 Windows 安裝的兩個最有效的工具。這些工具可以與命令提示符或 Windows PowerShell 一起使用。對於本指南,我們將在命令提示符下使用它們。
讓我們從 DISM 開始。DISM 可用於獲取損壞的 Windows 文件的新副本。
按 Win key + r 打開“運行”框,輸入 cmd ,然後Ctrl + Shift + Enter 一起按 (而不是按 Enter)以打開提升的命令提示符。
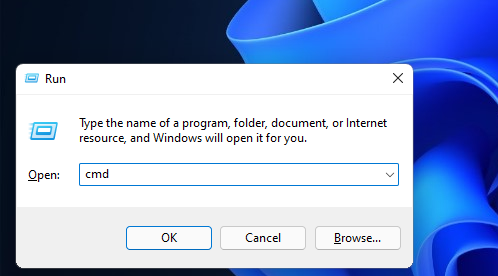
進入命令提示符後,粘貼以下代碼並按 Enter。
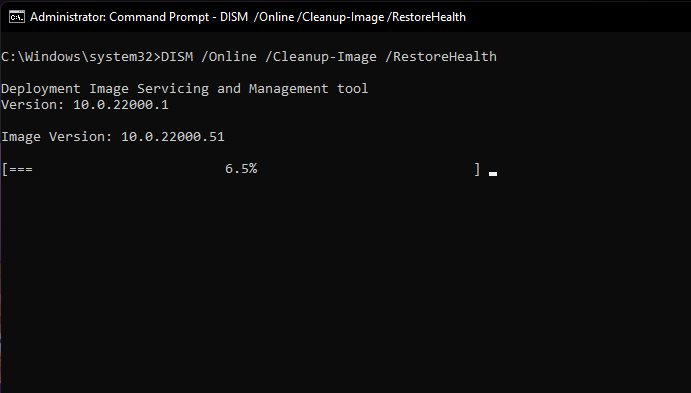
DISM /Online /Cleanup-Image /RestoreHealth
DISM 現在將通過從 Windows 更新請求該文件的全新副本來嘗試從當前安裝中恢復損壞的文件(如果有)。整個過程大約需要 15-20 分鐘。以下是該命令的實際效果。
一旦該命令恢復了所有損壞的文件,您應該會看到類似這樣的內容。
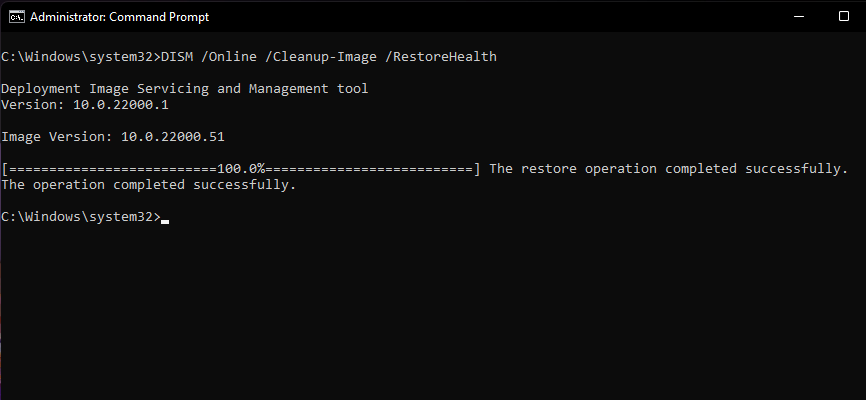
完成此步驟後,保持命令提示符窗口打開以運行下一個命令。
下一步是驗證所有 Windows 11 文件的完整性,以確保它們處於良好狀態。為此,我們將使用 SFC 工具。
就是這樣。
將以下代碼粘貼到命令提示符窗口中,然後按 Enter。
sfc /scannow
命令如下所示。
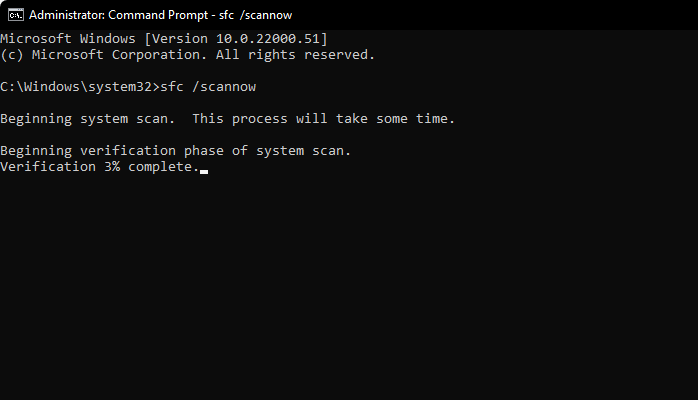
上面的命令只需幾分鐘即可完成對 Windows 文件完整性的掃描。完成後,結果應如下所示。
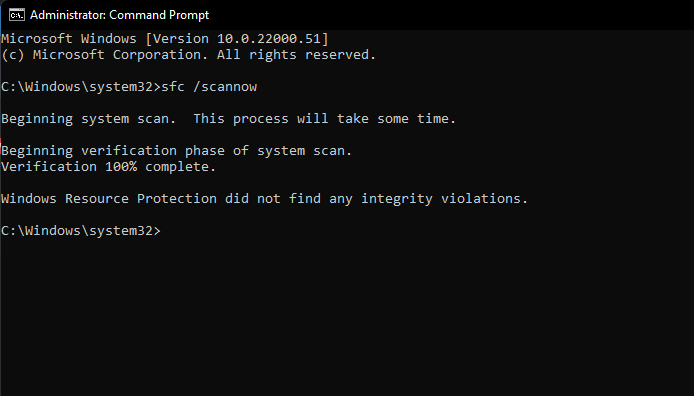
提示: 確保您的 PC 具有穩定的互聯網連接,以使用此方法。
現在是重新啟動的時候了。
仍然停留在損壞的開始菜單上,是時候嘗試下一個方法了。
相關: 在 Windows 11 上更新驅動程序的 6 種方法
修復 #7:重建搜索索引
開始菜單和 Windows 搜索緊密集成。搜索和索引問題可能已經進入“開始”菜單並對其產生影響。所以,我們也要排除這種可能性。
讓我們來看看執行此操作的步驟。
按 打開運行框 Win key + r。然後將下面的文本粘貼到運行框中並按回車鍵。
control /name Microsoft.IndexingOptions
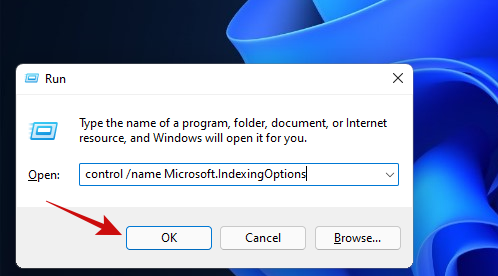
您應該會看到一個名為“索引選項”的彈出窗口打開。單擊“修改”按鈕。
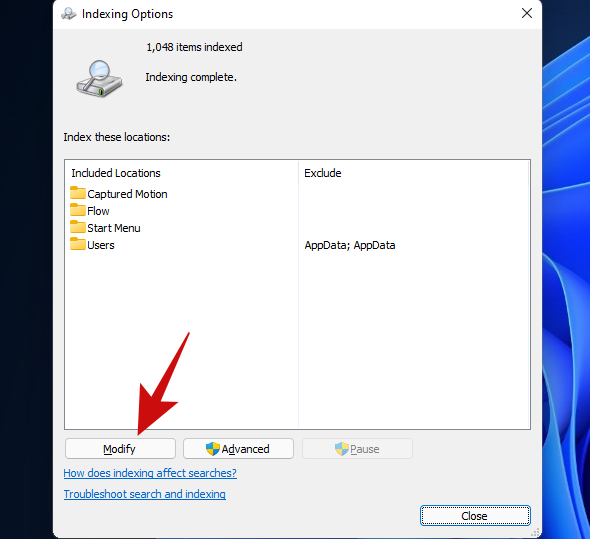
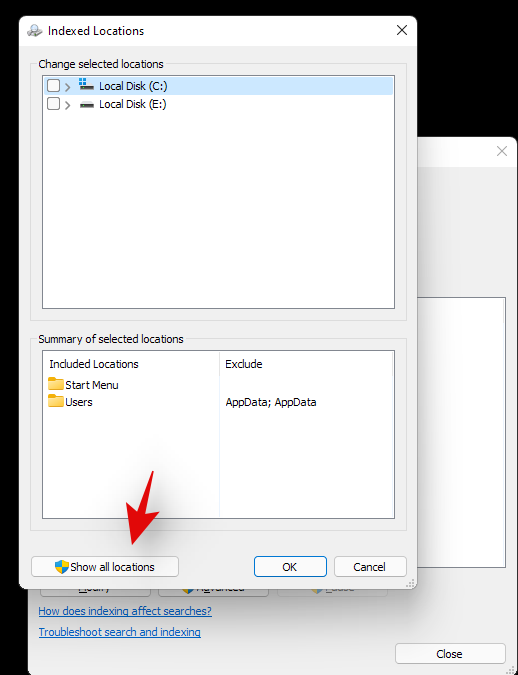
單擊“顯示所有位置”按鈕。
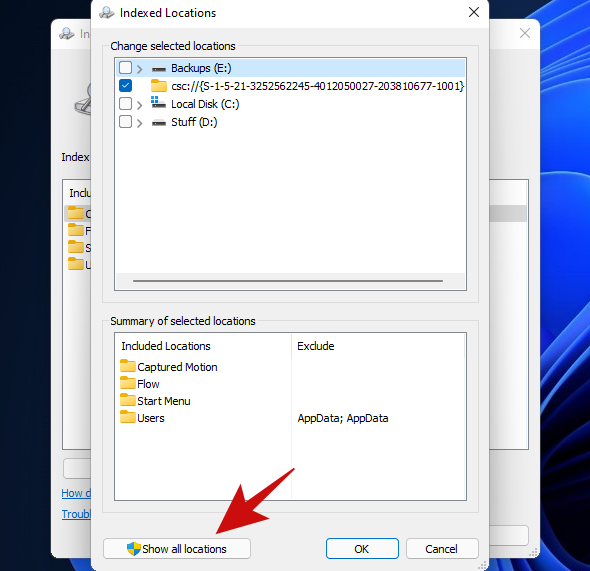
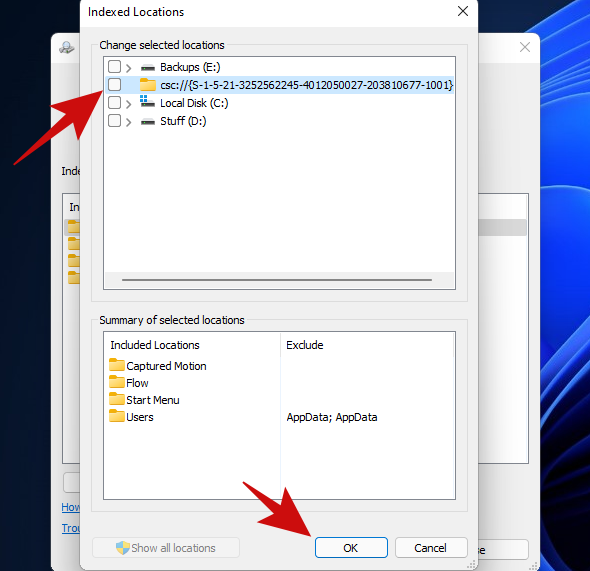
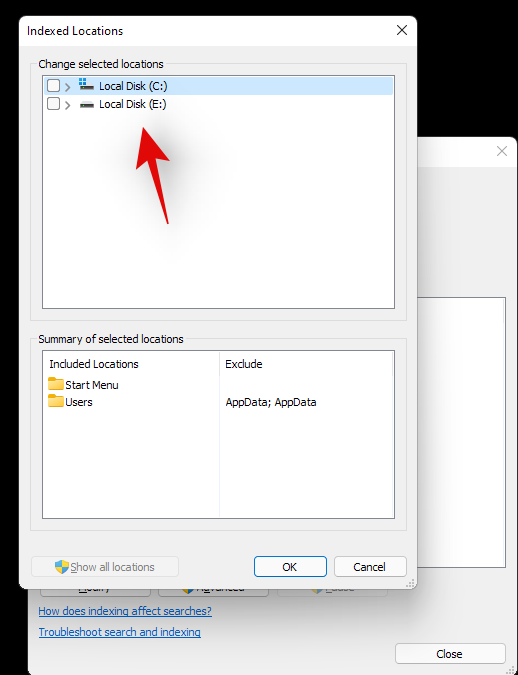
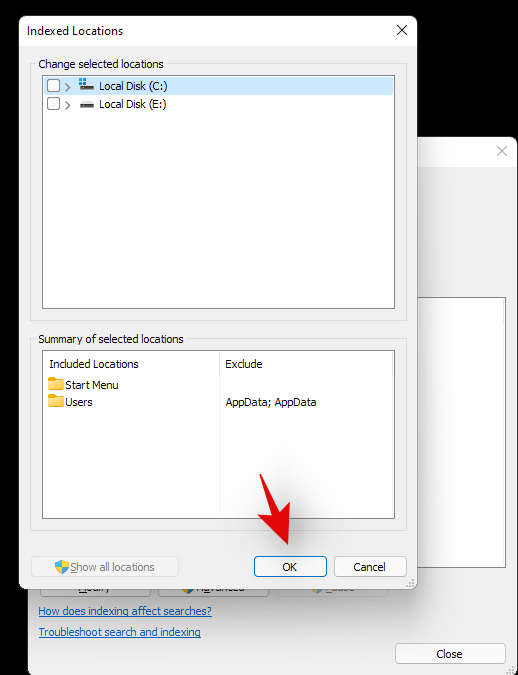
在此屏幕上,取消選中所有位置並單擊“確定”按鈕。我們只勾選了一個位置,因此我們只取消了此列表中的一個位置。
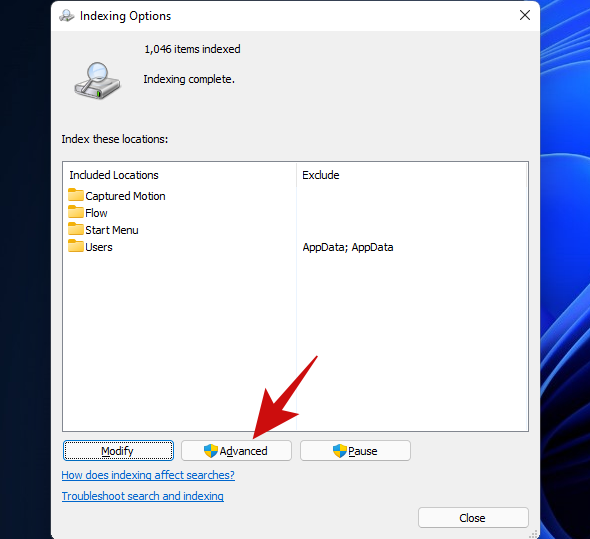
單擊“高級”按鈕。
單擊“重建”按鈕。
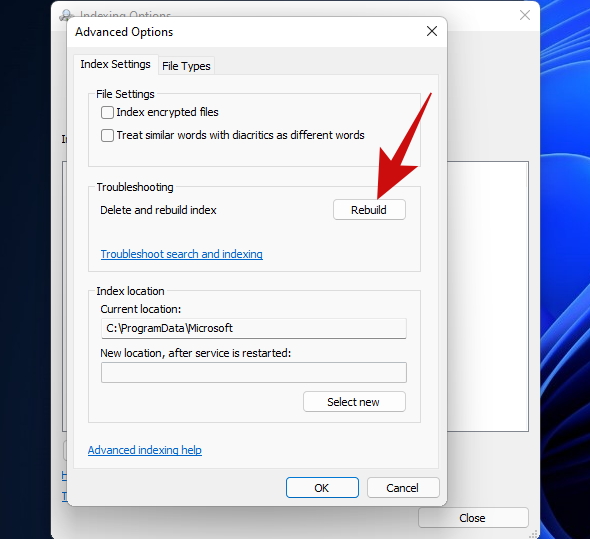
Windows 現在將開始重建搜索索引。請放心,整個過程現在將由 Windows 處理並且實際上不需要任何用戶輸入,儘管它確實需要相當長的時間才能完成。
當 Windows 重建您的搜索索引時,重新啟動您的 PC。再次進入 Windows 後,嘗試打開“開始”菜單。如果它仍然不起作用,我們認為是時候選擇更具彈性的方法了。
如果您安裝了任何第三方程序來修改開始菜單的外觀或功能,那麼我們建議您刪除所有此類程序。很可能,這些程序之一與新的 Windows 11 開始菜單不兼容,這就是您面臨系統問題的原因。如果您有下面提到的以下應用程序之一,那麼我們建議您盡快還原它們的設置並卸載它們。這些應用程序大多是為 Windows 10 設計的,在一定程度上與 Windows 11 開始菜單代碼不兼容。最近的 Windows 11 更新可能破壞了它們的兼容性,導致開始菜單在您的系統上出現故障。
和更多。如果刪除修改開始菜單的第三方應用程序有助於恢復其功能,那麼您可以等待兼容更新再次使用該應用程序。
您是否使用註冊表黑客在 Windows 11 上獲取較舊的 Windows 10 開始菜單?如果是這樣,則此註冊表黑客的功能可能會因最近的 Windows 11 更新而中斷。在這種情況下,您可以使用以下指南恢復系統上的更改。
按 Windows + R 鍵盤上的鍵並在“運行”對話框中鍵入以下內容。
regedit

完成啟動註冊表編輯器後,按鍵盤上的 Enter 鍵。您也可以單擊“確定”。
現在將下面給出的地址複製並粘貼到註冊表編輯器頂部的地址欄中,然後按鍵盤上的“Enter”。
Computer\HKEY_CURRENT_USER\Software\Microsoft\Windows\CurrentVersion\Explorer\Advanced
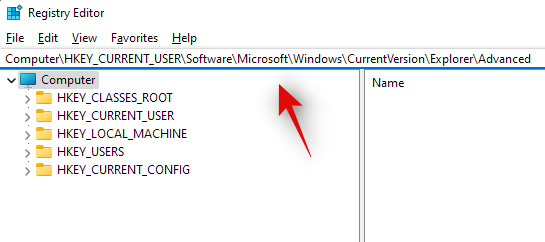
在您的右側查找“Show_StartClassicMode”並右鍵單擊它。

選擇“修改”。

將其值數據更改為“0”並單擊“確定”。暫時不要關閉註冊表編輯器。

按下 Ctrl + Shift + Esc 鍵盤以啟動任務管理器。現在單擊並切換到頂部的“詳細信息”選項卡。
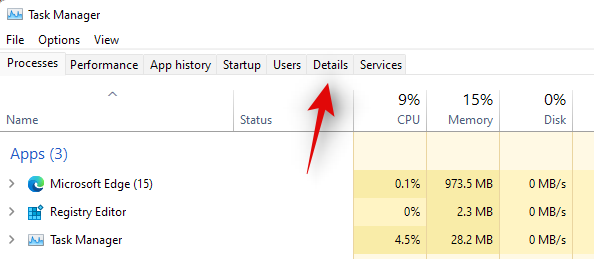
單擊並從列表中選擇 Explorrer.exe,然後按鍵盤上的 Delete 鍵。

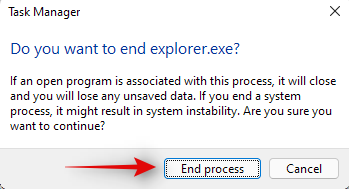
單擊“結束進程”確認您的選擇。
現在單擊左上角的“文件”並選擇“運行新任務”。
輸入“Explorer.exe”,然後按鍵盤上的 Enter。您也可以單擊“確定”。
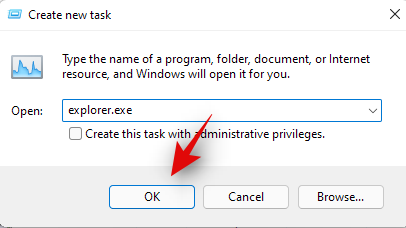
資源管理器現在將在您的系統上重新啟動。切換回註冊表編輯器並單擊並選擇“Start_ShowClassicMode”。
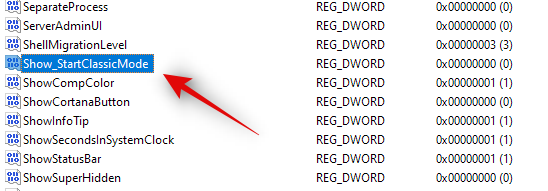
按鍵盤上的 Delete 鍵並確認您選擇刪除註冊表值。

現在重新啟動您的系統以進行良好的測量。
如果您的開始菜單由於註冊表黑客獲取舊的開始菜單而無法工作,那麼現在應該修復它。您可以通過單擊任務欄中的“開始”菜單圖標來檢查相同的內容。
與其前輩相比,Windows 11 已經取得了長足的進步。後台進程、任務和應用程序現在更加精簡,各種功能和元素似乎都有自己的專用包。這些專用軟件包使您可以更輕鬆地解決 Windows 某些功能的問題,甚至在最壞的情況下重新安裝它們。如果開始菜單仍然不適合您,那麼您可以重新安裝 Windows 11 的基本元素,這也會在您的系統上重新安裝開始菜單模塊。這應該有助於修復任何後台衝突,並使開始菜單在您的系統上備份和運行。請按照以下指南開始。
按下 Windows + S 鍵盤並蒐索 PowerShell。一旦應用程序出現在您的搜索結果中,點擊“以管理員身份運行”。
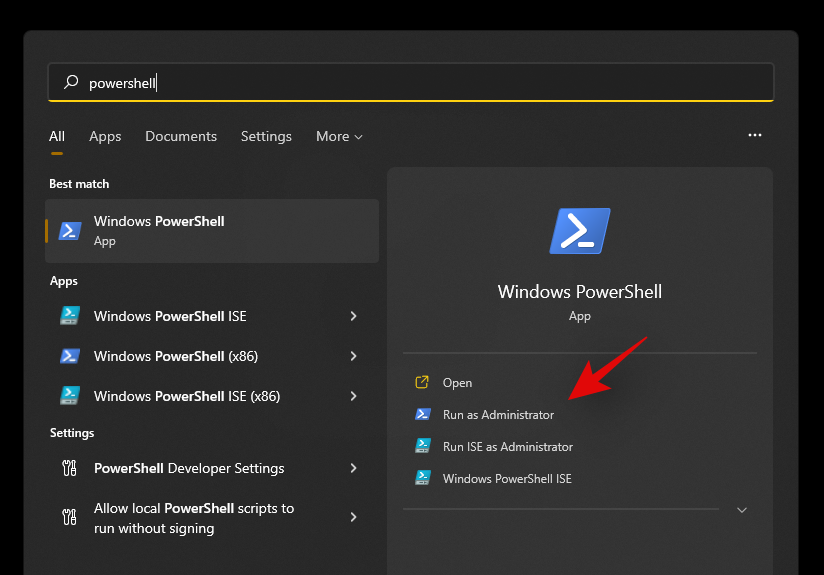
現在輸入以下命令並按鍵盤上的“Enter”。
Get-appxpackage -all *shellexperience* -packagetype bundle |% {add-appxpackage -register -disabledevelopmentmode ($_.installlocation + “\appxmetadata\appxbundlemanifest.xml”)}

忽略您收到的任何警告並繼續該過程。完成後,重新啟動系統以進行良好的測量。
現在開始菜單和其他基本功能已經在您的系統上重新安裝,讓我們重建您的系統索引,讓一切重新啟動並重新運行。按 Windows + R 鍵盤上的打開“運行”對話框。
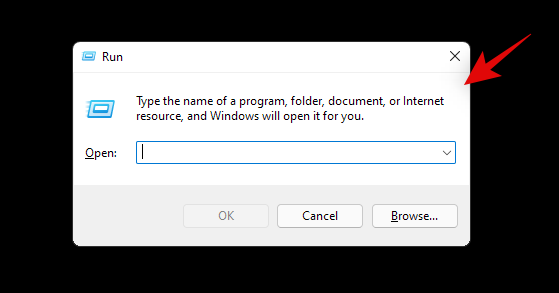
輸入以下命令,然後按鍵盤上的 Enter。
control /name Microsoft.IndexingOptions
單擊“修改”並選擇“顯示所有位置”。
取消選中當前列表中的所有框。
單擊“確定”。
現在點擊“高級”。
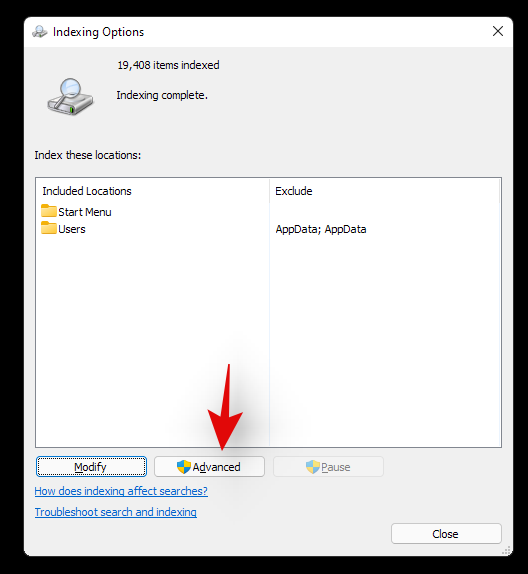
在故障排除下選擇“重建”。
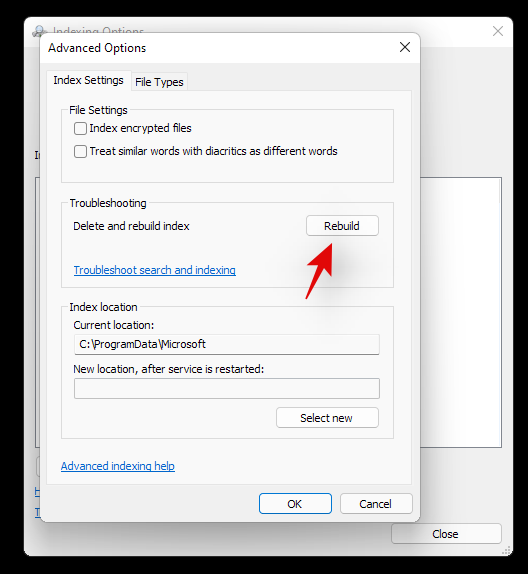
屏幕上彈出警告後,單擊“確定”。
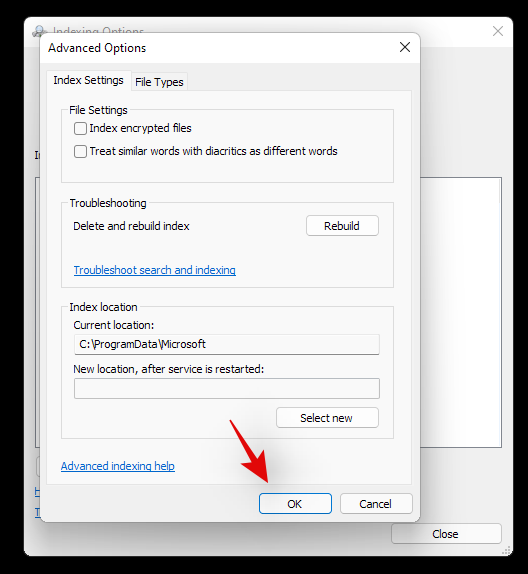
該過程完成後,我們強烈建議您重新啟動系統。
您現在可以嘗試在系統重新啟動後單擊“開始”圖標。重新安裝開始菜單應該有助於解決大多數係統上開始菜單的任何問題。
修復 #11:安裝任何掛起的驅動程序和 Windows 更新
This might be a bit obvious but you should definitely install any pending driver updates or Windows update on your system. This will help get you up and running on the latest drivers and help your system be compatible with all the hardware installed on your system. While drivers rarely cause issues with Windows features, you can never be too sure. Hence we recommend you install the latest available drivers on your system. You can use the link below to go to our detailed guide for updating drivers on Windows 11. If you are using a pre-built system or a laptop, then we recommend checking your OEM support page for dedicated driver updates as well.
There is a registry value that if modified, can disable your Start menu altogether. If you have been using registry modifiers, cleaners, and more, then it is likely that this registry value was modified which ended up disabling the Start menu on your system. Additionally, the Start menu’s functionality was moved to a Xaml process once Windows 10 was released. This process is known to glitch out
Use the guide below to check if the start menu is disabled on your system and re-enable it if needed.
Press Windows + R on your keyboard and type in the following command given below.
regedit
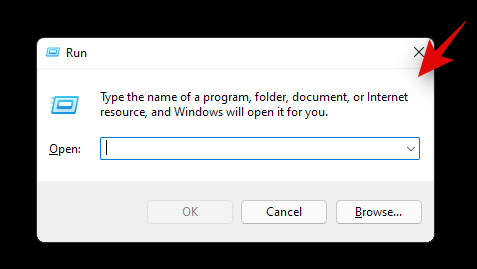
Now press Enter on your keyboard or click on ‘Ok’.
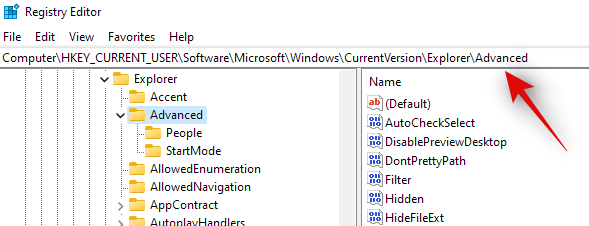
Copy and paste the following address in the address bar at the top of your registry editor.
HKEY_CURRENT_USER\Software\Microsoft\Windows\CurrentVersion\Explorer\Advanced
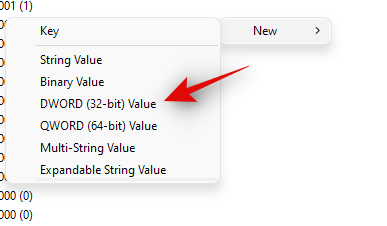
Now right-click on your right tab and select ‘New’.
Select ‘DWORD (32-bit value)’.
Enter the name as ‘EnableXamlStartMenu’.
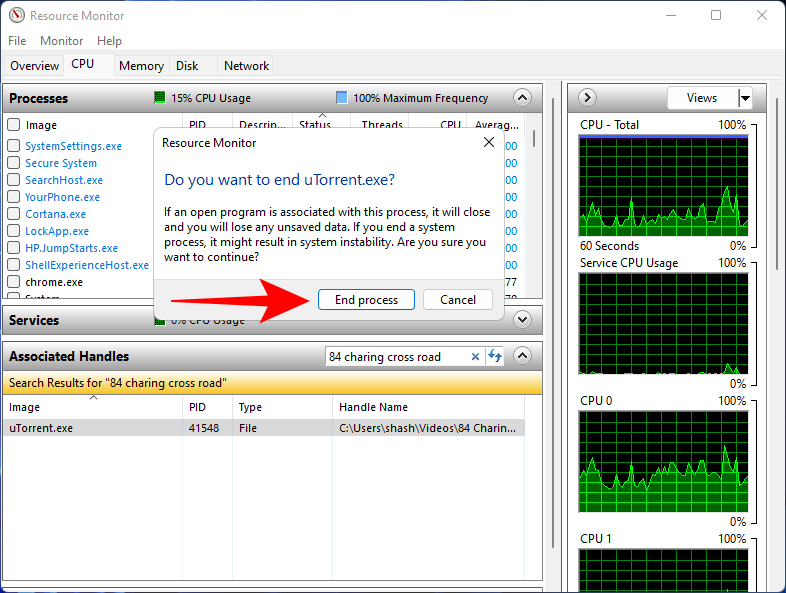
Enter the value as ‘0’.
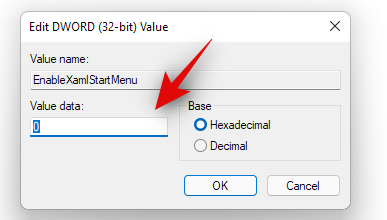
Restart your PC now.
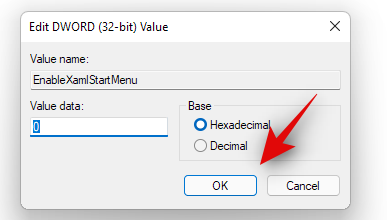
Once restarted try activating the Start menu now. If the Xaml process was facing conflicts, then they should be fixed now and the Start menu should be back up and running on your system again.
Fix #13: Restart Windows background services
If the Start menu still fails to launch then it’s time to restart all background Windows services. Usually restarting the ‘ShellExperienceHost.exe’ is enough but if that does not work for you, you can try restarting all the services listed below. This usually gets the Start menu back up and running on most systems.
Press Ctrl + Shift + Esc on your keyboard to open the ‘Task Manager’. Now click on ‘Details’ at the top to switch to the Details tab.
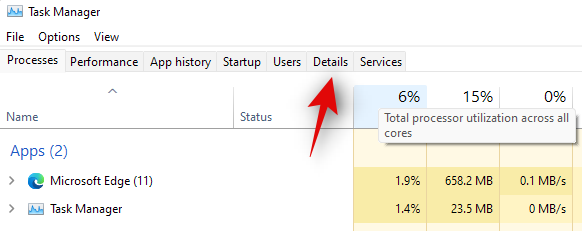
Find ‘StartMenuExperienceHost.exe’ in the list and click and select it.

Press Delete on your keyboard or click on ‘End Task’ in the bottom right corner. Click on ‘End Process’ again to confirm your choice.
ShellExperienceHost.exe will now be killed. The process should automatically restart within a few seconds. Once restarted, try activating the Start menu on your system. If the menu starts working then you are good to go. However, if it is still not working then use the guide above to restart the following services on your system as well.
And that’s it! If a background process was stopping you from accessing the Start menu then the issue should be fixed for you by now.
Fix #14: Run a Windows Troubleshooter
During a Windows 1909 feature update back in 2019, the Start menu was essentially broken due to a background conflict. To fix this issue for the masses, a troubleshooter was released by Microsoft to help fix this issue. If the Start menu is still not working for you then you can try running this troubleshooter on your system. Use the guide below to download and run the troubleshooter on your system.
Download the archive linked above to a convenient location on your local storage and extract its contents.
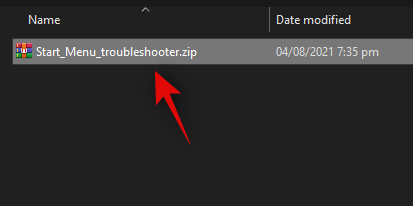
Now copy and paste the ‘startmenu.diagcab’ file on your desktop.

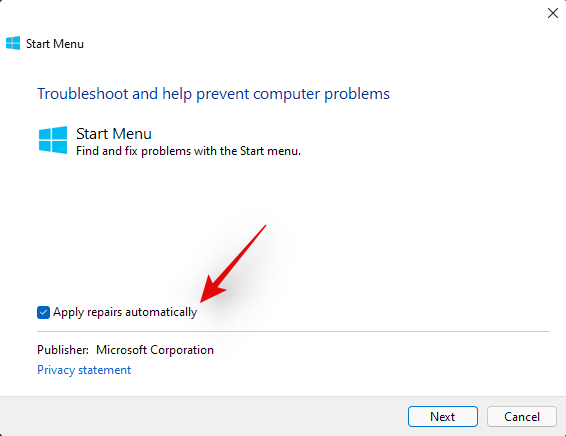
Double click and run the file from your desktop. Click on ‘Advanced’.
Check the box for ‘Apply repairs automatically’. Click on ‘Next’ once you are done.
The troubleshooter will now do its thing and try to fix the Start menu on your system. Any errors or issues found will be automatically fixed and the Start menu’s functionality should now be restored on your system.
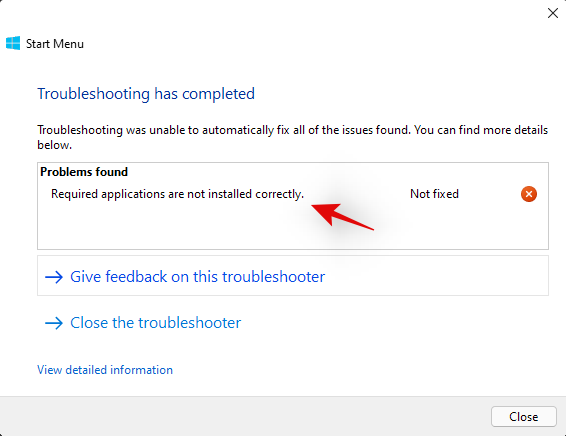
However, if the troubleshooter fails to fix the Start menu then this might indicate a more serious issue on your system. In such cases, let’s verify if Windows is actually able to access and initiate the process for the Start menu on your system. Use the checks below to help you along with the process.
We now need to check if the Start menu is actually available within your install of Windows 11. Let’s create a new local account that will help you verify its functionality. If the Start menu is working in the new account then it is likely an issue with your current user account.
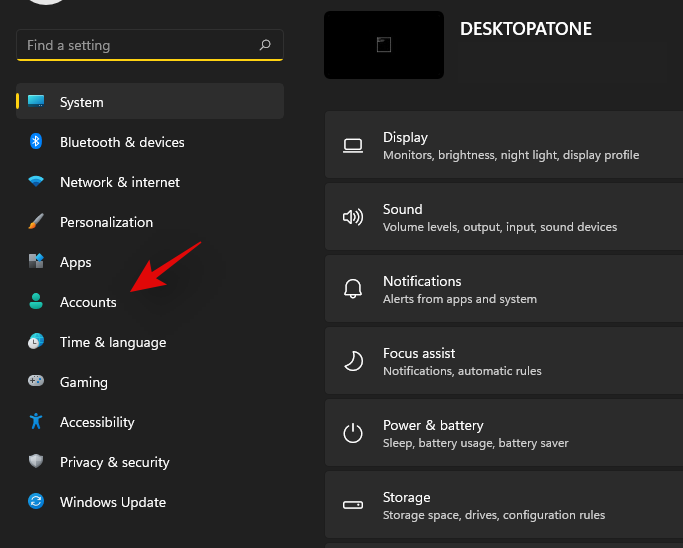
Press Windows + i on your keyboard and click on ‘Accounts’ on your left.
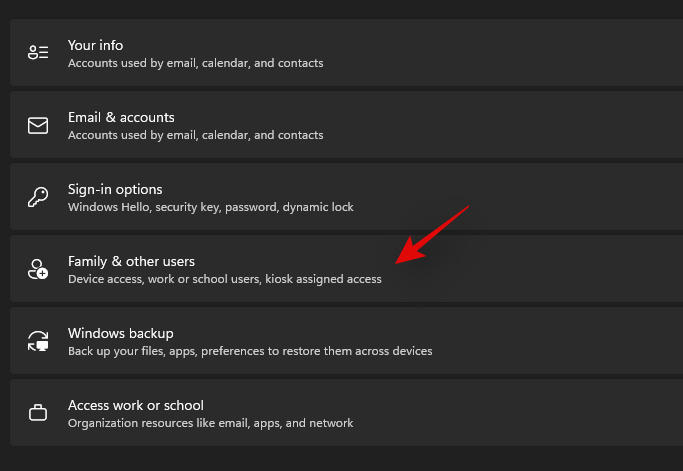
Click on ‘Family & other users’.
Now click on ‘Add account’ under other users.

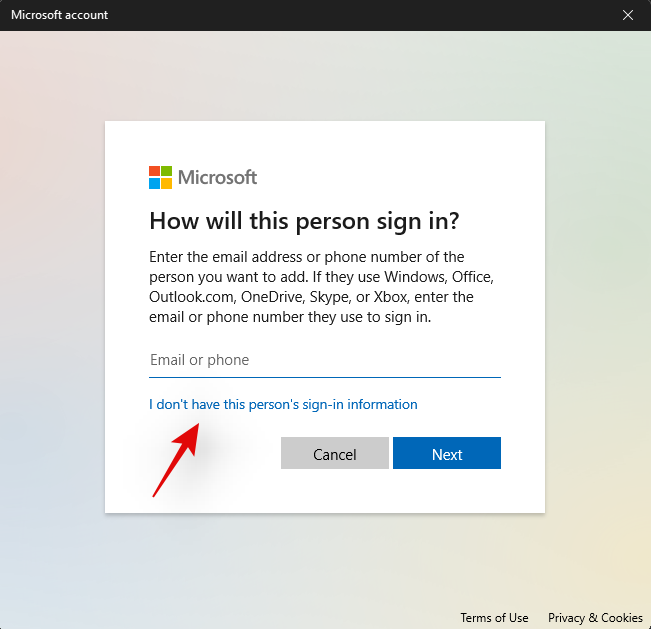
Click on ‘I don’t have this person’s sign-in information’.
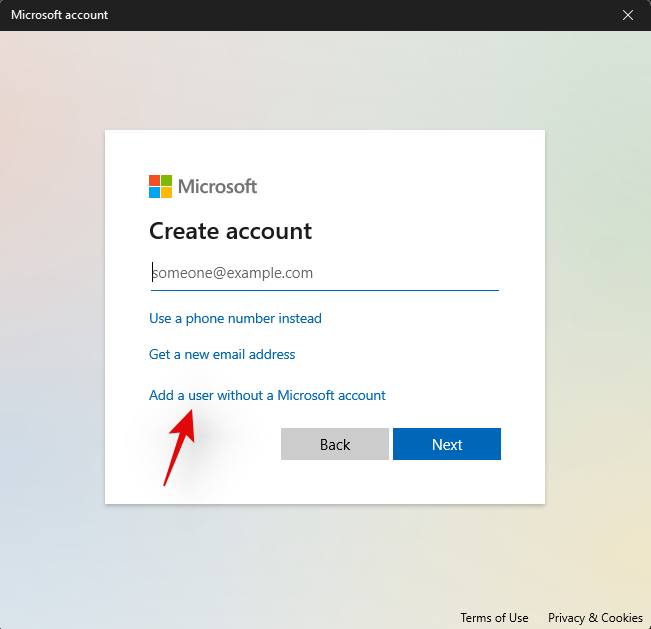
Click on ‘Add a user without a Microsoft Account’.
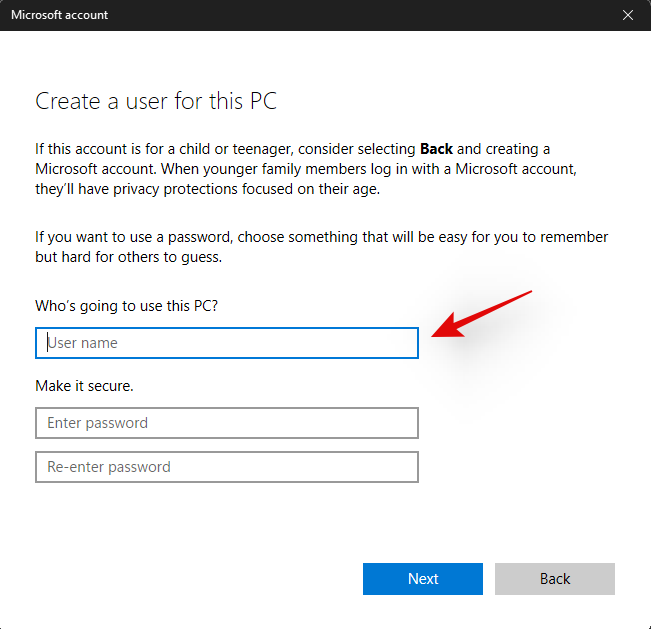
Now enter a username for the new account, and a password if needed.
Click on ‘Next’ once you are done.
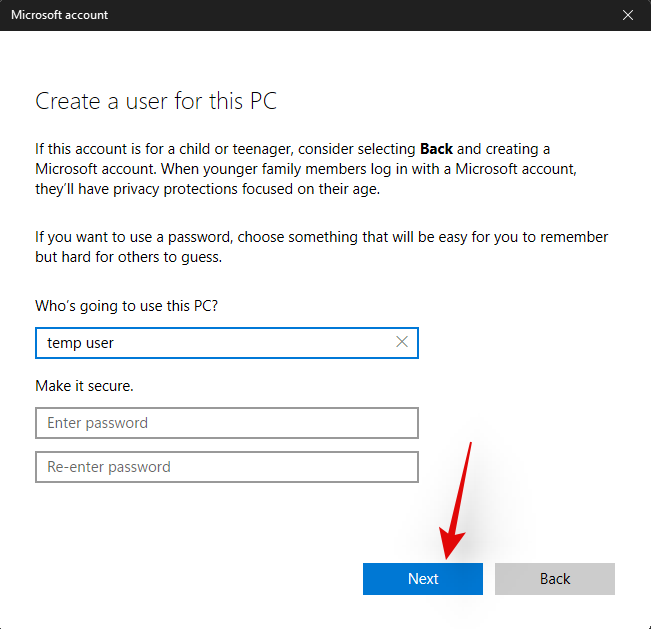
The new user account will now be created. Sign out of your current account and sign in to the new account.
Try to activate the Start menu now in the new temporary local account. If it is working then this is an issue specific to your user account. However, in case the Start menu fails to open, then this might indicate a more serious issue with your Windows 11 installation.
It’s now time to check if the Start menu is working in Safe mode. In case it is, then a third-party app is likely interfering with the Start menu’s functionality. You can remove any third-party apps used to modify the Start menu to try and fix this issue. Follow the guide below to activate Safe mode on Windows 11.
Press Windows + i on your keyboard and select ‘Windows Update’.
Now click on ‘Advanced options’.
Click and select ‘Recovery’.
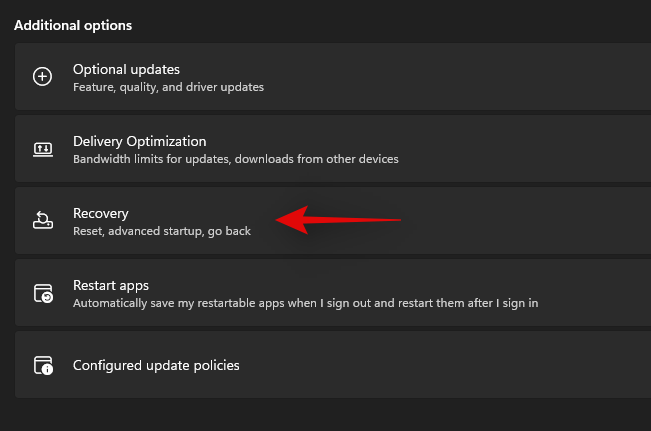
Now click on ‘Restart now’ beside ‘Advanced startup’.

Click on ‘Restart now’ again.
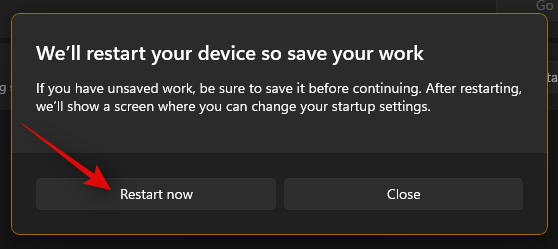
Your PC will now restart to the recovery screen. Click and select ‘Troubleshoot’.
Now click on ‘Advanced options’.
Click on ‘Startup Settings’.
Press ‘F4’ to start your PC in safe mode now.
Once your PC restarts, the safe mode should be active on your system. Now try to activate the start menu. If the menu activates, then it is likely that a third-party app is causing issues on your Windows 11 system. You can try removing apps used to customize the Start menu one by one to find the culprit on your system.
Fix #17: Run a malware and antivirus scan
We recommend you try and run a malware scan before opting for the last resort. If any malware or malicious service is causing issues with the Start menu, then a scan will help solve these issues. Use the guide below to run a malware scan through Windows Defender.
Press Windows + S on your keyboard and search for ‘Windows Security’. Click and launch the app once it shows up in your search results.

Click on ‘Virus & threat protection’.
Click on ‘Scan options’.
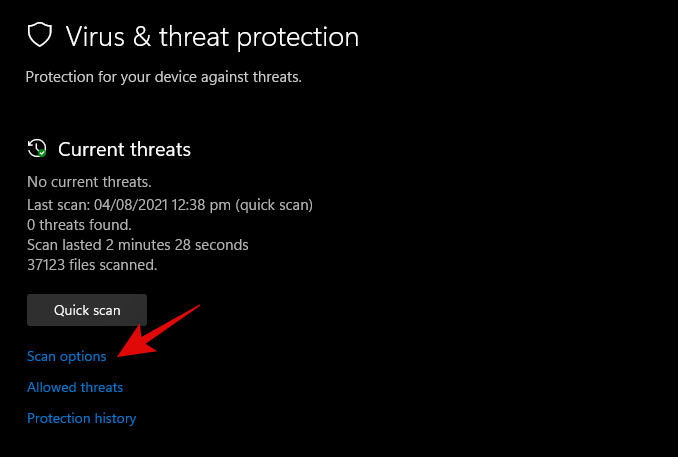
Select ‘Full Scan’.
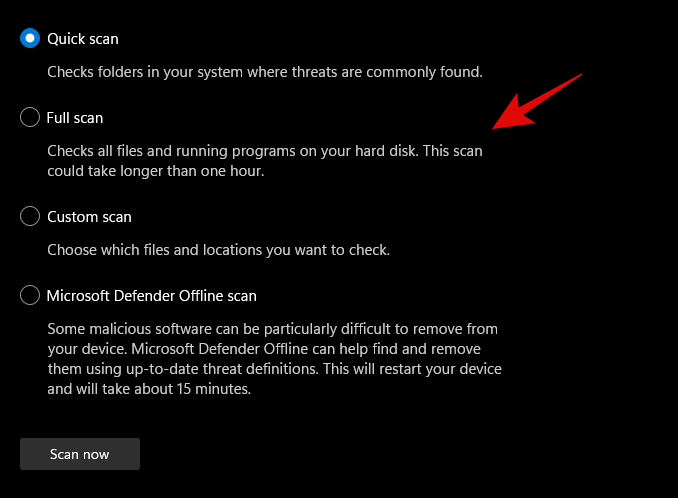
Finally, click on ‘Scan now’.
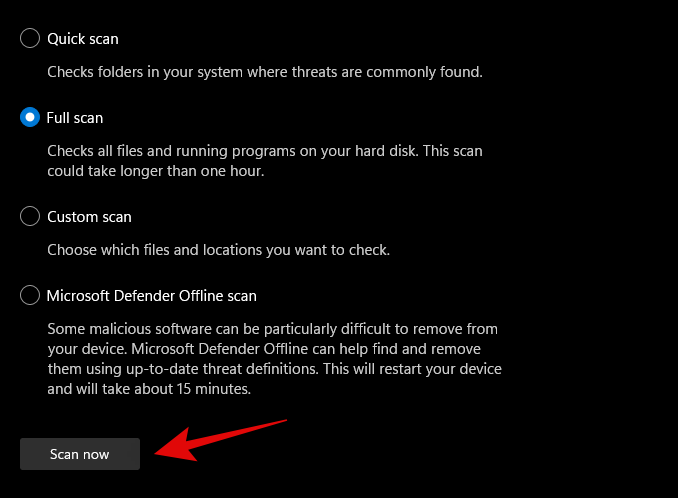
Windows Defender will now scan your entire PC for malware and malicious software. In case any are found, they will be automatically quarantined, and you will be prompted to take the necessary action as soon as possible.
3 General Fixes: Last Resort options
Fix #18: Create a new user via command prompt
If you’re facing an issue where you’re unable to add a local account via Settings to your PC then you can use the command prompt (CMD) for the same. Once added you can try and check if the Start menu is working for you. If it is, you can try the fixes below to restore it in your original account. However, if none of the fixes work for you then you can use the newly created account instead. The new account will be created with administrator privileges so you shouldn’t have problems moving your files and Settings. More on this below.
Press Windows + R to bring up the Run dialog box and type in the following. Press Ctrl + Shift + Enter on your keyboard once you are done.
cmd
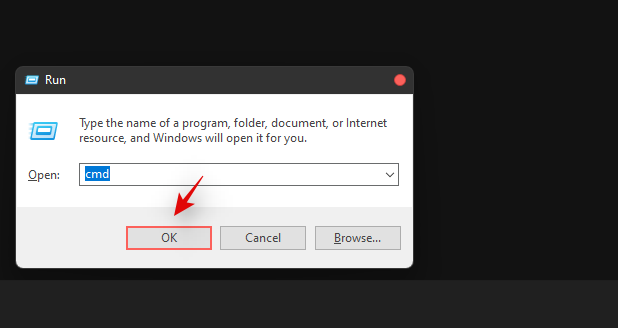
Type in the following command and press Enter on your keyboard. Replace ‘USER’ with your desired username for the new account. Similarly, replace ‘PASSWORD’ with your desired password.
net user /add USER PASSWORD
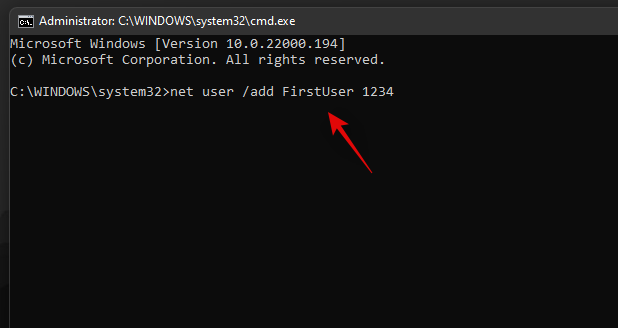
Now execute the following command as well and use the same username as above.
net localgroup administrators USER /add
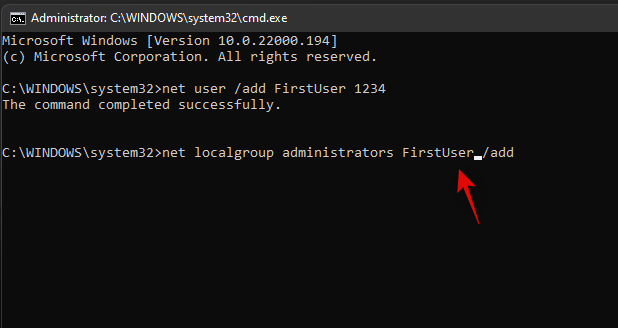
The user will now be added to your PC. Simply restart and log into the new account when the PC restarts.
The start menu should work alright now in the new user account. You can copy your files from the old user account to the new account.
To find your data in the old user account, open Windows Explorer and go to the User folder under the C Drive (or whichever drive you have installed Windows in).
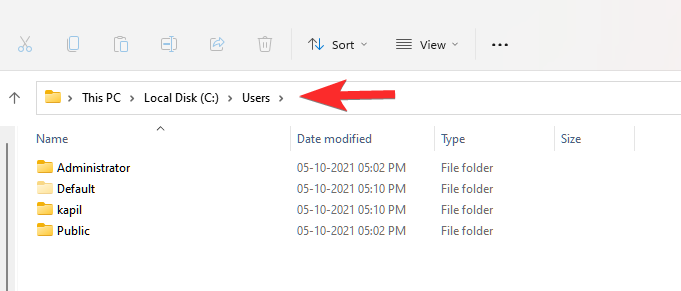
Click on the old user account. Now, copy all the files from here to your new user account that you can also find in the Users folder.
An easy method to transfer files from one user account (old one) to another user account (new one) is to copy the profile. Read more about it here.
Fix #19: Perform a Windows Reset
If you had zero luck with all of the previous methods, we think you should try a Windows Reset. It has been known to solve a host of problems in Windows 11 while keeping your personal files intact. Moreover, resetting Windows to its factory settings can give your PC a fresh start.
Here are the steps.
For this method, you’ll need an elevated PowerShell instance.
Press Win key + r to open the Run box, then type in ‘PowerShell and press Ctrl + Shift + Enter to open PowerShell as administrator.
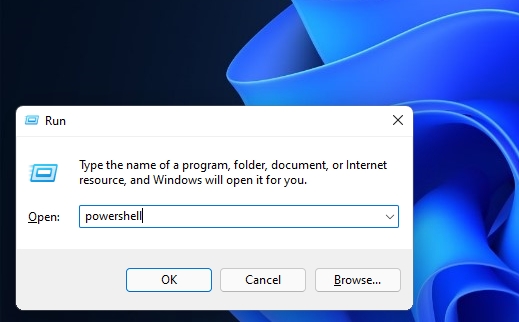
When opened correctly, you should already be inside the C:\Windows\system32 folder.
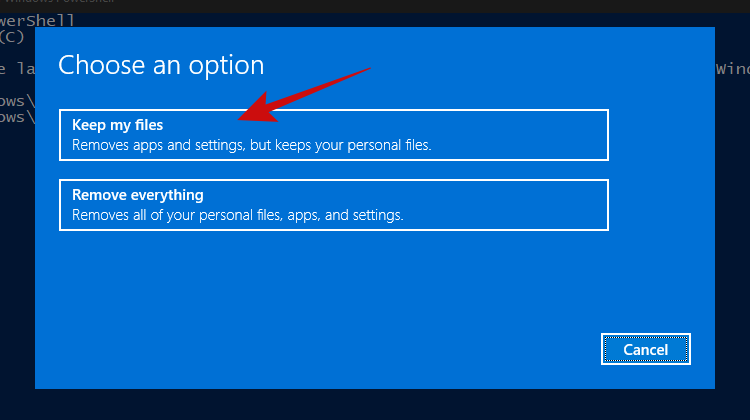
Now type in ‘system reset and press enter. You should be presented with two options, to either keep all your files or to remove everything. Click on ‘Keep my files’.
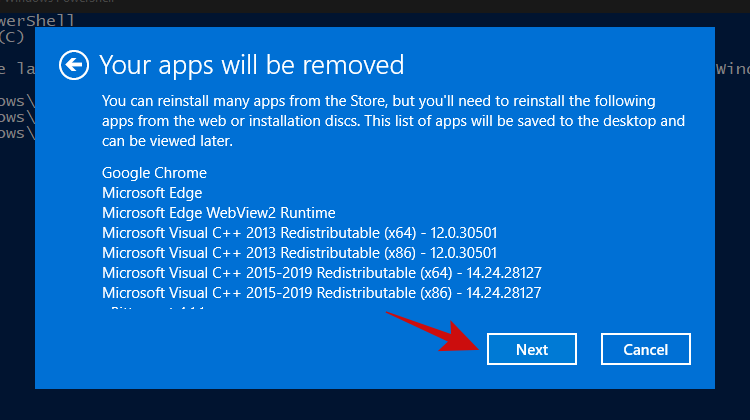
Within a few minutes, Windows should give you a list of apps that’ll be removed from your PC after the reset. Here’s how our list looks.
Once you’ve scrolled through the list of apps, simply click on the ‘Next’ button.
Windows should now start the reset process. Simply follow the instructions and your PC should be reset within a couple of minutes. The Start menu should be working now.
Fix #20: Re-install Windows from scratch
Well, if you’re really considering this method, it’s safe to assume that none of the other methods worked for you. At this point, we think it’s now time to go for a clean installation of Windows 11, which will probably wipe your current Windows partition (if you choose to).
Note: Before proceeding with this method, we recommend making a complete backup of all your files stored inside folders on the Windows drive, such as in Downloads, Documents, and the likes.
Once you have backed up all your files from the Windows drive, let’s take a look at the things you’ll need.
Next, follow our guide on downloading and installing the Windows 11 ISO.
Read: How to Download and Install Official Windows 11 ISO
We hope that after following this guide, you were able to fix the annoying and unresponsive Start menu in Windows 11 and bring it back to life.
If you find yourself stuck at any point in this guide, let us know in the comments below.
Related:
發現解決 Google Meet 麥克風問題的有效方法,包括音頻設置、驅動程序更新等技巧。
解決 Twitter 上「出錯了,重試」錯誤的最佳方法,提升用戶體驗。
如果 YouTube 檢測到來自我的計算機的異常流量,這可能意味著系統懷疑這是自動流量。了解解決方法!
Steam Deck 可能會遇到無法正常工作的問題,本文提供有效的解決方案以修復各種問題,讓您的 Steam Deck 恢復正常運行。
使用集成到 Windows 計算機中的不同方法仔細按照這些步驟修復 Microsoft Edge 始終出現在桌面上的問題。
嘿 Siri 不能在 Mac 上運行嗎?以下是一些快速解決方案,可用於對 Siri 進行故障排除並且不響應。使用這些技巧後,您不僅可以解決 Siri 問題,還可以解決其他與 Mac 相關的問題
由於 gpedit.msc 未找到錯誤,群組原則編輯器可能無法在您的電腦上執行。這是一個常見問題,且相對容易解決。
微軟在 Windows 11 上做了很多工作,使用了一系列新舊設計元素,讓其栩栩如生。本文提供修復方案,幫助用戶獲得新的文件資源管理器。
TikTok 是否無法在您首選的網頁瀏覽器中運作?以下是修復 TikTok 無法在瀏覽器中運行的方法。
您是否面臨計算機上的 Windows Shell 主機進程 CPU 使用率高的問題?閱讀博客以找到解決 Windows Shell 體驗主機進程高 CPU 使用率的解決方案。
Threads 應用程式在 Android 與 iPhone 上無法運行或不斷崩潰?讓我們來看看可以幫助解決此問題的 9 種方法。
您在 PC 上打開 Telegram 視頻時遇到錯誤?以下是如何修復無法在 PC 上播放的 Telegram 視頻的有效方法。
如果您無法在 YouTube 上直播,請生成一個新的流密鑰並確保您的編碼器已更新。然後重啟路由器和電腦。
無法在手機上撥打或接聽 Instagram 電話?以下是如何修復 Instagram 通話在 Android 上無法使用的問題。
如果您的瀏覽器不顯示任何 YouTube 評論,很可能是您的緩存和 cookie 破壞了 YouTube 腳本。在這裡了解修復的方法。
如果 Microsoft Teams 無法顯示圖像且僅顯示灰色或紫色矩形,這裡有幾個解決方案來修復此問題。
在過去的幾個月裡,Zoom 成為了視頻通話的必要工具。了解如何解決 Zoom 中的死機和黑屏問題。
了解並修復 Google Meet 的“永遠加載”問題,提升您的視頻會議體驗。
如果 Microsoft Outlook 拼字檢查在 Windows 10 或 11 電腦上不起作用,本文將提供有效解決方案給您。
了解如何快速解決您的 MacBook 無法從睡眠狀態喚醒的問題,提供 9 種有效的修復法。
Windows 11 安全中心服務缺失,讓您束手無策?我們提供經過驗證的分步修復方案,協助您安全地恢復本服務,輕鬆保護您的電腦安全。所有方法均已更新,確保最佳防護效果。
Windows 11 系統陷入令人抓狂的 BitLocker 復原金鑰循環?本文提供逐步教程,幫助您繞過無止盡的提示,恢復驅動器,重回正軌。無需任何技術知識——簡單有效的解決方案盡在其中。
還在為 Windows 11 系統下 VBS 和 HVCI 導致的遊戲卡頓而苦惱嗎?我們提供經過驗證的故障排除步驟,協助您優化效能、減少卡頓、提升幀率,且不影響安全性。輕鬆解決遊戲難題。
Windows 11 運作緩慢?了解「終極效能計畫」的逐步修復方案,提升您的電腦效能。
遇到 Windows 11 沙盒功能錯誤?我們提供經過驗證的逐步修復方案,讓您輕鬆打造流暢的隔離測試環境。無需任何技術專長!
Windows 11 內建麥克風聲音模糊不清?我們提供經過驗證的逐步修復方案,可協助您輕鬆恢復清晰的音訊品質。立即讓您的麥克風完美運作!
遇到 Windows 11 上的 Classic Shell 或 Start11 錯誤?本文提供逐步修復方案,解決當機、相容性問題等,協助您恢復自訂「開始」功能表的正常使用。已更新最新故障排除技巧。
遇到 Windows 11 系統下 Windows Hello PIN 碼重設錯誤?本文提供經過驗證的故障排除步驟,可快速解決此問題並重新安全地存取您的裝置。已更新至最新修復程式。
還在為 Windows 11 上的 PowerShell ISE 已棄用錯誤而苦惱嗎?本文提供經過驗證的解決方法,幫助您輕鬆解決此問題,恢復功能,並提升腳本編寫效率。內含詳細步驟指南。
遇到 Windows 11 藍牙低功耗裝置同步錯誤?了解經過驗證的故障排除步驟,以解決連線問題、更新驅動程式並恢復週邊裝置的無縫配對。

