ปิดการเล่นวิดีโออัตโนมัติใน Firefox และ Chrome

เรียนรู้วิธีปิดเสียงวิดีโอที่กวนใจใน Google Chrome และ Mozilla Firefox ด้วยบทแนะนำนี้.

แม้ว่าการแจ้งเตือนจะมีความจำเป็นในบางกรณี แต่บางครั้งการแจ้งเตือนก็กลายเป็นสิ่งที่ทำให้ไขว้เขว เช่นเดียวกับโทรศัพท์ของคุณ พีซียังสามารถรบกวนคุณด้วยการแจ้งเตือน นี่คือสาเหตุที่ Windows 11 มีฟีเจอร์ Focus Assist ซึ่งช่วยให้คุณหลีกเลี่ยงการแจ้งเตือนที่รบกวนสมาธิได้ เมื่อใช้ฟีเจอร์นี้ คุณจะทำงานได้อย่างมีสมาธิ แทนที่จะฟุ้งซ่านจากข้อความสุ่มและการแจ้งเตือน การแจ้งเตือนอาจเป็นอันตรายต่อประสิทธิภาพการทำงานของคุณ ดังนั้นจึงต้องระงับการแจ้งเตือนในเวลาที่เหมาะสม
เพียงไม่กี่คลิกก็สามารถซ่อนการแจ้งเตือน การแจ้งเตือน และข้อความทั้งหมดบนพีซีของคุณได้ หากคุณเพิ่งอัพเกรดระบบของคุณเป็น Windows 11 และไม่พบ UI ใหม่ บทความนี้จะช่วยคุณด้วยคำแนะนำที่ครอบคลุมเกี่ยวกับวิธีการใช้ Focus Assist บน Windows 11 เพื่อกำจัดการแจ้งเตือน
ที่เกี่ยวข้อง: วิธีถ่ายภาพหน้าจอบน Windows 11
สารบัญ
Focus Assist บน Windows 11 คืออะไร?
Focus Assist เป็นเพียงโหมดห้ามรบกวนสำหรับพีซีของคุณ เช่นเดียวกับโหมดที่คุณมีในโทรศัพท์ของคุณ เป็นคุณสมบัติที่มีประโยชน์ใน Windows 11 ซึ่งช่วยให้คุณกำจัดการแจ้งเตือน ข้อความ และการแจ้งเตือนที่ไม่จำเป็น ฟีเจอร์ช่วยโฟกัสช่วยให้คุณปรับแต่งรายการลำดับความสำคัญของคุณ แทนที่จะปิดกั้นพีซีของคุณจากการแจ้งเตือนทั้งหมด
ความฟุ้งซ่านอาจส่งผลเสียต่อผลผลิตของคุณ ดังนั้น ด้วยฟีเจอร์ Focus Assist คุณจึงสามารถซ่อนการแจ้งเตือน การแจ้งเตือน และข้อความทั้งหมดได้ในขณะที่คุณกำลังทำงานที่สำคัญ แทนที่จะเตือนคุณ พวกเขาจะตรงไปที่ศูนย์ปฏิบัติการ คุณสามารถดูการแจ้งเตือนที่ซ่อนอยู่ในศูนย์ปฏิบัติการตามเวลาของคุณเอง
ระบบช่วยโฟกัสทำงานอย่างไรบน Windows 11
Focus Assist มอบความยืดหยุ่นในการเลือกเวลาที่จะบล็อกสิ่งรบกวนสมาธิ เช่น ข้อความ การแจ้งเตือน และการเตือน คุณสามารถเปิดใช้ Focus Assist ได้ทุกเมื่อ หรือคุณสามารถกำหนดเวลาช่วงเวลาในการตั้งค่าซึ่งจะเปิดระบบช่วยโฟกัสโดยอัตโนมัติ
คุณสมบัติช่วยโฟกัสช่วยให้คุณสร้างรายการลำดับความสำคัญเพื่อให้แน่ใจว่าคุณจะไม่พลาดการแจ้งเตือนใด ๆ จากบุคคลที่สำคัญที่สุดในผู้ติดต่อของคุณ คนที่อยู่ในรายการลำดับความสำคัญของคุณสามารถติดต่อคุณได้เสมอ แม้ว่าคุณจะมีงานสำคัญบางอย่างก็ตาม ในกรณีที่คุณต้องการสมาธิอย่างเต็มที่ในขณะทำงาน คุณยังสามารถเลือกที่จะบล็อกการแจ้งเตือนทั้งหมดได้ ในการดูการแจ้งเตือนที่ถูกบล็อกทั้งหมดที่คุณได้รับในขณะที่คุณอยู่ในที่ทำงาน ให้เปิดศูนย์ปฏิบัติการของระบบของคุณ
ที่เกี่ยวข้อง: วิธีหยุดป๊อปอัปใน Windows 11
วิธีเปิดใช้งานระบบช่วยโฟกัส
Focus Assist ถูกปิดโดยค่าเริ่มต้น แต่ถ้าคุณต้องการเปิดใช้งานเพื่อหยุดรับการแจ้งเตือน ให้ทำตามขั้นตอนด้านล่าง
วิธีที่ #1: การใช้ Settings
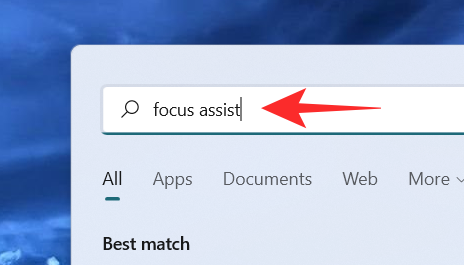
คลิกที่ ไอคอนค้นหา ซึ่งดูเหมือนแว่นขยายบนแถบงาน

พิมพ์focus Assistในแถบค้นหา
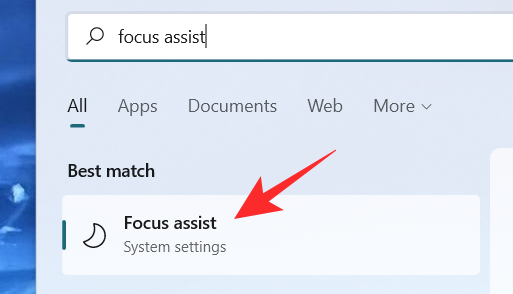
คลิกที่การ ตั้งค่าระบบFocus Assist
หน้าต่างการตั้งค่าระบบ Focus Assist จะปรากฏขึ้นบนหน้าจอ ภายใต้ Focus Assistให้เลือกหนึ่งในตัวเลือกเหล่านี้:
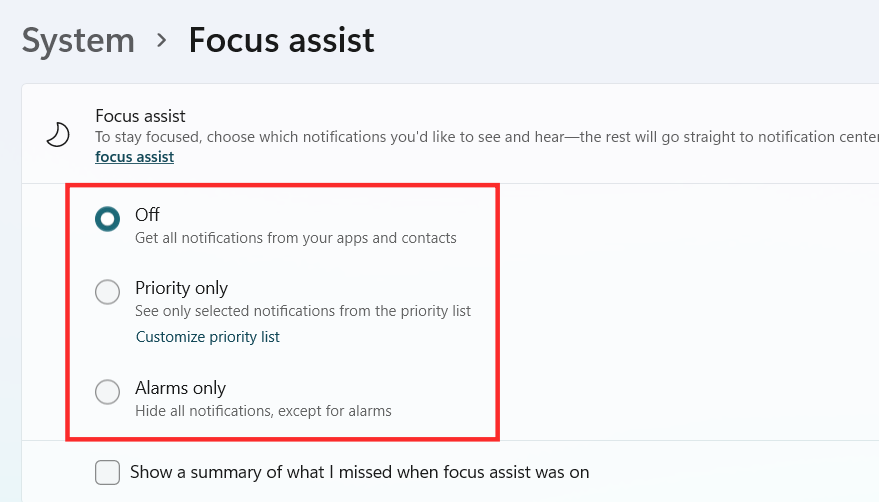
ควรเปิดใช้งาน Focus Assist ภายใน Windows 11 ขึ้นอยู่กับตัวเลือกที่คุณเลือก
วิธีที่ #2: การใช้ศูนย์ปฏิบัติการ
คลิกที่ Action Center ซึ่งแสดงไอคอนของ Wifi, ระดับเสียง และแบตเตอรี่พร้อมกัน

ใต้ไอคอน Bluetooth คุณจะเห็น ไอคอนFocus Assistซึ่งดูเหมือนพระจันทร์เสี้ยว
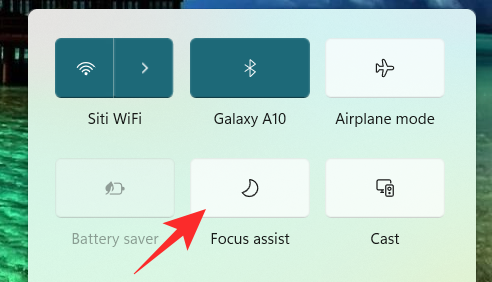
ตามค่าเริ่มต้น คุณลักษณะ Focus Assist จะถูกปิดใช้งาน คลิกที่มันและคุณสมบัติจะถูกตั้งค่าเป็น ลำดับความสำคัญเท่านั้นโดยตรง
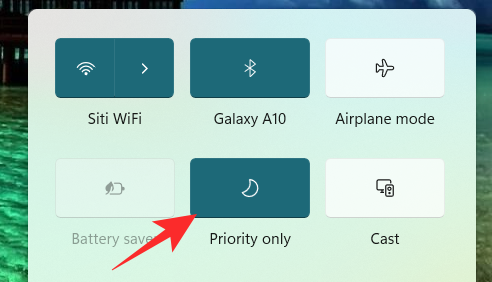
คลิกที่ภาพอีกครั้งเพื่อตั้งช่วยโฟกัสคุณสมบัติในการ เตือนภัยเท่านั้น
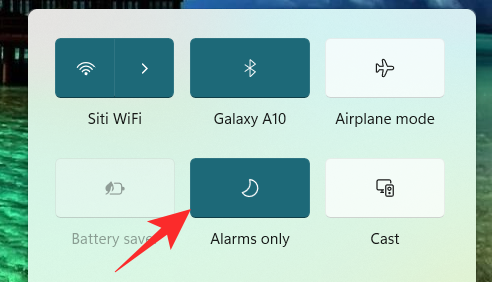
หากต้องการปิดใช้งานคุณสมบัติ Focus Assist ให้คลิกอีกครั้ง
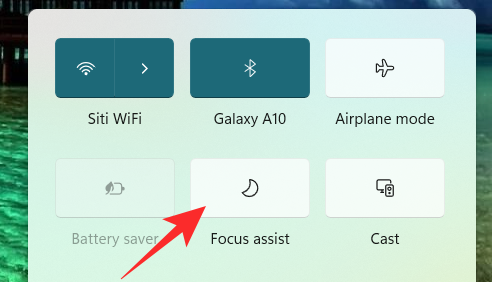
เพียงคลิกที่ไอคอน Focus Assist บน Action Center คุณสามารถเปลี่ยนฟังก์ชันเป็นปิด เฉพาะลำดับความสำคัญ และเฉพาะการเตือนเท่านั้น อย่างไรก็ตามเพื่อให้การเปลี่ยนแปลงอื่น ๆ ที่จำเป็นในการตั้งค่าช่วยโฟกัสจากศูนย์ปฏิบัติการคลิกขวาบน ช่วยโฟกัส ไอคอนในศูนย์ปฏิบัติการและคลิก ไปที่ตั้งค่า
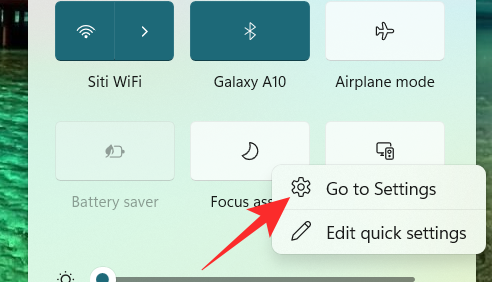
การดำเนินการนี้จะนำคุณไปยังแอปการตั้งค่า ซึ่งคุณสามารถทำการเปลี่ยนแปลงทั้งหมดที่ต้องการได้อย่างง่ายดาย และนั่นแหล่ะ! ขณะนี้ควรเปิดใช้งานการช่วยโฟกัสภายใน Windows 11 โดยตรงจากศูนย์ปฏิบัติการ
วิธีที่ #3: การใช้ตัวแก้ไขนโยบายกลุ่ม
คุณยังสามารถเปิดใช้งานโหมดช่วยโฟกัสได้โดยใช้ตัวแก้ไขนโยบายกลุ่มในกรณีที่คุณเป็นผู้ดูแลระบบ ใช้คำแนะนำด้านล่างเพื่อช่วยคุณในกระบวนการ
กดWindows + Rบนแป้นพิมพ์ของคุณและพิมพ์ข้อมูลต่อไปนี้ในกล่องโต้ตอบ Run กด Enter บนแป้นพิมพ์เพื่อเปิด Group Policy Editor
gpedit.msc
นำทางไปยังโหนดต่อไปนี้ที่กล่าวถึงด้านล่าง
User configuration > Administrative Templates > Start Menu and Taskbar > Notifications
ค้นหาและดับเบิลคลิกที่ค่า 'ปิดชั่วโมงเงียบ' ทางด้านขวาของคุณ
ตอนนี้ให้เลือกตัวเลือกใดตัวเลือกหนึ่งต่อไปนี้ขึ้นอยู่กับความต้องการในปัจจุบันของคุณที่มุมบนซ้ายของหน้าต่างคุณสมบัติ
และนั่นแหล่ะ! ตัวช่วยโฟกัสจะถูกเปิดใช้งานหรือปิดใช้งานจากตัวแก้ไขนโยบายกลุ่ม ขึ้นอยู่กับค่ากำหนดของคุณ ขออภัย คุณไม่สามารถปรับแต่งการทำงานของ Focus Assist ในฐานะผู้ดูแลระบบได้ ความสามารถนั้นยังคงอยู่กับผู้ใช้ คุณสามารถเปิดหรือปิดใช้งานความสามารถในการใช้ Focus Assist สำหรับระบบโดยใช้ตัวแก้ไขนโยบายกลุ่มเท่านั้น
วิธีใช้ตัวช่วยโฟกัส
ตัวช่วยโฟกัสมีการตั้งค่าและตัวเลือกการปรับแต่งต่างๆ ที่สามารถช่วยคุณเปลี่ยนลักษณะการทำงานตามความต้องการในปัจจุบันของคุณ ใช้หนึ่งในคำแนะนำด้านล่างที่เหมาะสมกับความต้องการในปัจจุบันของคุณมากที่สุด
วิธีที่ #1: เปิดใช้งานโหมดนาฬิกาปลุกเท่านั้น
โหมด Alarms only บนหน้าต่าง Focus Assist ให้คุณซ่อนการแจ้งเตือนทั้งหมดยกเว้นการเตือน ทำตามขั้นตอนที่กล่าวถึงด้านล่างเพื่อเปิดใช้งานโหมด Alarms only
คลิกที่ ไอคอนค้นหา บนแถบงาน

ชนิด ตัว ช่วยโฟกัส

คลิกที่ ช่วยโฟกัส

ภายใต้ Focus Assist ให้คลิกที่ Alarms Only เพื่อหยุดรับการแจ้งเตือน ยกเว้นการเตือน
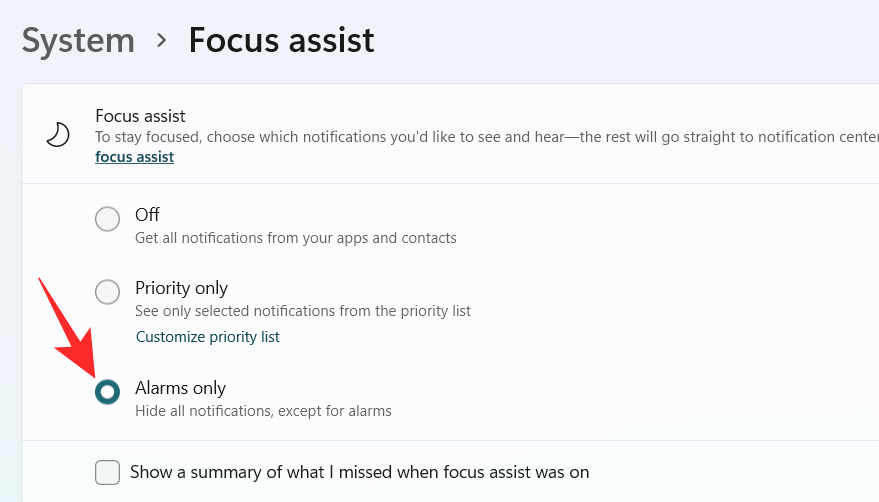
และนั่นแหล่ะ! ตอนนี้คุณจะได้รับแจ้งเฉพาะการเตือนในระบบของคุณเท่านั้น การแจ้งเตือนอื่นๆ ทั้งหมดโดยไม่คำนึงถึงลำดับความสำคัญ จะถูกปิดเสียงใน Windows 11
วิธีที่ #2: เปิดใช้งานลำดับความสำคัญเฉพาะกับรายการที่กำหนดเอง
คน หน้าต่างจะปรากฏบนหน้าจอ เลือกคนที่คุณต้องการโดยพิมพ์ชื่อของพวกเขาบนแถบค้นหา
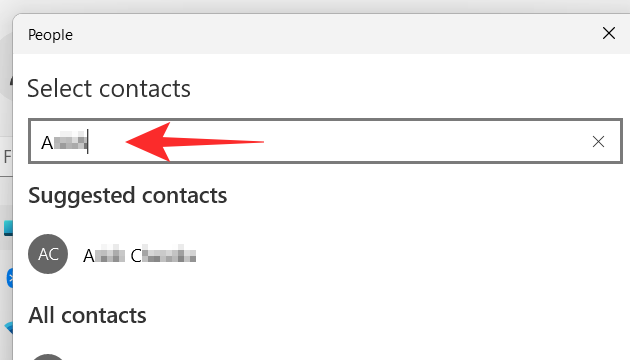
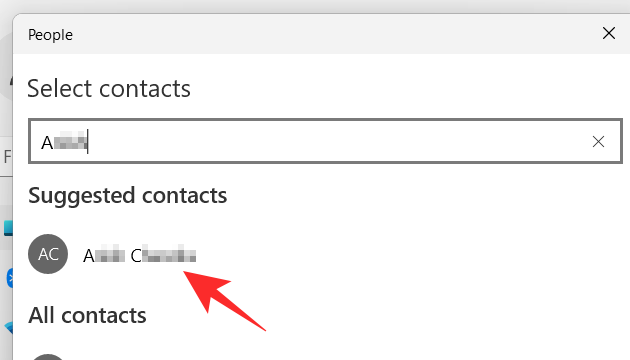
คลิกที่ชื่อของบุคคล
คลิกที่ ปุ่มติ๊กที่มุมล่างขวาของหน้าต่าง People
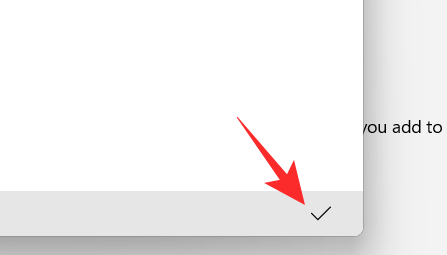
สร้างรายการลำดับความสำคัญของคุณแล้ว ตอนนี้ถ้าคุณต้องการที่จะลบรายชื่อออกจากรายการสำคัญของคุณให้คลิกที่ติดต่อภายใต้ คน
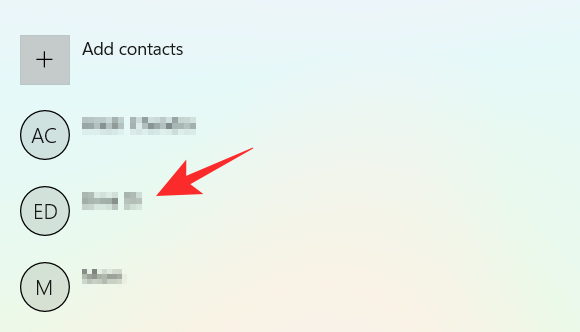
คลิกที่ Remove
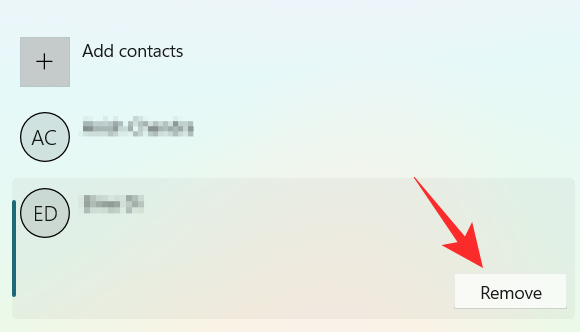
ตอนนี้ ใน ส่วนแอพ คุณสามารถเลือกแอพที่สามารถทำลายช่วงเวลาเงียบ ๆ ของคุณได้ ในการอนุญาตให้ปพลิเคชันที่จะแสดงการแจ้งเตือนให้คลิกที่ เพิ่มแอป ปุ่ม
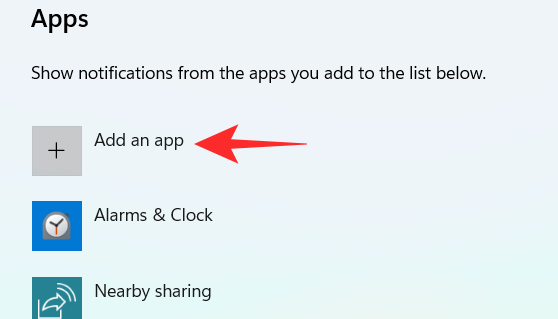
รายการแอพจะปรากฏขึ้นบนหน้าจอของคุณ คลิกแอปที่คุณต้องการเพิ่มในรายการลำดับความสำคัญ
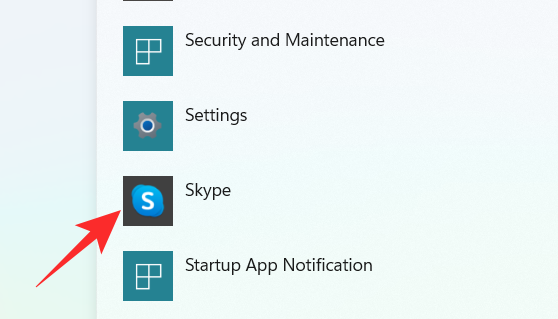
ดำเนินการตามขั้นตอนนี้ต่อไปจนกว่าคุณจะเลือกแอปเสร็จ ในกรณีที่คุณต้องการลบแอพออกจากรายการลำดับความสำคัญ คุณสามารถคลิกที่แอพภายใต้ ส่วนแอพ
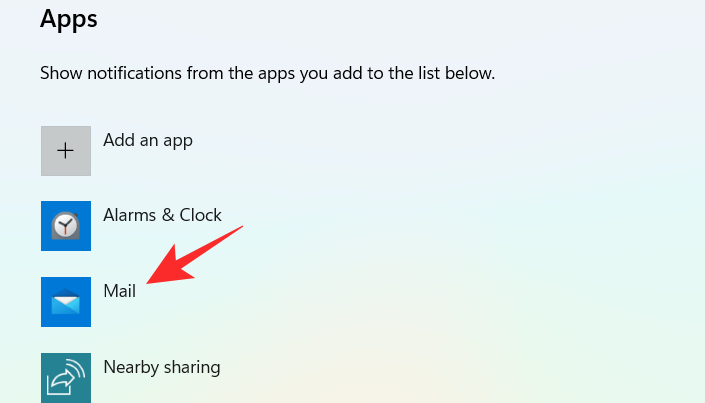
คลิกที่ Remove
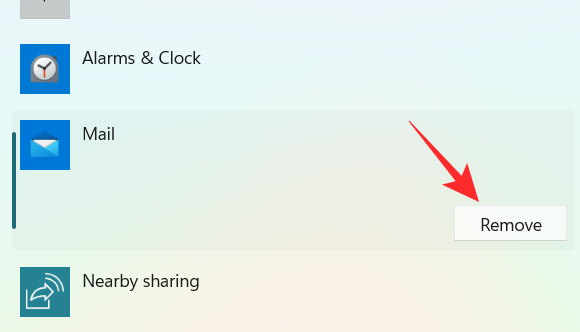
และนั่นคือวิธีที่คุณสามารถปรับแต่งรายการลำดับความสำคัญใน Focus Assist และใช้เพื่อประโยชน์ของคุณเพื่อรับการแจ้งเตือนจากผู้ติดต่อที่สำคัญเท่านั้น
วิธี #3: เปิดใช้งานสรุปการแจ้งเตือนเมื่อปิดใช้งานตัวช่วยโฟกัส
คลิกที่ ไอคอนค้นหา บนแถบงาน

ชนิด ตัว ช่วยโฟกัส

คลิกที่ ช่วยโฟกัส

คลิกที่ตัวเลือกที่คุณต้องการ ลำดับความสำคัญเฉพาะ หรือ สัญญาณเตือนภัยเท่านั้น
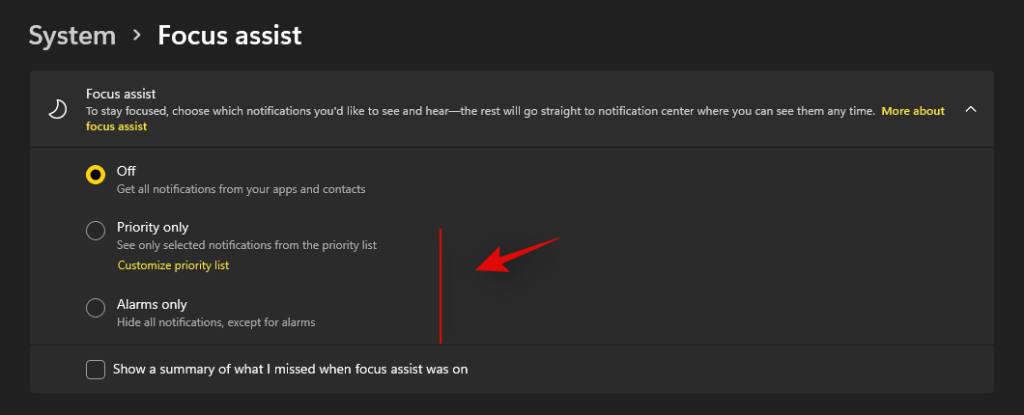
ทำเครื่องหมายในช่อง แสดงบทสรุปของสิ่งที่ฉันพลาดเมื่อช่วยโฟกัสอยู่บน
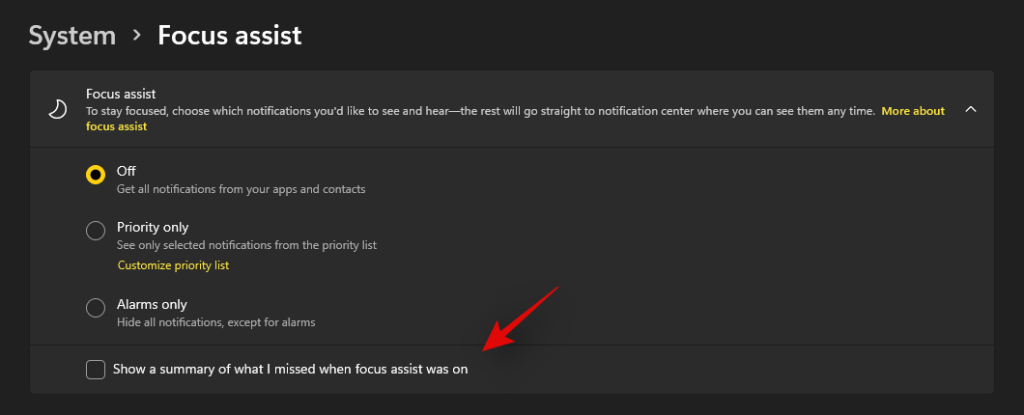
วิธีที่ #4: เปิดหรือปิดใช้งานกฎการช่วยโฟกัสอัตโนมัติ
กฎอัตโนมัติในตัวช่วยโฟกัสช่วยให้คุณกำหนดเงื่อนไขที่สามารถเปิดใช้งานตัวช่วยโฟกัสได้โดยอัตโนมัติ มีกฎอัตโนมัติสี่ข้อที่แตกต่างกันในหน้าต่างการตั้งค่า Focus Assist ที่สามารถปรับแต่งได้ ตรวจสอบขั้นตอนที่กล่าวถึงด้านล่างเพื่อปรับแต่งกฎอัตโนมัติใน Focus Assist
คลิกที่ ไอคอนค้นหา บนแถบงาน

ชนิด ตัว ช่วยโฟกัส

คลิกที่ ช่วยโฟกัส

ภายใต้ ส่วนกฎอัตโนมัติ มีสี่ส่วน เปิดสวิตช์สลับสำหรับตัวเลือกที่คุณต้องการเลือก
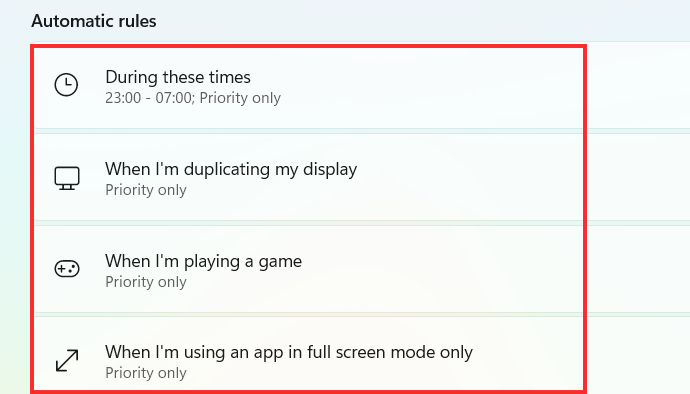
ตอนนี้ มาดูวิธีปรับแต่งตัวเลือกที่กล่าวถึงข้างต้นภายใต้กฎอัตโนมัติกัน
1. ในช่วงเวลาเหล่านี้
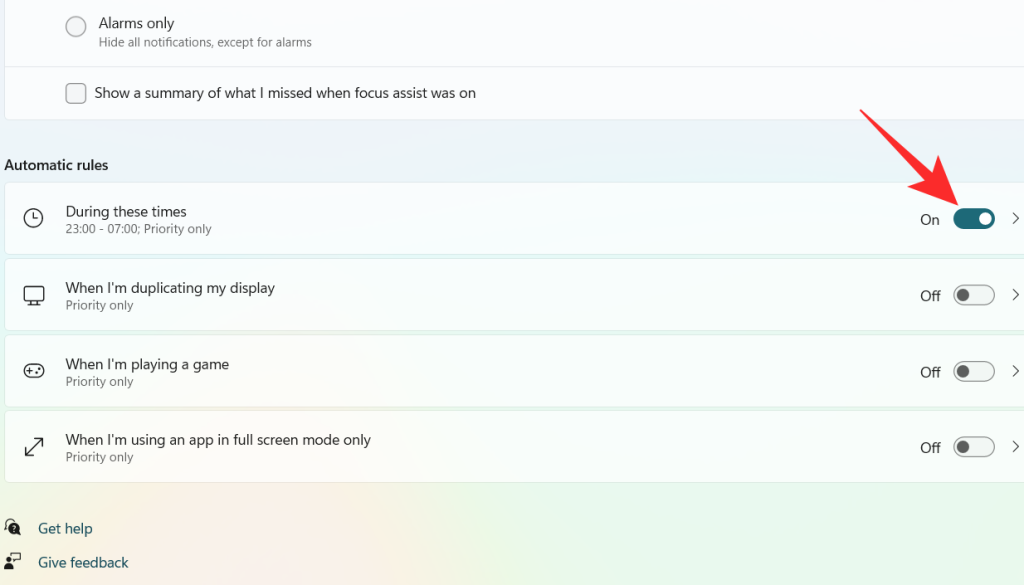
เปิดสวิตช์สลับซึ่งอยู่ทางขวาสุดของ แท็บในช่วงเวลาเหล่านี้
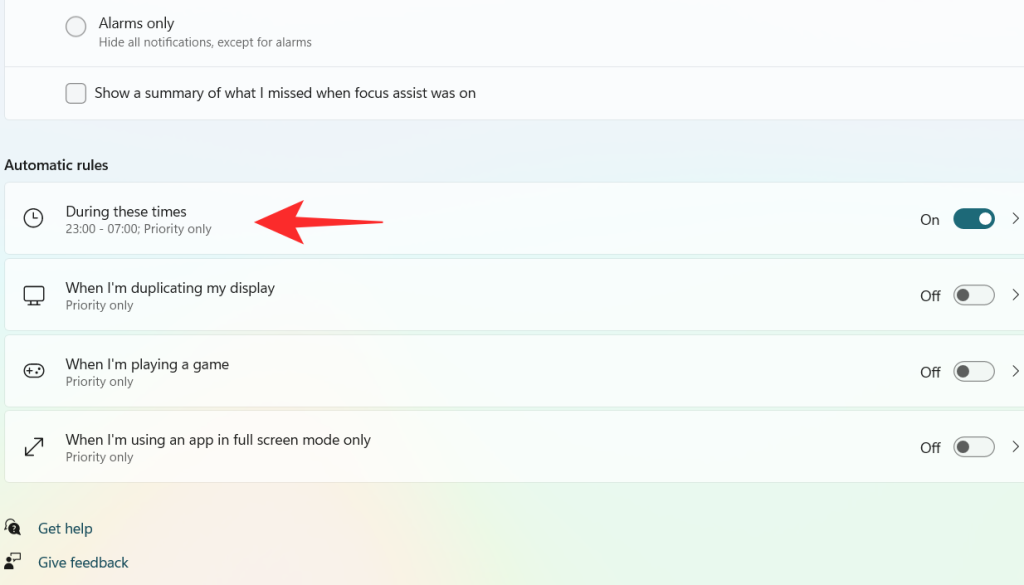
คลิกที่ แท็บในช่วงเวลาเหล่านี้
คลิกที่กล่องภายใต้ เวลาเริ่มต้น
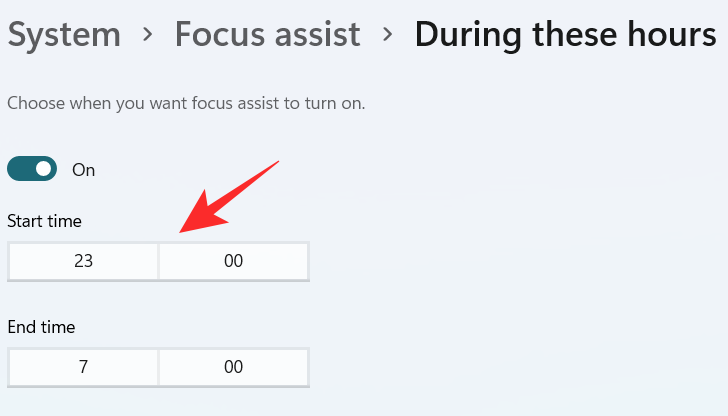
เลือกเวลาที่คุณต้องการให้ Focus Assist เปิด และคลิกเครื่องหมายถูกที่ด้านล่างของเมนูดรอปดาวน์
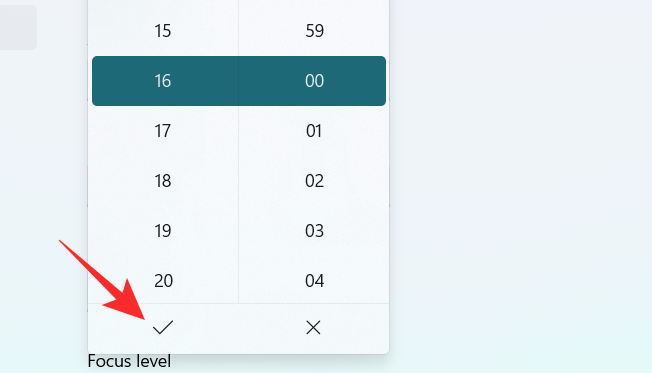
คลิกที่กล่องภายใต้ เวลาสิ้นสุด
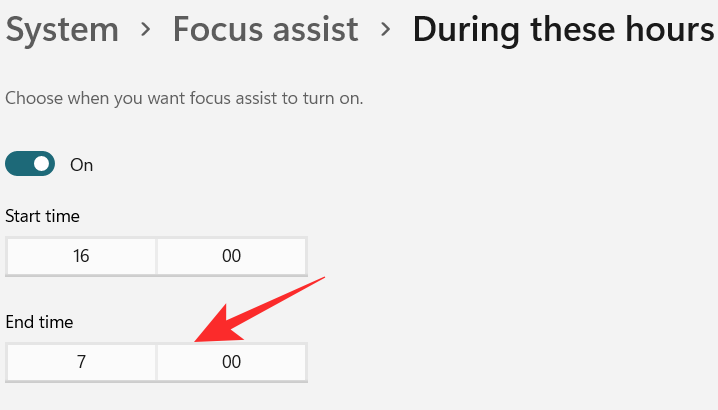
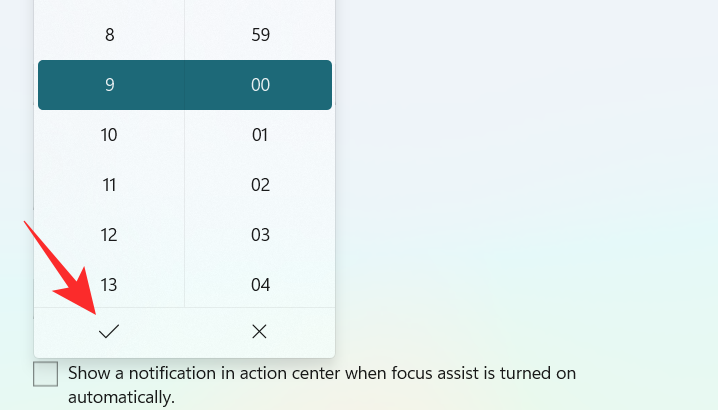
เลือกเวลาที่คุณต้องการปิด Focus Assist แล้วคลิกเครื่องหมายที่ด้านล่างของเมนูดรอปดาวน์
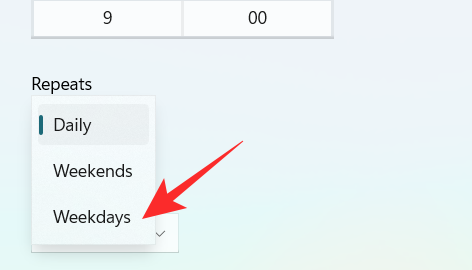
คลิกที่กล่องภายใต้ ซ้ำ
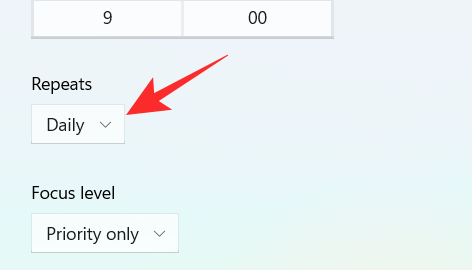
เมนูแบบเลื่อนลงขนาดเล็กจะปรากฏขึ้น กำหนดตารางเวลาในการ วัน, วันหยุดสุดสัปดาห์ หรือ วันธรรมดา
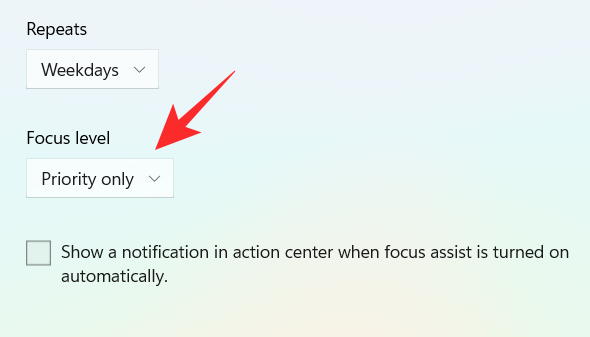
คลิกที่กล่องภายใต้ ระดับโฟกัส
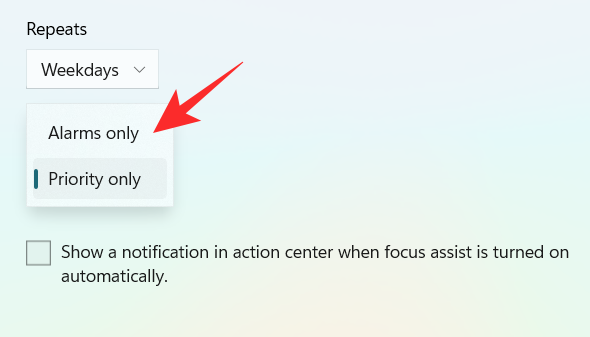
เมนูแบบเลื่อนลงขนาดเล็กจะปรากฏขึ้น เลือกระหว่าง ปลุกเท่านั้น หรือ ลำดับความสำคัญเท่านั้น
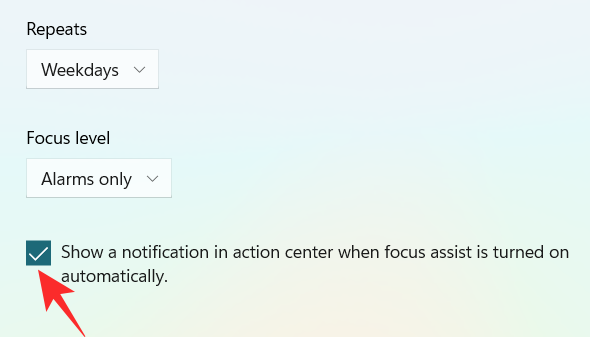
สุดท้าย หากต้องการรับการแจ้งเตือนเมื่อเปิดใช้ระบบช่วยโฟกัส ให้ทำเครื่องหมายในช่อง " แสดงการแจ้งเตือนในศูนย์ปฏิบัติการเมื่อเปิดใช้ระบบช่วยโฟกัสโดยอัตโนมัติ "
2. เมื่อฉันทำซ้ำจอแสดงผลของฉัน
เปิดสวิตช์สลับ ซึ่งอยู่ทางขวาสุด ของ แท็บเมื่อฉันทำซ้ำการแสดงผลของฉัน
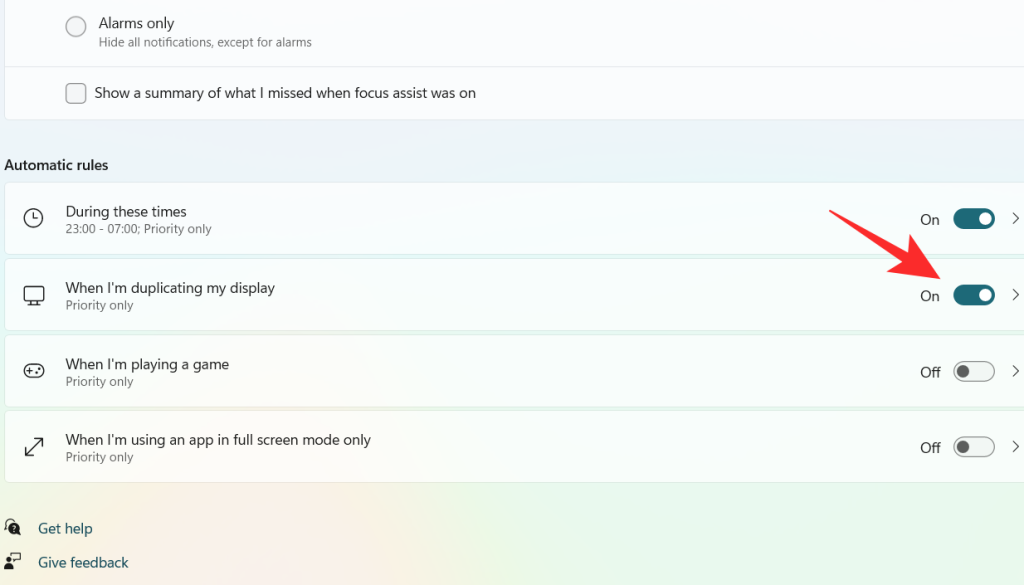
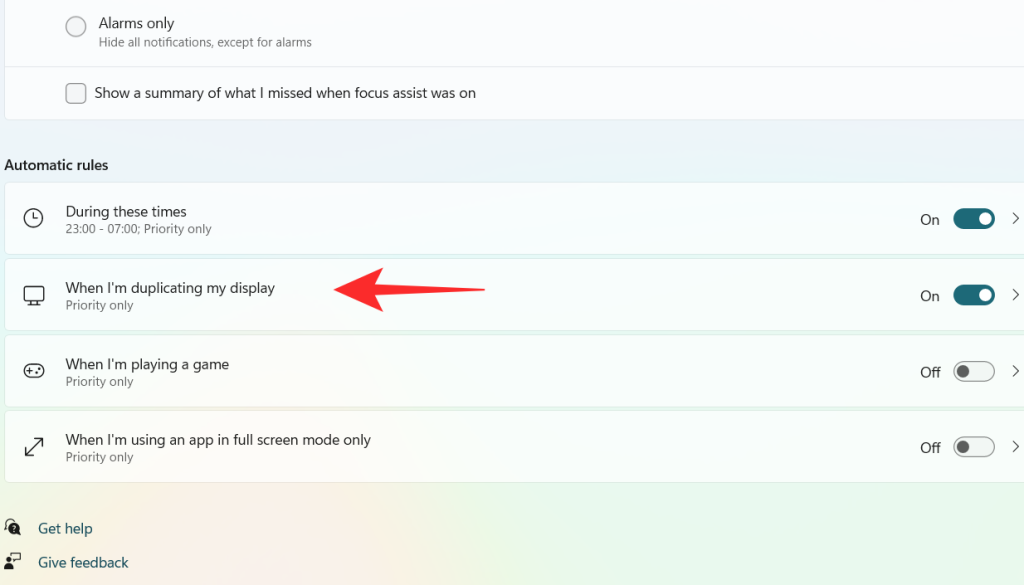
คลิกที่ แท็บเมื่อฉันทำซ้ำการแสดงผลของฉัน
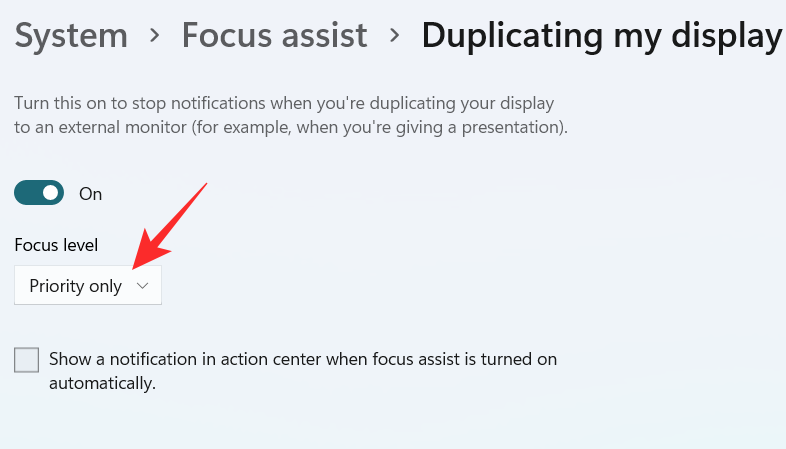
คลิกที่กล่องภายใต้ ระดับโฟกัส
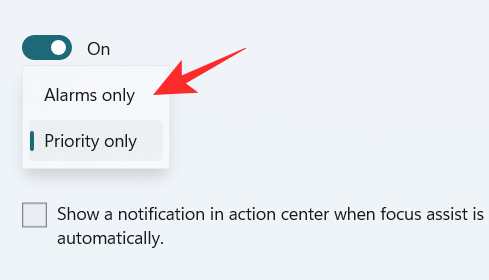
A dropdown menu appears, click on your desired option between Priority only and Alarms only.
To get a notification when the Focus assist is turned on, check the box “Show a notification in action center when Focus assist is turned on automatically“
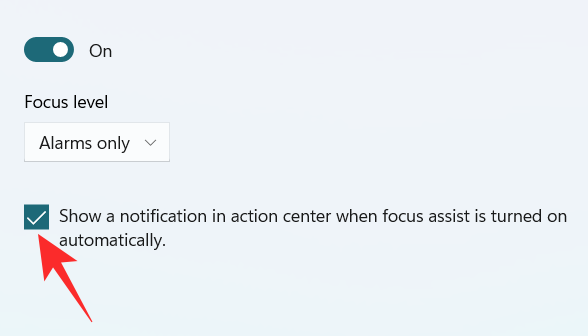
3. When I’m playing a game
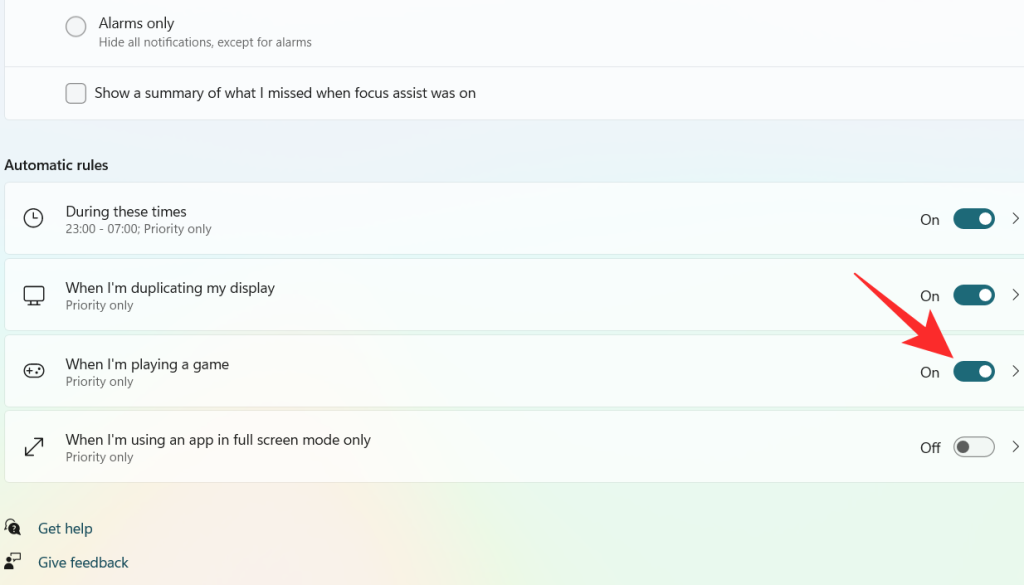
Turn on the toggle switch, which is extreme right to the When I’m playing a game tab.
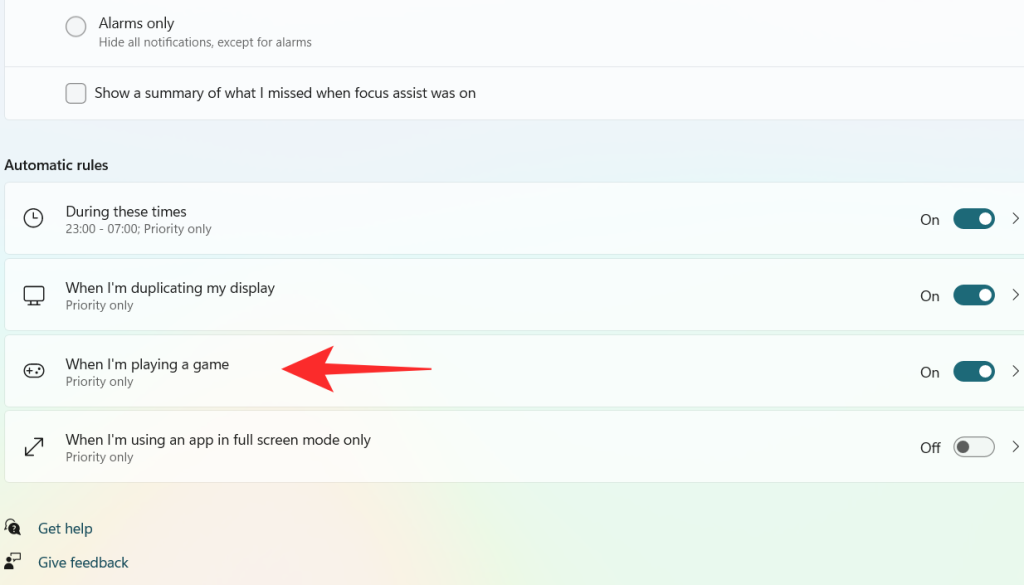
Click on the When I’m playing a game tab
Click on the box under Focus Level.
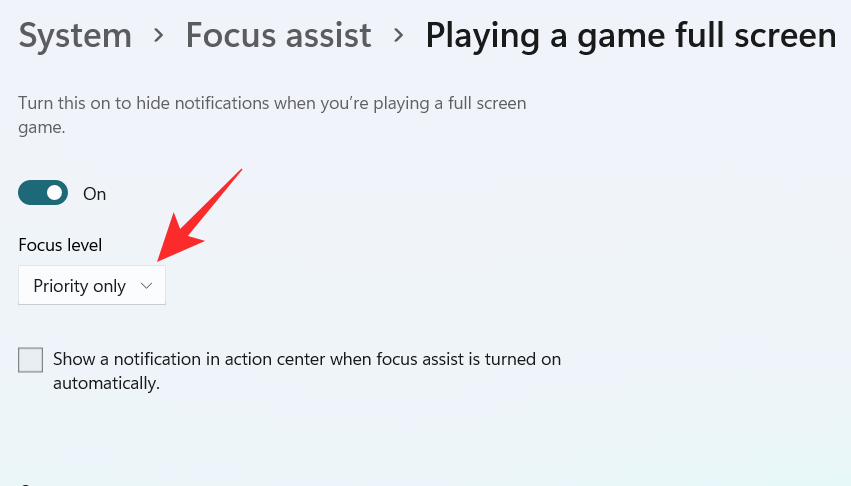
A dropdown menu appears, click on your desired option between Priority only and Alarms only.

To get a notification when the Focus assist is turned on, check the box “Show a notification in action center when Focus assist is turned on automatically“

4. When I’m using an app in full-screen mode only
Turn on the toggle switch, which is extreme right to the When I’m using an app in full-screen mode only tab.
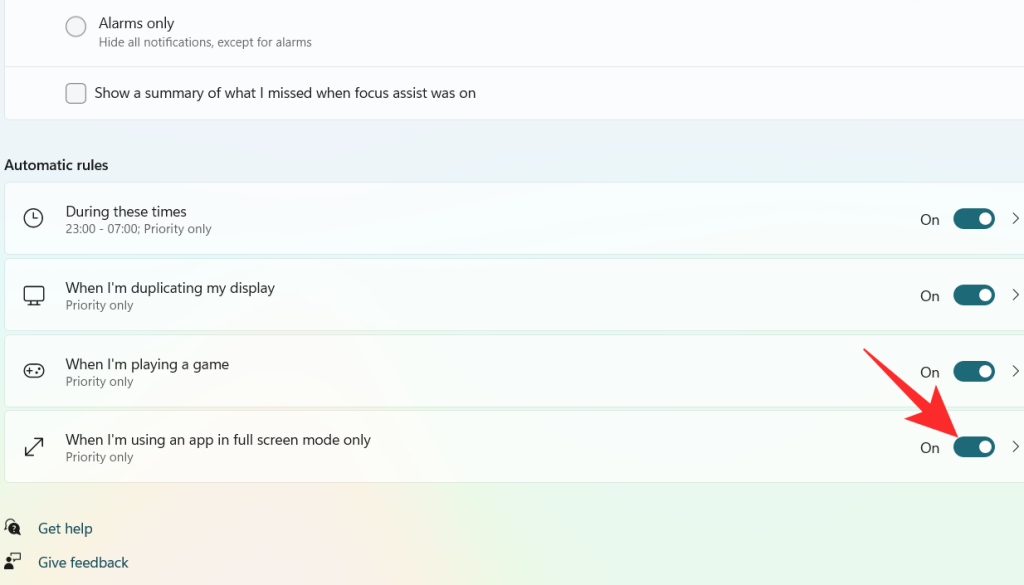
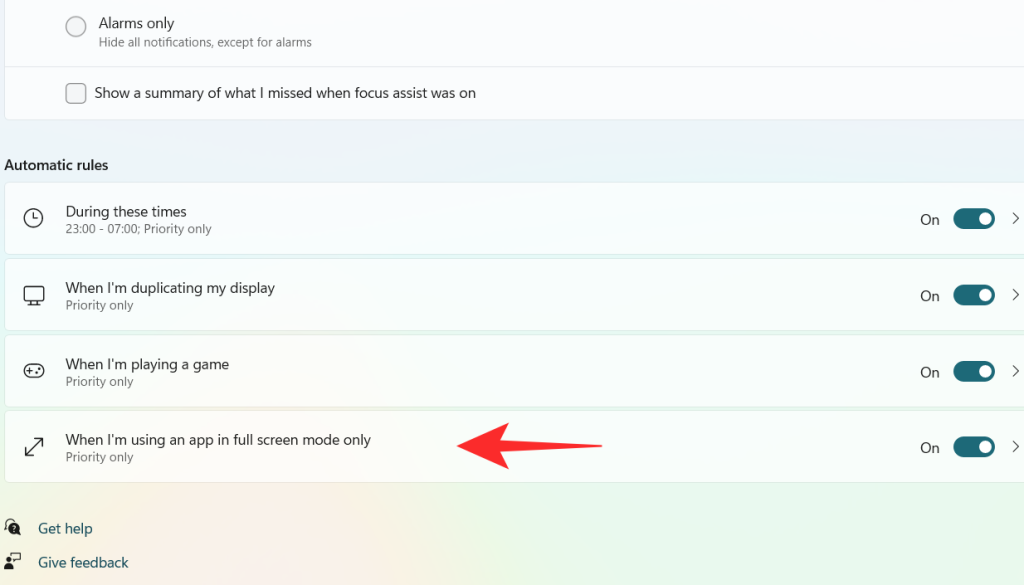
Click on the When I’m using an app in full-screen mode only tab
Click on the box under Focus Level.
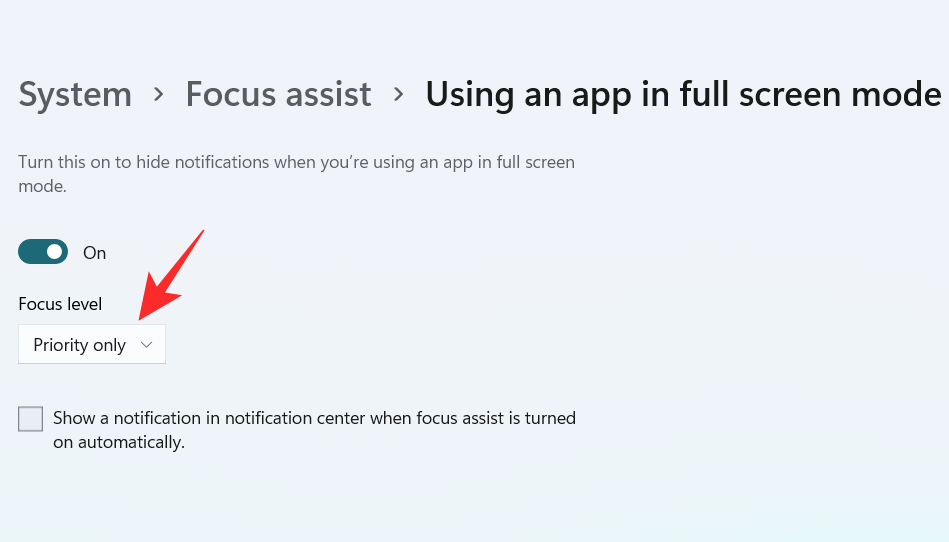
A dropdown menu appears, click on your desired option between Priority only and Alarms only.

To get a notification when the Focus assist is turned on, check the box “Show a notification in action center when Focus assist is turned on automatically“.

Using the above customizations, you can schedule and control Focus assist’s behavior according to your workflow for maximum efficiency no matter the task at hand.
Can you remove the Focus Assist icon from the Action Center?
Yes, you can easily remove the Focus Assist icon from the Action Center. Windows 11 brings a host of new cosmetic and UI changes and one of them has been the ability to customize your action center. You can now add or remove icons from the action center depending on your needs and opt for a more minimal or productive look depending on your workflow.
For now, you can only add and remove certain system modules but in the future, some users expect Microsoft to add the support for third-party apps as well. This would be a much welcome change that would allow you to manage dedicated system settings managed by third-party apps directly from your action center.
Customize your Focus assist icon in the action center
Depending on your current needs you can either remove or add the Focus assist module to the action center. Use one of the guides below depending on your current requirements.
1. Remove it
Click on the Action Center which shows the icon of Wifi, volume, and battery together.

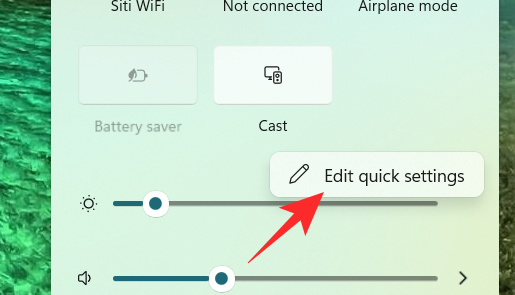
Right-click on an empty place or on any icon and click on Edit quick settings.
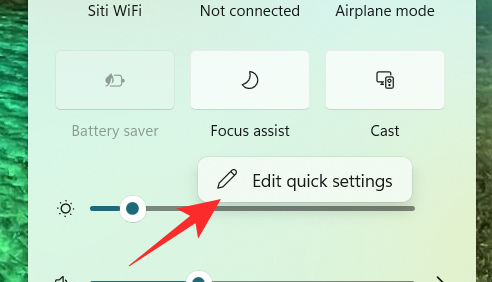
Click on the unpin symbol at the top right corner of the Focus Assist icon to remove the Focus Assist icon from the Action Center.
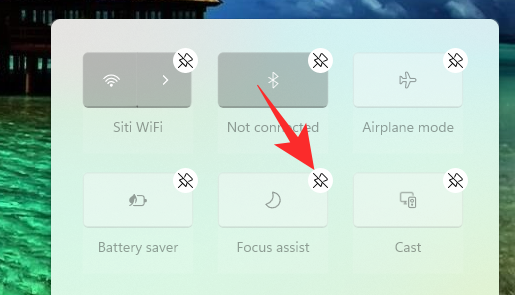
The Focus assist module should now have been removed from your action center. If not, we recommend you restart explorer.exe or your PC for the changes to take effect.
2. Restore it
Click on the Action Center which shows the icon of Wifi, volume, and battery together.

Right-click on an empty place or on any icon and click on Edit quick settings.
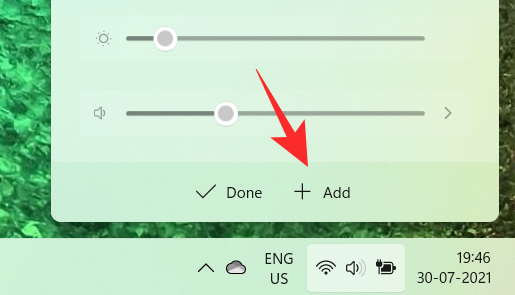
Now, click on the Add button at the bottom of the action center.
A list of different settings appears. Click on Focus Assist from the list and you will get to see the Focus Assist icon on the Action Center again.
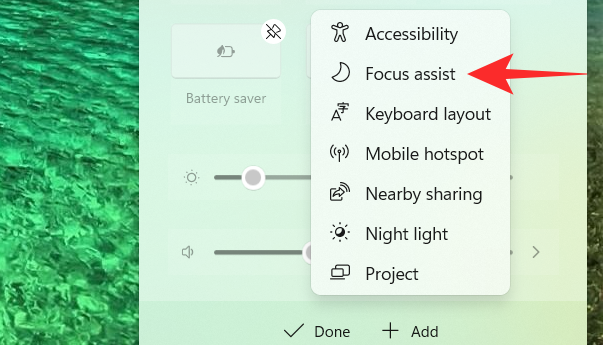
And that’s how you can add the Focus assist module back in the action center.
Focus assist keeps turning on automatically Issue: How to fix
If Focus assist keeps turning on automatically then there could be a couple of reasons for this behavior. Depending on its cause we can either fix it or use a workaround to manage the issue. Let’s find out why Focus assist keeps turning on automatically on your system.
Fix #1: Check Automatic Rules
Are you having this issue when projecting to a secondary display? Or when sharing your screen with a public computer? Then it is likely that focus assist is getting turned on automatically due to the default automatic rules in Windows 11.
By default, focus assist will silence all notifications in such scenarios to help maintain your privacy. But this can be counterproductive in case you are just trying to use a bigger display from a portable system like a laptop or an NUC.
It could also be that scheduled Focus assist was turned on your system by mistake which will enable and disable Focus assist automatically during certain hours. If any of these situations sounds like what you are facing then you can use the guide below to disable all automatic rules that enable Focus assist during certain scenarios and workflows on Windows 11. Let’s get started.
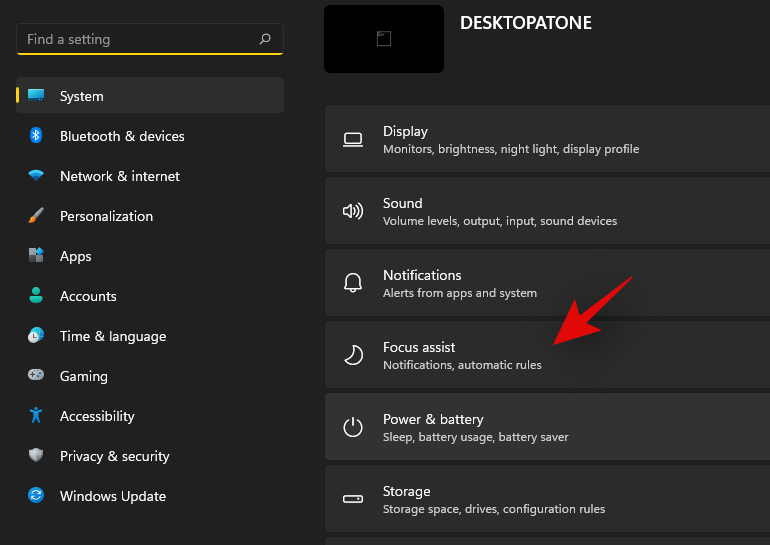
Press Windows + i on your keyboard to open the Settings app. Ensure ‘System’ is selected on your left and then click on ‘Focus Assist’ on your right.
Go down to automatic rules and turn off the following toggles.
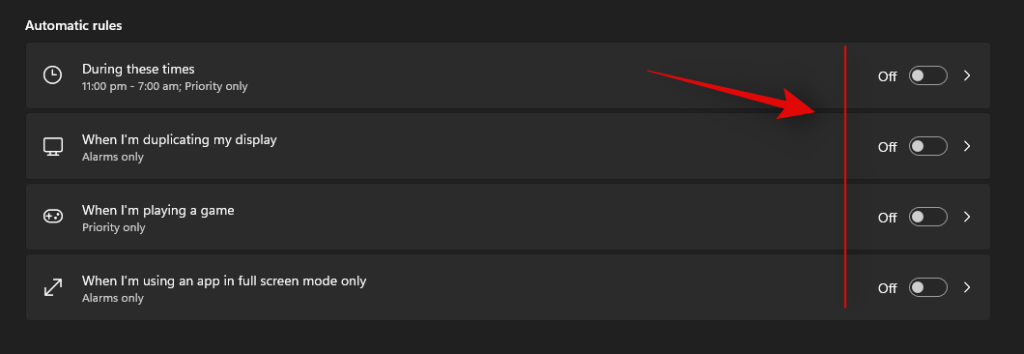
Once these rules are disabled, Windows 11 will not turn on Focus assist automatically on your system.
Fix #2: Turn of GeForce Overlay
This is another way to solve Focus assist misbehaving on your system. If you have a dGPU from Nvidia and are using the GeForce experience app then we recommend disabling its overlay option and restarting your system. With the automatic rule for ‘When I’m using an app in full-screen mode only’ turned on, Windows will mistake the Nvidia overlay detection on your desktop for a full-screen app which will trigger the Focus assist settings in return. You can also disable this automatic rule in case you wish to keep the Geforce Experience overlay enabled on your system.
Focus assist greyed out, option missing or not working; How to fix
Is the focus assist option missing from Windows 11 settings app? Is the module greyed out in the action center? This is a known bug that shows up occasionally with every feature update of Windows. Even certain versions of Windows 10 faced huge issues with this bug until a fix was released.
Fix #1: Enable in Group Policy Editor
If Focus assist seems to be missing from your system then it is likely disabled using the group policy editor. If your PC is managed by your organization or your workplace then it is likely disabled by your administrator. If you have access to the group policy editor then you can use the guide below to enable focus assist on your system. However, in case you have limited access, then you might need to get in touch with your administrator to enable Focus assist on your system.
Press Windows + R on your keyboard to bring up the Run dialog box and type in the following command to launch the Group Policy Editor. Click on ‘Ok’ once you are done.
gpedit.msc
Navigate to the following node.
User configuration > Administrative Templates > Start Menu and Taskbar > Notifications
Double click on ‘Turn off Quiet Hours’ on your right.
Click and select ‘Disabled’ in the top left corner.
Click on ‘Ok’ to save your changes.
And that’s it! Focus assist should now be enabled on your system in case it was disabled using the group policy editor.
Fix #2: Reinstall and repair default Windows UWP apps and system apps
If Focus assist is still missing from your system then let’s check if all the necessary apps and utilities are installed properly on your system. Use the guide below to check and repair Windows 11’s basic apps and functionality on your system.
Press Windows + S and search for PowerShell. Click on ‘Run as administrator’ once it shows up in your search results.
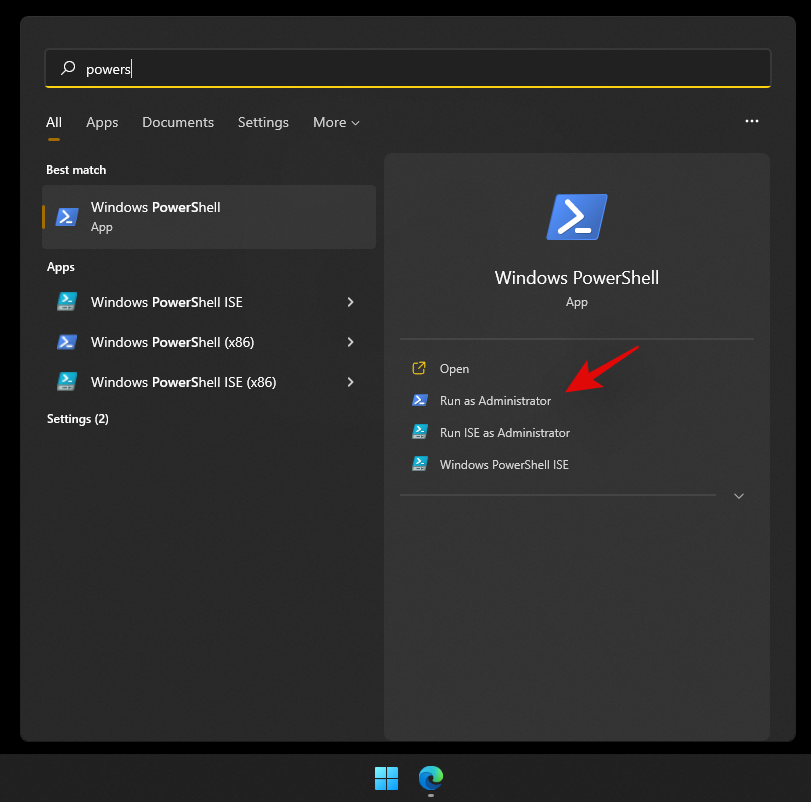
Once PowerShell is launched, execute the following command to reinstall all UWP apps and check and repair other default utilities required by Windows 11 in the background.
Get-AppXPackage -AllUsers | Foreach {Add-AppxPackage -DisableDevelopmentMode -Register "$ ($ _. InstallLocation) \ AppXManifest.xml"}

Wait for the process to finish and restart your PC for good measure. If Focus assist was corrupted or missing from your system, then this fix should help solve all your issues.
Fix #3: Check for a Windows Update
Haven’t updated in a while? We recommend checking for recent Windows Updates. While updates rarely disable major features like Focus assist, a new feature update installation can help refresh your registry, fix mismatched values and more importantly iron out bugs that could be preventing you from accessing Focus assist on your system. Use the guide below to check for recent Windows updates on your system.
Press Windows + i on your keyboard to open the Settings app and click on ‘Windows Update’ on your left.

Click on ‘Check for updates’.

In case any new updates show up, let them install on your system and restart if prompted. In case you are using a metered connection then you will need to click on ‘Download now’ manually to avoid any unexpected data charges.
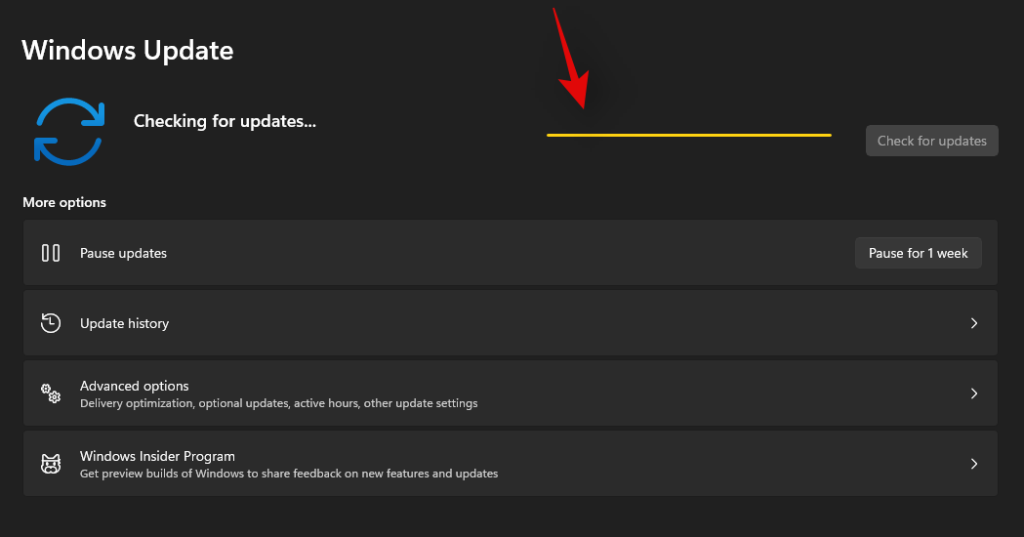
Once the necessary Windows updates are installed on your system, Focus assist should be restored in your action center and the Settings app.
Last Resort: Reset your PC
If Focus assist is still missing from your PC then this indicates a corrupted Windows installation on your system. The best way to fix this without wasting much time on troubleshooting would be to simply reset your PC while keeping all your files intact. This will refresh the entire Windows 11 installation and reinstall all the apps which should help restore functionality for all Windows features including Focus assist. Follow the guide below to reset your PC while keeping your files.
Note: The reset process will remove all installed applications and only retain files stored manually on your local storage. A list of all the removed apps will be available in .txt format on your desktop once your PC has been reset.
Press Windows + i on your keyboard and click on ‘Windows Update’ on your left.
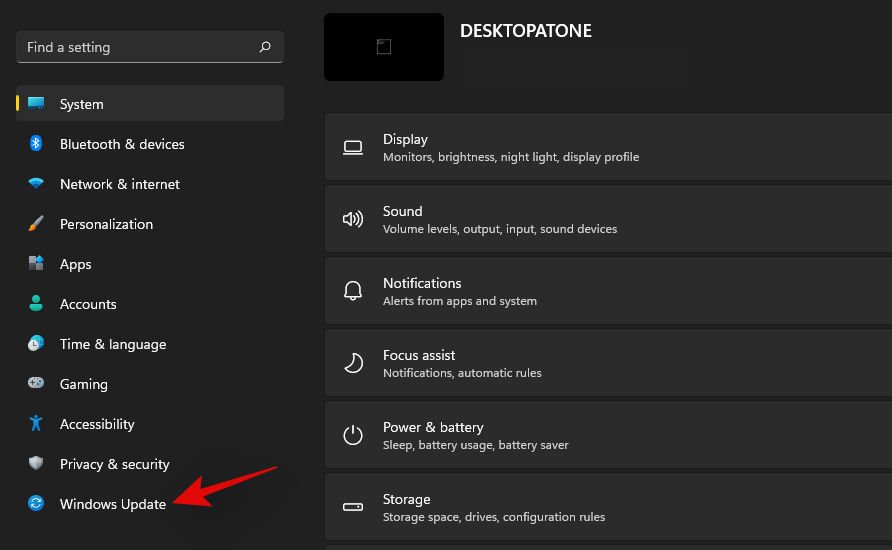
Click on ‘Advanced options’.
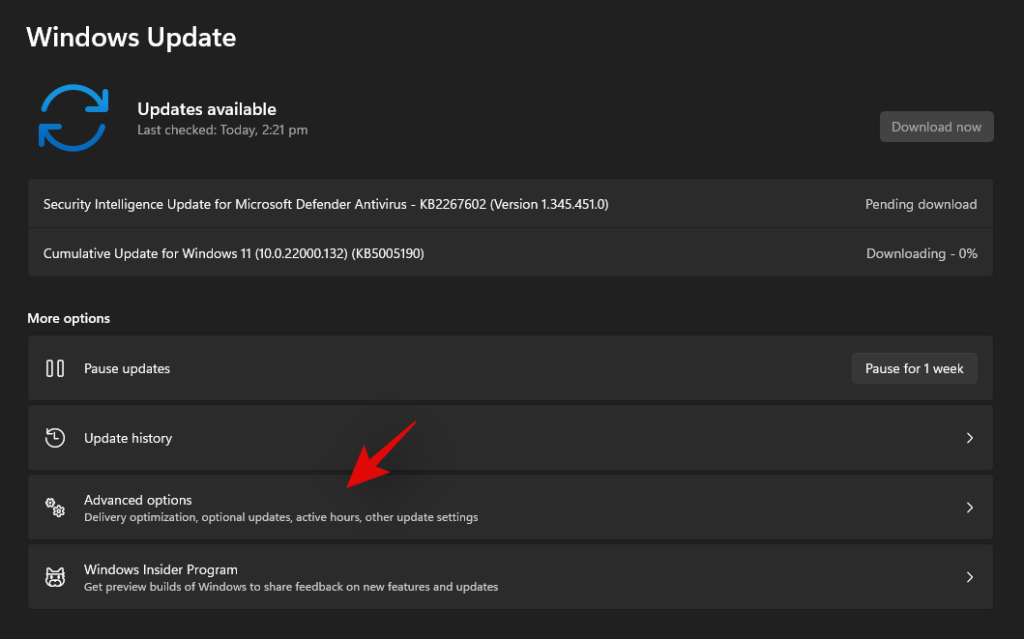
Click and select ‘Recovery’.
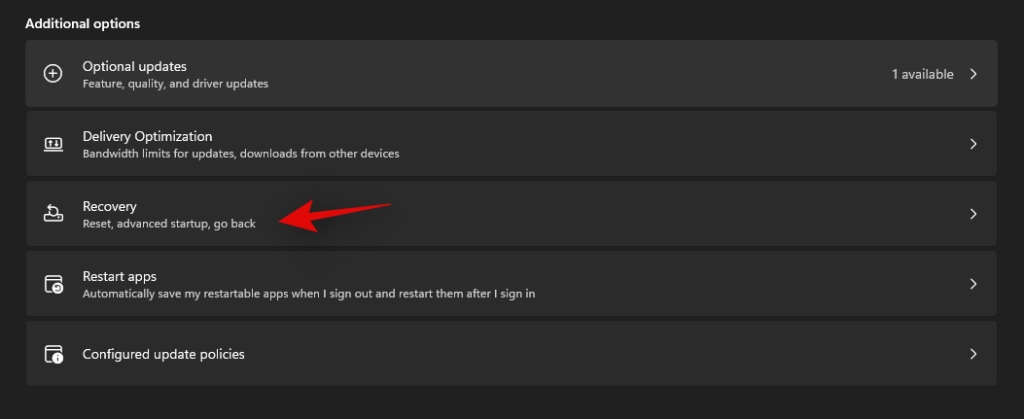
Click on ‘Reset PC’ beside Reset this PC.

Click on ‘Keep my files’.
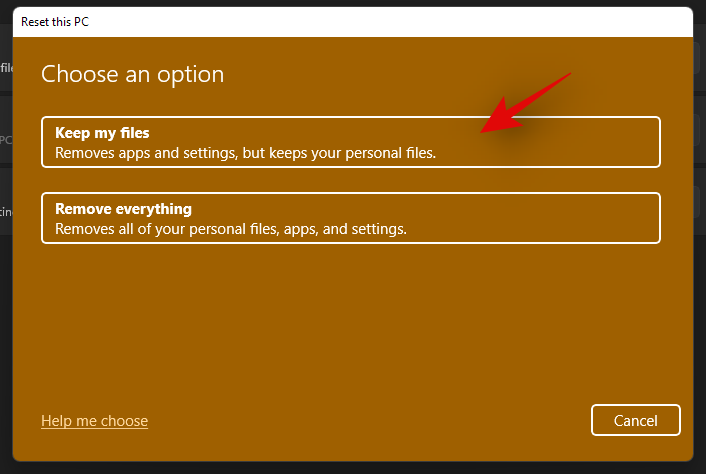
Windows will now process all the files on your local storage. Click on ‘Reset’.
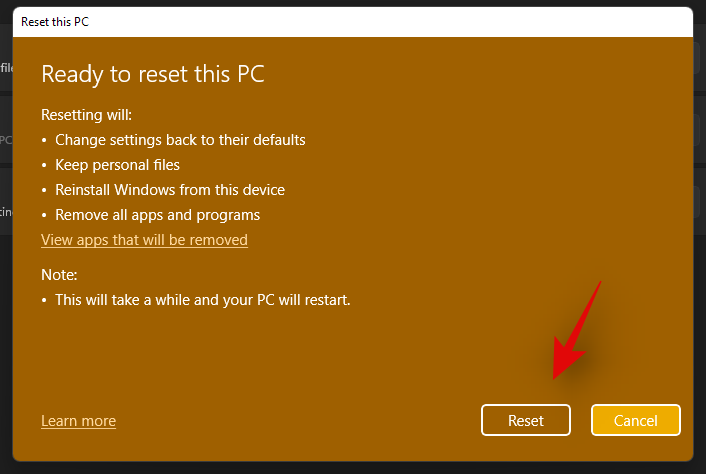
Note: If you are using Windows 11 Pro or higher then you will get the option to use a local installation/recovery media to reinstall Windows 11 as well. However, this option will be missing for Windows 11 Home users.
Windows will now reset your PC while retaining all your files. Your PC will restart several times during this process. This is completely normal and you should let Windows do its thing. If you are using a laptop or a portable NUC, then ensure that your unit is plugged into the power at all times during this process.
How to turn off Focus assist permanently
Do you wish to turn off Focus assist permanently in all scenarios? Then you can use the guide below to do so. The best way to disable Focus assist is by using the group policy editor. But in case you are using Windows 11 Home Edition, then you can use the first method in this guide to disable Focus assist permanently.
Method #1: Disable all settings and rules
Once you disable all the settings and rules for Focus assist, the feature should be turned off automatically on your system. Use the guide below to get you started.
Press Windows + i on your keyboard to open the Settings app and click on ‘Focus assist’ on your right.

Click and select ‘Off’ at the top.
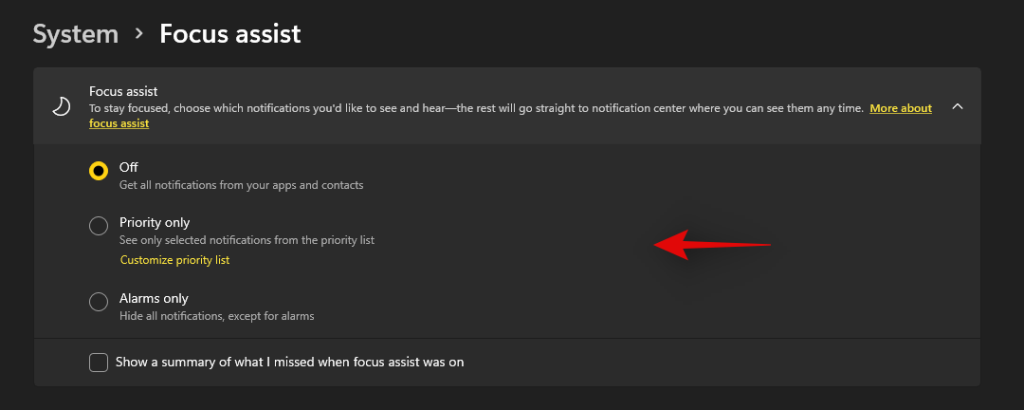
Uncheck the box for ‘Show a summary of what I missed when focus assist was on’.

Subsequently, disable all the toggles under ‘Automatic rules’ as shown below.

We also recommend turning off notifications for unnecessary apps using the guide after this section to avoid unnecessary notifications from interrupting you when focus assist is disabled.
Method #2: Using Group Policy Editor
The group policy editor will permanently disable focus assist on your system and even prevent you from accessing it in your settings. However, this method will only work on Windows 11 Pro or higher versions. In case you have the Windows 11 home edition, you can use the guide above to disable Focus assist instead.
Press Windows + R and type in the following to open Froup Policy EDitor. Click on ‘Ok’ once done.
gpedit.msc
Navigate to the following node.
User configuration > Administrative Templates > Start Menu and Taskbar > Notifications
Find and double-click on ‘Turn on Quiet Hours’ on your right.
Select ‘Enabled’ in the top left and click on ‘Ok’.
Focus assist will now be permanently disabled on the selected system. We recommend you restart your system or explorer.exe in case the changes do not take place immediately.
Is there any other way to disable notifications?
Yes, you can disable notifications individually on a per-app basis in Windows 11 to customize the notifications you receive. This is another way to ensure that you are only notified about the apps and notifications that you intended. Customizing your notifications this way will also allow you to retain the full functionality of the focus assist mode without having to disable certain rules to avoid mismatched scenarios in your workflow.
However, the only downside to managing your notifications this way is that you have to keep enabling and disabling notifications for apps every few months depending on your new installs and uninstalls. You can use the guide below to disable notifications on a per-app basis in Windows 11.
Disable notifications permanently on a per-app basis
Here’s how you can disable notifications on a per-app basis in Windows 11.
Press Windows + i on your keyboard to open the Settings app and then click on ‘Notifications’ on your right.
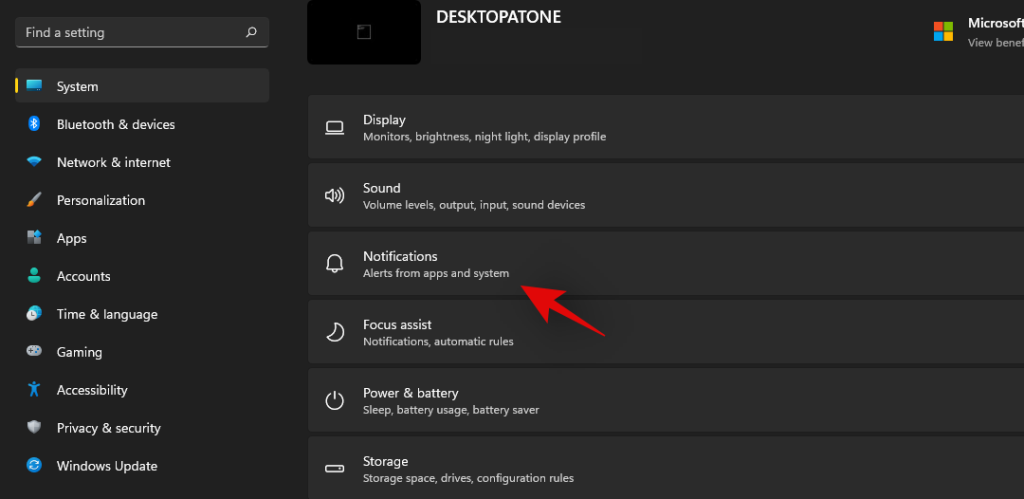
You will now get a list of all the apps that have the permission to deliver notifications on your system. Scroll the list to find the necessary apps and turn off the toggle beside them to disable notifications.

Repeat the steps above for all the intended apps to disable notifications.
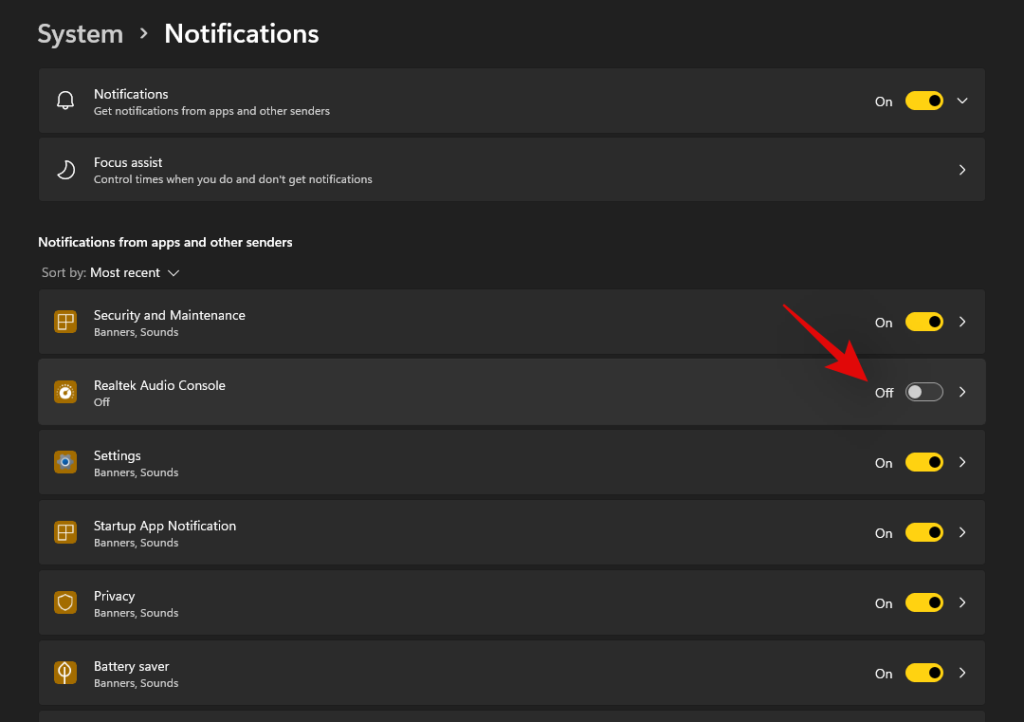
Close the Settings app and notifications for the selected apps should now be permanently disabled on your system.
Can you customize notifications in Windows 11?
Well, not exactly. Windows 11 currently has very limited options when it comes to customizing your notifications. You can not change the look, behavior, or color palette of your notifications without changing the accent color of your overall UI. However, you can customize the way your notifications sound. You can set a nice quiet notification sound that does not interrupt your workflow or opt for a quirky take that makes for a few good laughs each time you get a notification. The choice is completely up to you. Use the guide below to customize your Windows 11 notification sounds.
Required
Guide
Let’s start by first placing the .wav file in a compatible media folder so that you can set it as your default notification sound in Windows 11. Navigate to the concerned .wav file and copy it to your clipboard.
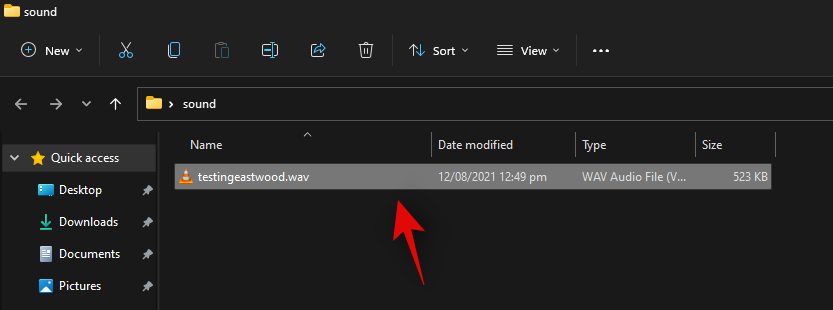
Now navigate to the following path given below. Paste your .wav file in this location. Click on ‘Continue’ when you will be prompted for administrator permission.
C:\Windows\media
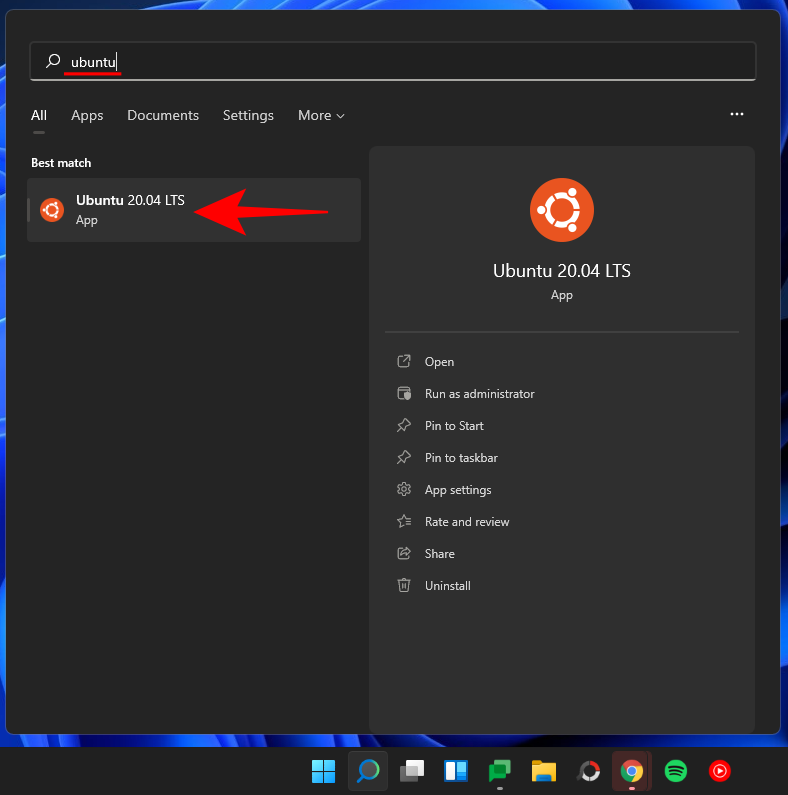
We can now use the .wav file as our default notification sound. Press Windows + i on your keyboard to open the Settings app and then click on ‘Sound’ on your right.
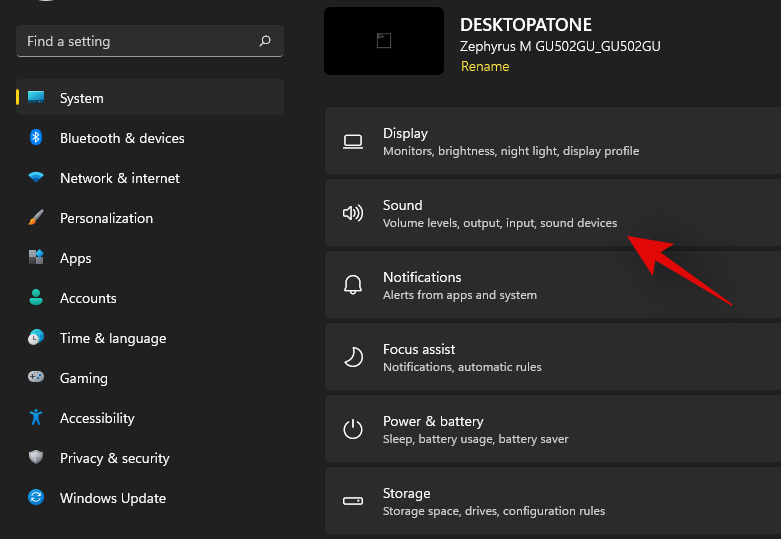
Scroll to the bottom and click on ‘More sound settings’.

Click and switch to the ‘Sounds’ tab at the top.
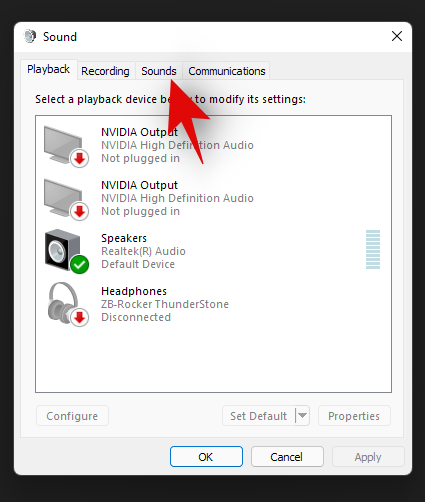
Under ‘Program Events’ scroll the list and find ‘Notifications’. Click on ‘Notifications’ to select it.
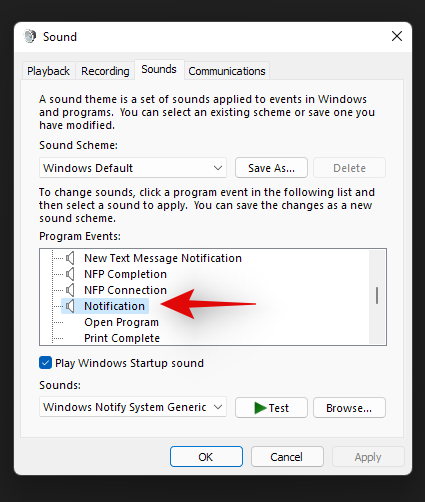
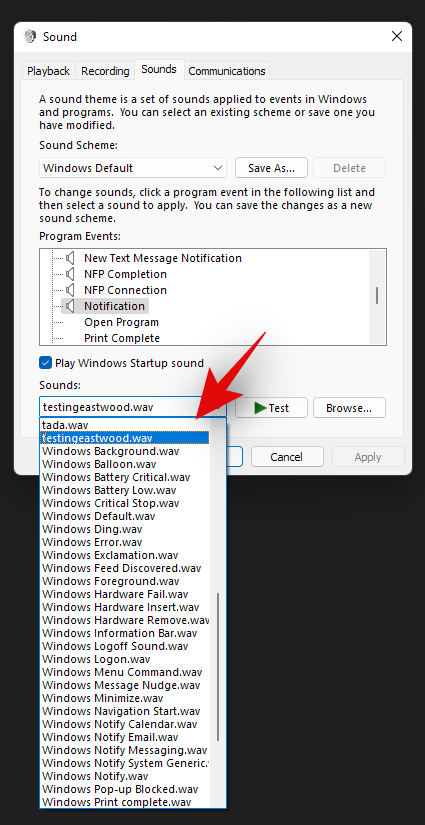
Now click on the drop-down arrow under Sounds and select the .wav file we pasted in the Media folder.
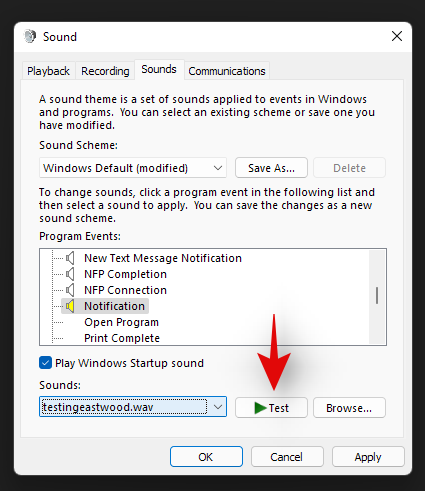
You can click on ‘Test’ to test your custom notification sound.
Click on ‘Ok’ to save your changes.
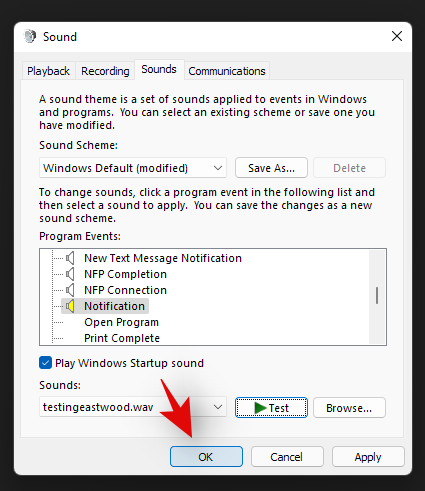
And that’s it! You will now have set a custom sound as your default notification sound in Windows 11.
Distractions from notifications are a huge problem especially when you are into some important work. Using the steps mentioned above, now, you can easily get rid of unnecessary notifications and work peacefully with full concentration.
Related:
เรียนรู้วิธีปิดเสียงวิดีโอที่กวนใจใน Google Chrome และ Mozilla Firefox ด้วยบทแนะนำนี้.
ในช่วงหลายปีที่ผ่านมา เราได้เห็นการเปิดตัวเครือข่ายเซลลูลาร์รุ่นต่อไปเรื่อยๆ การมาถึงของ 5G เป็นเรื่องที่น่าตื่นเต้น มีผู้ให้บริการรายใหญ่
วิธีการเปิดหรือปิดระบบการเข้ารหัสไฟล์ใน Microsoft Windows ค้นพบวิธีการที่แตกต่างกันสำหรับ Windows 11.
วิธีเปิดใช้งาน Ad-Blocker บนอุปกรณ์ Android ของคุณและทำให้พบกับโฆษณารบกวนบน Kiwi Browser ได้อย่างมีประสิทธิภาพมากที่สุด.
ไม่มีวิธีการที่แน่นอน 100 เปอร์เซ็นต์ในการตรวจสอบว่าบางคนออนไลน์จริงๆ บนเฟสบุ๊คเมื่อเขาแสดงว่าออฟไลน์
เรียนรู้วิธีลบรูปโปรไฟล์จาก Microsoft Teams สำหรับทั้งมือถือและคอมพิวเตอร์ ด้วยขั้นตอนง่ายๆ ที่จะช่วยเพิ่มความเป็นส่วนตัวของคุณ
ทุกไฟล์ใน Windows 11 มีนามสกุลไฟล์ที่ทำให้คุณทราบประเภทไฟล์ แต่ค่าเริ่มต้นไม่แสดงให้เห็น นี่คือวิธีที่จะช่วยให้คุณแสดงนามสกุลไฟล์ได้อย่างง่ายดาย
หากต้องการใช้ Dynamic Lighting บน Windows 11 23H2 ให้เปิดการตั้งค่า > การกำหนดค่าส่วนบุคคล > Dynamic Lighting เปิดคุณสมบัติและกำหนดค่าเอฟเฟกต์
ใน Windows 11 หากต้องการแชร์เครื่องพิมพ์ท้องถิ่นผ่านเครือข่าย ให้เปิดตัวเลือกแชร์เครื่องพิมพ์นี้ในการตั้งค่าเครื่องพิมพ์ นี่คือวิธีการ
หากต้องการแชร์ไฟล์บน Windows 11 ในเครือข่าย ให้เปิดแท็บการแชร์โฟลเดอร์ คลิกแชร์ เลือกผู้ใช้หรือกลุ่ม เลือกสิทธิ์ แล้วคลิกแชร์
ค้นพบวิธีแก้ปัญหา Microsoft Teams ที่ปรากฏขึ้นซ้ำ ๆ ด้วยเคล็ดลับและแนวทางการตั้งค่าที่มีประสิทธิภาพที่จะช่วยให้คุณหยุดการรบกวนจากแอปนี้ได้
ต้องการแทนที่รูปโปรไฟล์ของคุณใน Zoom เป็นอย่างอื่นหรือไม่? ต่อไปนี้คือวิธีเปลี่ยนรูปภาพบัญชี Zoom ในไม่กี่ขั้นตอน
ซูมช่วยให้คุณเบลอพื้นหลังในการประชุมวิดีโอได้อย่างมีประสิทธิภาพ การใช้งานที่ง่ายและมีประสิทธิภาพสำหรับการเสนอตัวเองในทุกสถานการณ์
ต่อไปนี้คือขั้นตอนในการสร้างสื่อ USB ที่สามารถบู๊ตได้ของ macOS (Catalina) ด้วยการสนับสนุนพาร์ติชัน GPT บน Windows 10, 11, 8.1, 7 เพื่อช่วยเหลือ Mac ของคุณ
หากต้องการเปลี่ยนโหมดพลังงานของ Windows 11 ให้อ่านคู่มือนี้เพื่อปรับปรุงอายุการใช้งานแบตเตอรี่หรือประสิทธิภาพอย่างดีที่สุด
เรียนรู้วิธีอัปเดตไดรเวอร์ใน Windows 11 เพื่อแก้ไขปัญหาด้านความเข้ากันได้และประสิทธิภาพของอุปกรณ์
บน Windows 10 คุณสามารถใช้ File History, Windows Backup หรือ OneDrive เพื่อสำรองไฟล์ของคุณโดยอัตโนมัติ และนี่คือวิธีการ
หากต้องการเปิดใช้งานการสร้าง ReFS Dev Drive ใหม่บน Windows 11 ให้เปิด ViveTool และรันคำสั่ง vivetool /enable /id:42866187
หากต้องการเปิดใช้งานการตั้งค่าการจัดการดิสก์เสมือนใหม่ใน Windows 11 ให้เปิด ViveTool และรันคำสั่ง vivetool /enable /id:42401084
หากต้องการลดขนาดของฐานข้อมูลการจัดทำดัชนี Windows.db บน Windows 11 ให้เปิดตัวเลือกการจัดทำดัชนีและสร้าง batabase ใหม่สำหรับการตั้งค่าขั้นสูง
เรียนรู้วิธีซิงค์ Sticky Notes ระหว่างอุปกรณ์ต่างๆ ใน Windows 11 ได้อย่างง่ายดาย คู่มือนี้ครอบคลุมการตั้งค่า การแก้ไขปัญหา และเคล็ดลับเพื่อเพิ่มประสิทธิภาพการทำงานสูงสุดด้วยคุณสมบัติล่าสุด
กำลังประสบปัญหาเครื่อง Windows 11 ทำงานช้าใช่ไหม? มาดูวิธีแก้ไขทีละขั้นตอนสำหรับแผนเพิ่มประสิทธิภาพขั้นสูงสุดเพื่อเพิ่มประสิทธิภาพพีซีของคุณกัน
กำลังประสบปัญหาเกี่ยวกับการจัดวางสกิน Rainmeter บน Windows 11 อยู่ใช่ไหม? พบกับวิธีแก้ไขทีละขั้นตอนที่ได้รับการพิสูจน์แล้ว เพื่อคืนความสมบูรณ์แบบให้กับเดสก์ท็อปของคุณ อัปเดตด้วยการปรับแต่งล่าสุดเพื่อการปรับแต่งที่ราบรื่น
กำลังประสบปัญหาข้อผิดพลาดในการรีเซ็ต PIN ของ Windows Hello ใน Windows 11 อยู่ใช่ไหม? ค้นพบขั้นตอนการแก้ไขปัญหาที่ได้รับการพิสูจน์แล้วเพื่อแก้ไขปัญหานี้อย่างรวดเร็วและกลับมาเข้าถึงอุปกรณ์ของคุณได้อย่างปลอดภัย อัปเดตด้วยการแก้ไขล่าสุดแล้ว
กำลังประสบปัญหาข้อผิดพลาดของ Cortana และ Copilot AI ใน Windows 11 อยู่ใช่ไหม? ค้นพบวิธีแก้ไขที่ได้รับการพิสูจน์แล้วเพื่อแก้ปัญหาการหยุดทำงาน การไม่ตอบสนอง และปัญหาการทำงานร่วมกัน เพื่อประสิทธิภาพ AI ที่ราบรื่น ทำให้ระบบของคุณกลับมาใช้งานได้ตามปกติในวันนี้!
กำลังประสบปัญหาเกี่ยวกับระยะห่างและขนาดของแถบงานใน Windows 11 อยู่ใช่ไหม? พบกับวิธีแก้ไขที่ได้ผลจริงเพื่อกำจัดไอคอนขนาดใหญ่เกินไป ระยะห่างที่ผิดปกติ และคืนแถบงานให้ราบรื่นและไม่มีปัญหา คู่มือทีละขั้นตอนสำหรับผู้ใช้ทุกคน
กำลังประสบปัญหาเสียงเบาจากไมโครโฟนภายในเครื่องบน Windows 11 อยู่ใช่ไหม? พบกับวิธีแก้ไขแบบทีละขั้นตอนที่พิสูจน์แล้ว เพื่อคืนคุณภาพเสียงที่คมชัดโดยไม่ต้องยุ่งยาก ทำให้ไมโครโฟนของคุณใช้งานได้อย่างสมบูรณ์แบบในวันนี้!
กำลังประสบปัญหาการใช้งาน Pagefile.sys สูงใน Windows 11 อยู่ใช่ไหม? มาดูขั้นตอนการแก้ไขปัญหาที่ได้รับการพิสูจน์แล้ว เพื่อแก้ไขปัญหานี้ ปรับแต่งหน่วยความจำเสมือน และคืนประสิทธิภาพการทำงานที่ราบรื่นให้กับพีซีของคุณ วิธีแก้ไขง่ายๆ สำหรับทั้งมือใหม่และมืออาชีพ
กำลังประสบปัญหาหน้าจอดำใน OBS Studio บน Windows 11 อยู่ใช่ไหม? พบกับวิธีแก้ไขปัญหาที่ได้ผลจริงสำหรับปัญหาการบันทึกภาพ ปัญหาความขัดแย้งของ GPU และอื่นๆ อีกมากมาย คู่มือทีละขั้นตอนที่จะช่วยให้การสตรีมและการบันทึกของคุณกลับมาใช้งานได้ตามปกติโดยไม่มีปัญหา
กำลังประสบปัญหาเกี่ยวกับเสียง aptX และ LDAC ใน Windows 11 อยู่ใช่ไหม? พบกับวิธีแก้ไขที่ได้รับการพิสูจน์แล้วเพื่อคืนคุณภาพเสียง Bluetooth คุณภาพสูงบนพีซีของคุณ คู่มือทีละขั้นตอนเพื่อการเล่นที่ราบรื่นโดยไม่มีปัญหาใดๆ
