Home
» How To
»
How to Clean a Car Air Filter Safely: When to Clean, When to Replace
How to Clean a Car Air Filter Safely: When to Clean, When to Replace
Cleaning a car air filter is not one universal procedure. The first question is what kind of engine air filter your car actually has. Most factory-style paper or cellulose filters are designed to be replaced when they are dirty or due for service, not washed back to new condition. Washable performance filters are different: they can be serviced, but only with the cleaner, rinse method, drying process, and—if applicable—filter oil specified by their manufacturer.
The result you want is straightforward: a filter that is appropriate for continued use, completely dry if it was washed, seated evenly in a clean airbox, and sealed around its full perimeter. After reassembly, the engine should run normally with no intake leaks, warning lights, or loose housing clips. If the filter is torn, distorted, oil-soaked, heavily contaminated, or not explicitly reusable, replacement is usually the better outcome.
First, make sure you are working on the engine air filter
A car may have both an engine air filter and a cabin air filter. The engine air filter sits in the intake system under the hood and protects the engine from airborne dirt. A cabin filter cleans air entering the passenger compartment through the HVAC system. They are not interchangeable and their service procedures differ.
This guide covers the engine air filter. Before opening anything, check your owner's manual for the filter location, service interval, fastener type, and any model-specific precautions. Toyota's current owner documentation, for example, warns that an electric cooling fan may start automatically in some conditions and that driving with the engine air cleaner filter removed can cause excessive engine wear. See Toyota's do-it-yourself service precautions for an example of the kinds of under-hood warnings manufacturers provide.
How to service a car engine air filter
1. Park safely, shut the vehicle down, and locate the airbox
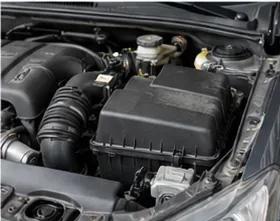
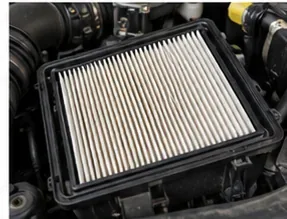
Locate the engine air filter housing with the vehicle shut down; the airbox is commonly a black plastic enclosure connected to the intake duct.
Park on a level surface, turn the engine off, remove the key or disable the vehicle's ready mode, and allow hot components to cool. Keep hands, clothing, and tools away from fans and belts. The airbox is usually connected to a large intake hose and held together with clips, screws, or bolts.
Do not run the engine with the filter removed. The intake system is designed to receive air through the filter, and leaving the clean side of the intake open allows debris to reach areas it normally should not.
2. Open the housing without forcing clips or wiring
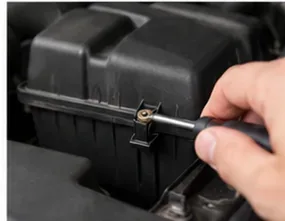
Release the housing clips or fasteners carefully and note any nearby sensors, hoses, or wiring before lifting the cover.
Undo only the fasteners needed to lift or move the airbox lid. Some vehicles have a mass airflow sensor or wiring attached to the intake tube near the housing. Do not pull on electrical connectors or strain a sensor harness just to gain more room.
If the lid does not move after the visible fasteners are released, stop and check the manual. Hidden tabs are common, and forcing a plastic lid can crack the housing or create a poor seal later.
3. Remove the filter and remember its orientation
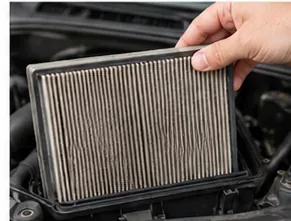
Lift the filter out without dropping accumulated dirt into the clean side of the intake, and note which face was exposed to incoming air.
Lift the element straight out when possible. Pay attention to its shape, gasket position, airflow direction markings, and which side faces the dirty portion of the airbox. A quick photo before removal can help if the filter is asymmetric.
Keep loose leaves, sand, and dust away from the opening that leads toward the engine. Ford Performance similarly warns in its engine-air-filter instructions not to allow foreign material into the air induction system when the element is removed.
4. Inspect the media, frame, and seal before deciding to clean
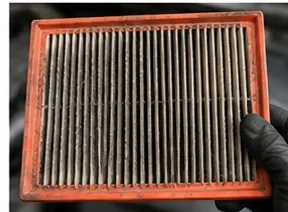
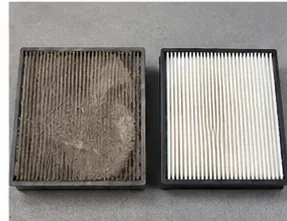
Heavy dirt, damaged pleats, a distorted frame, or a compromised seal are signs that replacement may be safer than trying to restore the filter.
Look for torn pleats, holes, separated seams, a warped frame, crumbling foam, hardened or damaged gaskets, oil saturation, mud, rodent damage, or contamination that has reached the clean side. If you see any of those, replace the filter.
For conventional passenger-car filters, cleaning is often the wrong goal. MANN+HUMMEL states in its air-cleaner maintenance guidance that it recommends exchanging rather than cleaning the element because cleaning can damage filter media and allow dust through. FRAM's installation instructions likewise tell users to remove the old element, clean the housing, and install a new filter with the perimeter properly sealed.
5. Decide which path applies: disposable or reusable
Do not assume a dirty filter is washable; identify the filter type from the part number, owner's manual, or filter manufacturer's instructions first.
Disposable paper or cellulose filter: do not wash it unless its manufacturer explicitly says it is washable. Avoid blasting it with compressed air, beating it against a hard surface, or scrubbing the pleats. Those methods can create damage that is difficult to see. Replace it when it is due, heavily loaded, damaged, or outside the vehicle manufacturer's service recommendation.
Washable reusable filter: follow the instructions for that exact filter family. Reusable filters are not all serviced the same way. Some use oiled cotton media; others use dry synthetic media. Using oil on a filter designed to run dry, or skipping oil on a filter that requires it, can defeat the intended service procedure.
6. If—and only if—the filter is washable, clean it exactly as its maker specifies
Wash with low-pressure water only when the filter manufacturer identifies the element as reusable and provides a wet-cleaning procedure.
K&N's current official cleaning instructions for its oiled cotton automotive filters call for removing loose debris, applying the specified cleaner, rinsing with cool low-pressure water from the clean side outward, allowing the element to dry naturally, and then applying the correct filter oil. K&N's dry synthetic filters use a different procedure and do not use the same oiling step.
AEM's Dryflow cleaning instructions likewise specify the proper cleaner, low-pressure rinse direction, and drying method for its synthetic media. These examples show why generic advice such as “hose it off” or “spray it with oil” is not safe for an unidentified filter.
Do not use household degreasers, gasoline, solvents, high-pressure washers, or harsh brushes unless the filter manufacturer explicitly allows them. If you cannot identify the filter or find servicing instructions for it, replacement is the lower-risk choice.
7. Let a washed reusable filter reach the condition its manufacturer requires
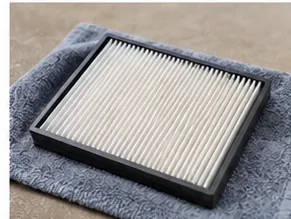
Allow a washable filter to dry as directed before reinstallation; for oiled media, apply only the specified oil after the required drying stage.
Drying is not a step to rush. Excess water left in a filter can affect airflow and carry moisture into the intake. For oiled cotton filters, K&N says not to apply oil until the media is completely dry, then to distribute the specified oil evenly and allow it to wick before touching up light areas. Other reusable filters may have different requirements.
The quality check here is not simply “it looks cleaner.” The filter should have intact pleats, a sound frame and gasket, no visible residue from the cleaner, and the correct dry or oiled condition specified for that product. If the media remains distorted or damaged after cleaning, replace it.
8. Clean the housing, reinstall the filter, and verify the seal
Seat the filter evenly in the airbox, confirm the perimeter gasket is not folded, and secure every clip or fastener before starting the engine.
Before putting the element back, remove leaves and loose debris from the dirty side of the housing with a shop vacuum or clean cloth. Do not push debris into the intake opening. FRAM's official installation sequence specifically includes cleaning the cover and housing, installing the new element, checking that it seals around the perimeter, and then fastening the cover.
Place the filter in exactly the correct orientation. Run a finger around the perimeter to confirm the gasket is fully seated and not pinched. Refit the airbox lid so all tabs, clips, screws, and ducts are secure. Reconnect anything that the vehicle's official procedure required you to disconnect.
How do you know the job was done well?
A good result is mostly about condition and fit, not a dramatic change in how the car feels. Use these checks:
The filter media has no tears, holes, collapsed pleats, or damaged seams.
A washable filter is in the dry/oiled condition required by its manufacturer.
The gasket sits flat around the entire housing perimeter with no visible gap.
No loose debris is left on the clean side of the airbox or intake tube.
Every clip, screw, duct connection, and sensor connector is secure.
The engine starts and idles normally, with no new warning light or unusual intake noise.
Do not expect filter cleaning by itself to guarantee better fuel economy, horsepower, or throttle response. The practical goal is to maintain the filtration and airflow the intake system was designed to have. If the filter was badly restricted, replacement or proper servicing may restore normal airflow, but the effect on vehicle performance depends on many other factors.
When should you replace instead of clean?
Change course and install the correct replacement filter when the element is disposable, torn, warped, saturated with oil or mud, contaminated on the clean side, missing gasket material, or still visibly damaged after an approved cleaning process. You should also replace it when the vehicle's maintenance schedule calls for replacement rather than cleaning.
Toyota's genuine-parts guidance advises inspecting the engine air filter at the recommended service intervals and replacing it as needed, while FRAM publishes replacement-oriented instructions for its disposable engine filters. Service intervals vary by vehicle, driving environment, filter design, and manufacturer, so the owner's manual should take priority over a generic mileage number.
What if the engine runs poorly after you reinstall the filter?
Turn the vehicle off and recheck your work. Look for an airbox lid that is not fully closed, a filter gasket that is folded, an intake hose that was left loose, or an electrical connector that was disturbed. Do not keep driving with an obvious intake leak or with the filter removed.
If everything is seated correctly but a warning light, rough idle, abnormal intake noise, or drivability problem persists, stop troubleshooting by trial and error. Consult the factory service information or a qualified technician. The air intake may have a sensor, duct, clamp, or unrelated fault that needs proper diagnosis.
Bottom line
The safest answer to “how to clean a car air filter” depends on the filter. For most standard paper engine filters, inspect the element, clean the airbox, and replace the filter when it is dirty or due for service rather than trying to wash it. For a verified reusable filter, use only the manufacturer's approved cleaner, rinse direction, drying method, and oiling procedure.
The finished job should leave you with intact filter media, a clean housing, a complete perimeter seal, and normal engine operation. If cleaning cannot deliver those conditions, replacement is the better result.