Home
» How To
»
How to Clean a Dehumidifier Filter: Vacuum, Wash, or Replace?
How to Clean a Dehumidifier Filter: Vacuum, Wash, or Replace?
A clean dehumidifier filter keeps airflow moving through the machine instead of forcing the fan to pull air through a mat of dust and lint. The basic job is simple, but the best cleaning method depends on the filter design and how dirty it is. For a lightly dusty washable mesh filter, vacuuming may be all you need. For heavier grime, washing can be more effective, but only if the manufacturer says the filter is washable and you let it dry completely before reinstalling it.
There has not been a major recent change that replaces this basic approach. Current manufacturer guidance still emphasizes model-specific care, regular inspection, and complete drying before reuse. GE Appliances says clogged filters can reduce dehumidifier performance and instructs owners of many models to clean washable filters with warm, soapy water, rinse them, and let them dry fully. Midea's current U.S. dehumidifier manual likewise tells users to remove and wash the air filter regularly, while De'Longhi notes that light dust can be vacuumed and a very dirty filter can be rinsed with warm water. Those differences are why the owner's manual for your exact model should take priority over a generic routine.
First Decide: Vacuum, Wash, or Replace?
Method
Best for
Main advantage
Main tradeoff
Vacuum with a soft brush attachment
Loose household dust, lint, pet hair
Fast and dry; no waiting for the filter to dry
May leave oily or embedded dirt behind
Rinse or wash a washable filter
Visible gray film or dirt that vacuuming does not remove
More thorough cleaning
Requires drying time; not safe for every filter type
Replace the filter
Torn, warped, brittle, permanently clogged, or nonwashable filter media
Restores an intact filtration surface
Costs more and requires the correct replacement part
Some dehumidifiers use more than one filter stage. For example, certain current Meaco models pair a washable dust filter with a HEPA filter and offer an optional charcoal filter. That is a useful reminder not to assume every layer can go under the faucet. Check the manual or product page for each filter element before using water.
Step 1: Turn Off, Unplug, and Remove the Filter
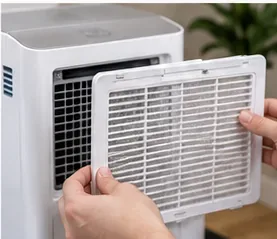
Switch the dehumidifier off and unplug it before opening the filter area. Filter access varies: it may slide from the rear, side, or behind a grille, and some designs require removing the water bucket first. Do not force the filter frame. If it does not slide out easily, stop and check the owner's manual so you do not crack tabs or bend the frame.
Remove the filter only after the dehumidifier is switched off and unplugged; the filter may slide from the rear or another model-specific access point.
Before doing anything else, inspect the filter. A reusable plastic or mesh prefilter often tolerates cleaning, while paper-like, HEPA-style, carbon, or specialty media may have different instructions. Also look for tears, broken frame pieces, crumbling material, or permanent distortion. Cleaning cannot repair structural damage.
Step 2: Remove Loose Dust First
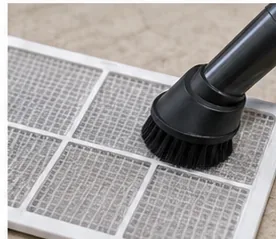
For a filter with only light surface dust, a vacuum with a soft brush attachment is the lowest-mess option. De'Longhi specifically recommends vacuuming collected dust from its dehumidifier air filters, then rinsing only when a filter is very dirty. GE also lists vacuuming as an option on older-model cleaning guidance before escalating to washing.
Vacuuming is a practical first choice for loose dust because it cleans without adding moisture or drying time.
Use gentle suction and support the filter so the mesh does not flex excessively. Vacuum both sides if the design allows it. If the filter looks clean afterward and airflow was your only concern, you can stop here. This is the best tradeoff when the filter is only dusty and you need the machine back in service quickly.
When vacuuming is not enough
Switch to washing only when two conditions are met: dirt remains after dry cleaning, and the manufacturer confirms that the filter is washable. Sticky dust, kitchen residue, or a gray film embedded in plastic mesh usually responds better to water than to vacuuming alone.
Step 3: Wash Only If the Filter Is Designed for It
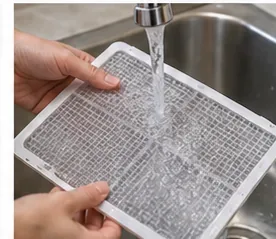
For a washable filter, follow the manual's water-temperature and detergent instructions. GE's current dehumidifier support tells users to use warm, soapy water, rinse well, and avoid the dishwasher. Midea's MAD22S1CWWT manual instructs users to wash the air filter with clean water and dry it before reinstalling. De'Longhi advises warm water no hotter than 100°F (40°C) for a very dirty filter.
Rinse a filter only when its manufacturer identifies it as washable; use gentle water flow and follow any temperature limits in the manual.
A small amount of mild dish soap may help when the manual permits it. Avoid bleach, solvents, abrasive cleaners, strong degreasers, and dishwasher cycles unless your specific manufacturer explicitly approves them. Strong chemicals can attack plastics or filter material, while high heat can warp the frame.
Do not blast the filter with a high-pressure hose. More force is not necessarily better: it can deform thin mesh or separate filter material from its frame. A gentle rinse is usually enough after loose dust has already been removed.
Step 4: Air-Dry Completely Before Reinstalling
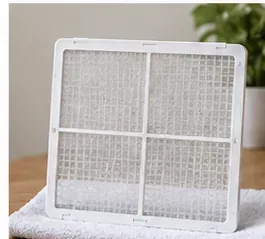
This step is easy to rush and important not to skip. Shake off excess water, set the filter in a clean, well-ventilated place, and allow it to air-dry completely. GE explicitly tells users to let the filter dry completely before replacement, and Midea also instructs users to dry the filter before reinstalling it.
Let a washed filter air-dry completely before it goes back into the dehumidifier; reinstalling it wet adds unnecessary moisture near the air path.
Avoid ovens, hair dryers on high heat, radiators, or direct high-temperature drying. If you need the dehumidifier immediately and the filter is still wet, waiting is safer than reinstalling it damp or operating the machine without its required filter. Manufacturer instructions commonly warn against running a dehumidifier with the filter removed because dust and lint can clog internal components and reduce performance.
How Often Should You Clean a Dehumidifier Filter?
There is no single interval that fits every dehumidifier. Usage, pets, dust, renovation work, laundry drying, and filter size all change how quickly a filter loads up.
Manufacturer examples illustrate the range. GE says older models should be checked every two to three weeks, while newer GE models may trigger a filter reminder after 250 operating hours. Midea's current U.S. manual for the MAD22S1CWWT tells users to remove and clean the air filter every two weeks under normal operating conditions. The best routine is therefore to use your model's stated interval as the baseline and inspect more often when the room is dusty.
A filter reminder light is useful, but it is not a dirt sensor on every machine. A timer-based reminder cannot know that you just sanded drywall nearby or that two shedding pets share the room. If airflow drops or the filter visibly grays over sooner, clean it sooner.
How to Tell Whether Cleaning Worked
After reinstalling the dry filter, look for practical signs rather than expecting the machine to become dramatically quieter or collect a fixed amount of extra water. Room humidity, temperature, compressor cycling, and fan settings also affect dehumidifier output.
The filter surface should look substantially clearer and free of loose lint.
Air should pass through the filter without obvious mats of dust blocking the mesh.
The filter should sit flat in its tracks without bowing or gaps.
The machine should operate without a filter warning once the reminder is properly reset, if your model uses one.
If performance was poor because of a clogged filter, airflow may improve after cleaning, but persistent poor moisture removal can have other causes.
Frigidaire's troubleshooting guidance specifically asks owners to check whether the filter is clean when a dehumidifier is not collecting water properly. If cleaning the filter does not resolve poor performance, check room temperature, humidity setting, drainage, airflow clearance, and the model's troubleshooting guide rather than repeatedly washing the filter.
When Should You Replace Instead of Clean?
Replace the filter when cleaning no longer restores an intact, open surface or when the manufacturer describes that filter as replaceable rather than washable. A damaged frame that no longer seals in its slot can let unfiltered air bypass the media. Torn mesh, delaminated material, brittle plastic, or a filter that remains heavily clogged after approved cleaning are also reasonable signs to replace it.
For combination dehumidifier/air-purifier models, replacement rules may differ by layer. A washable dust prefilter and a HEPA or carbon filter can sit in the same appliance but have different care requirements. Treat each component separately according to the manual.
Which Method Is Best for Your Situation?
Choose vacuuming when the filter has light, dry dust and you want the fastest turnaround. It has the lowest risk of trapping residual water because no washing is involved.
Choose washing when the washable filter still looks dirty after vacuuming or has a film that dry cleaning cannot remove. The tradeoff is downtime while the filter dries.
Choose replacement when the filter is damaged, nonwashable, or permanently clogged. It costs more, but it avoids trying to rescue filter media that can no longer do its job reliably.
The most important choice is not between vacuum and water; it is between a method your particular filter is designed to tolerate and one it is not. When the manual is available, follow it.