Home
» How To
»
How to Clean a Hydro Flask Straw Lid: A Practical Care Guide
How to Clean a Hydro Flask Straw Lid: A Practical Care Guide
The simplest reliable way to clean a Hydro Flask straw lid is to take apart the removable pieces that Hydro Flask identifies, wash them with hot, soapy water, clean the straw and tight crevices with narrow brushes, rinse, let everything dry completely, and reassemble the cap only when it is dry. For the current Flex Straw Cap, Hydro Flask specifically says to open the straw nozzle, pull the straw out of the red seal, remove that seal by its tab, and clean all of the pieces. The company also states that the cap components are top-rack dishwasher safe.
This guide follows Hydro Flask's current Flex Straw Cap cleaning instructions, published August 28, 2024 and still available in 2026. If your lid is an older design or a different Hydro Flask cap, compare its parts with the manufacturer's instructions before prying out anything that is not clearly removable.
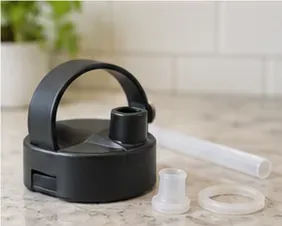
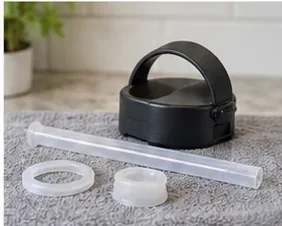
A straw lid, straw, and removable seal pieces laid out before washing. Keeping small components together makes reassembly easier.
Quick-reference cleaning checklist
Task
What to do
Useful tool
Routine wash
Disassemble the removable straw and seal, then wash all pieces with hot, soapy water.
Mild dish soap and a soft brush
Inside the straw
Run a narrow brush through the full length of the straw.
Straw brush
Tight lid crevices
Gently work around channels and recesses without gouging the plastic or silicone.
Small detail cleaner
Dishwasher option
Place cap and lid pieces on the top rack.
Top-rack dishwasher space or accessory basket
Before reassembly
Let every piece dry completely.
Clean drying rack or towel
Hydro Flask's Straw Cleaning Set page says its straw brush is designed to clean inside Hydro Flask straws, while the detail cleaner is intended for cap and lid crevices. You do not need a branded tool, but the brush you use should fit without forcing or scratching the parts.
How to clean the straw lid step by step
1. Open the nozzle and remove the straw
Start with an empty bottle. Open the drinking nozzle, then pull the straw away from the seal on the underside of the cap. On the current Flex Straw Cap, Hydro Flask describes this as removing the straw from the red seal. Work with clean hands and set the parts on a clean surface so a small seal does not disappear into the sink or trash.
2. Remove the seal that Hydro Flask identifies as removable
Pull the red seal from the cap using its tab, as directed in the official care guide. Do not assume every gasket, pin, hinge, or valve on every Hydro Flask lid should be pried out. If a component does not match the current Flex Straw Cap instructions and does not release normally, leave it in place until you have checked the instructions for that exact lid.
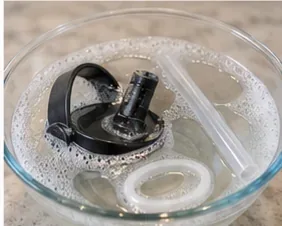
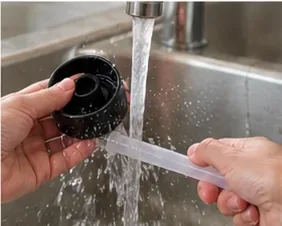
Disassembled lid pieces in warm, soapy water. Hydro Flask requires hot, soapy washing; a brief soak can help loosen residue but is not listed as a mandatory separate step.
3. Wash every removable piece with hot, soapy water
Wash the cap, straw, and seal with hot, soapy water. Pay attention to surfaces that stay damp during normal use: the underside of the lid, the area around the straw connection, and the seal channel. Hydro Flask's procedure does not require vinegar, baking soda, or a disinfecting chemical for normal Flex Straw Cap cleaning.
If you prefer a dishwasher, the Flex Straw Cap guide says the pieces are top-rack dishwasher safe. Hydro Flask's broader dishwasher-care guide likewise places caps and lids on the top rack. Keep small pieces secure so they cannot fall through the rack.
4. Brush the straw from end to end
A straw can look clean from the outside while residue remains inside. Wet the straw, add a little soapy water, and pass a properly sized straw brush through the full bore. Move it through more than once if needed, then rinse until no soap remains.
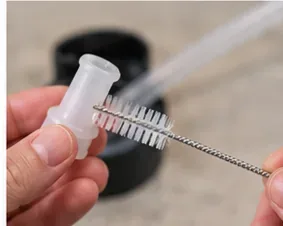
A narrow brush cleaning a small removable component. Use a straw brush through the full drinking tube and a smaller detail tool where the larger brush cannot reach.
5. Clean the lid's recesses without damaging them
Use a small detail cleaner around the straw connection, seal channel, and other crevices where residue can collect. Hydro Flask specifically recommends a detail cleaner for cap and lid crevices. The goal is to lift residue, not scrape or enlarge a sealing surface.
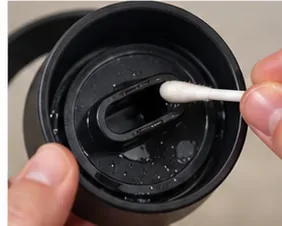
A small tool reaching a recessed lid channel. Hydro Flask's own care guidance recommends a dedicated detail cleaner for hard-to-reach cap crevices.
6. Rinse thoroughly
Rinse each piece with clean water, including the inside of the straw and the seal channel. Rotate the lid under the water so soap is not trapped in a cavity. A clean part should not feel slippery from detergent or release visible suds when water passes over it.
Rinse the lid and straw thoroughly so no soap remains in the drinking path or sealing surfaces.
7. Let all pieces dry completely
Set the pieces out separately with airflow around them. Hydro Flask's reassembly instructions explicitly say to dry the components completely before pressing the seal back into the cap. Reassembling a wet cap can trap moisture in the very channels you just cleaned.
Clean components separated on a dry towel. Allow the straw, lid, and seals to dry fully before putting them back together.
8. Reinstall the seal and straw
Press the seal back into the cap so it is seated evenly. Hydro Flask then instructs users to hold the straw at its flat tip and press it into the seal until it is firmly inserted. Check that the straw is straight, the seal is not folded or pinched, and the nozzle moves normally.
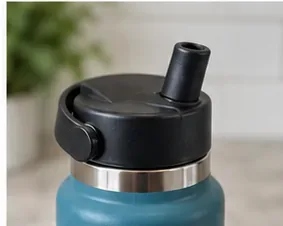
A reassembled straw lid on the bottle. The seal should sit flat and the straw connection should feel secure before use.
Before filling the bottle for the day, run a small amount of cool water through the straw and take a test sip. If airflow is restricted, the straw is loose, or the lid leaks around the connection, reopen it and check the seal and straw position rather than forcing the parts.
The cleaned lid fully assembled on the bottle and ready for cool beverages.
How often should you clean it?
Hydro Flask's Flex Straw Cap article uses a week of daily water use as the point when the cap is due for a refresh and recommends cleaning it regularly. The manufacturer does not give one universal interval for every person or every beverage. That matters because the right interval depends on what passes through the straw, how long the cap stays damp, and how it is stored.
Water-only use: use Hydro Flask's weekly example as a practical upper-bound reminder, and clean sooner if you notice residue, odor, cloudiness, or a sticky feel.
Flavored or sugary cold drinks: clean sooner rather than letting residue dry inside the straw or cap. The exact frequency is situational; inspect the drinking path after use.
Long storage: wash and dry the cap before storing it closed for an extended period.
One important product limit is not conditional: Hydro Flask says the Flex Straw Cap is not designed for hot liquids. Cleaning the cap well does not change that use restriction.
Common cleaning misconceptions
“I have to soak the lid for a long time.”
Not according to Hydro Flask's official Flex Straw Cap procedure. The manufacturer calls for cleaning all parts with hot, soapy water. A short soak can be useful when residue needs time to soften, but it is an optional aid, not a required manufacturer step. Action: prioritize mechanical cleaning of the straw and crevices rather than assuming a long soak will reach everything.
“The dishwasher will ruin every Hydro Flask straw lid.”
Not for the current Flex Straw Cap. Hydro Flask explicitly marks the pieces as top-rack dishwasher safe. Its general cleaning guidance also says to separate straws, caps, and lids and place them on the top rack. Action: use the top rack and secure small parts; do not generalize the bottle's dishwasher rules to every older bottle body.
“Strong bleach is better for deep cleaning.”
That is not Hydro Flask's recommended routine. The company's general cleaning guide says to avoid dishwashing cleansers with bleach or chlorine. The Flex Straw Cap instructions rely on hot, soapy water and brushing. Action: stay with mild soap for the lid unless Hydro Flask publishes a different instruction for your exact component.
“If I wash the outside, the straw is clean too.”
That is easy to get wrong. The manufacturer sells and recommends a straw brush precisely because the inside of the tube is a separate cleaning surface. Action: run a brush through the straw and clean the lid crevices, not just the surfaces you can see.
When should you stop cleaning and replace or inspect the part?
Cleaning removes residue; it cannot repair damaged plastic or silicone. Change your approach if the cap still leaks after correct reassembly, the seal is torn or permanently deformed, the straw connection no longer grips securely, or a crevice remains visibly contaminated after a thorough wash and brushing. At that point, inspect the exact lid model and contact Hydro Flask support or use a compatible replacement component rather than trying to scrape, cut, glue, or chemically treat a damaged seal.
Persistent odor alone does not prove a part is unsafe, and discoloration does not always mean mold. What you can verify at home is whether residue can be physically removed, whether the part can dry completely, and whether the sealing surfaces remain intact. If those conditions are not met, replacement is the cleaner solution.
Bottom line
For a current Hydro Flask Flex Straw Cap, the best cleaning routine is simple: remove the straw and red seal, wash the pieces with hot, soapy water or use the top rack of the dishwasher, brush the inside of the straw and lid crevices, rinse, dry everything completely, and reassemble carefully. The most important quality check is not how shiny the outside looks; it is whether the full drinking path and sealing surfaces are clean, dry, correctly seated, and free of residue.