Home
» How To
»
How to Clean AirPods Pro Ear Tips Safely: Apple’s Water-Only Method
How to Clean AirPods Pro Ear Tips Safely: Apple’s Water-Only Method
The safest way to clean AirPods Pro ear tips is simple: remove the silicone tips, rinse the detached tips with plain water, dry them completely with a soft lint-free cloth, and click them back onto the oval connectors. Apple specifically says not to use soap or household cleaners on the ear tips. That distinction matters because some cleaning instructions for other parts of AirPods Pro use different materials.
Apple’s current AirPods Pro cleaning guidance, published February 2, 2026, separates ear-tip cleaning from mesh and body cleaning. If your goal is only to remove earwax, sweat residue, or everyday grime from the removable tips, you do not need alcohol, detergent, a brush, or a special cleaning solution. You need water, a clean lint-free cloth, and enough drying time for the tips to be completely dry before they go back on the earbuds.
Do you need soap to clean AirPods Pro ear tips?
No. Apple’s instructions for AirPods Pro ear tips say to rinse the removed tips with water and not to use soap or other household cleaners. This is one of the most important points to get right because detergent residue can remain on a soft tip and later contact your skin.
There is an easy source of confusion here. Apple also publishes a separate procedure for cleaning certain AirPods Pro 2 and AirPods Pro 3 meshes that can involve micellar water and distilled water. That procedure is for specific meshes on the earbud body, not for the removable ear tips. For the silicone ear tips themselves, follow the simpler water-only method described in Apple’s AirPods Pro cleaning instructions.
Should you remove the ear tips before washing them?
Yes. Remove each tip from the AirPod before rinsing it. Do not put the AirPod itself under running water just because the removable tip can be rinsed.
If there is already water trapped inside an attached tip, Apple says to hold the ear-tip opening downward and tap the AirPod gently on a soft, dry, lint-free cloth to help remove the water before proceeding. Once the tip is off, you can clean it separately without exposing the earbud body to the rinse.
How do you remove an AirPods Pro ear tip without stretching it?
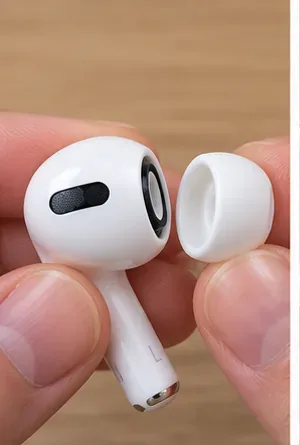
Grip the ear tip at its base, where it connects to the AirPod, and pull it straight off with steady pressure. Avoid pulling only on the thin outer silicone edge. If the tip feels slippery, Apple suggests rolling the soft edge slightly inside out or using a clean lint-free cloth for extra grip. The company’s current guide also notes that AirPods Pro ear tips are model-specific, so replacement tips are not interchangeable across all AirPods Pro generations. See Apple’s guide to removing and attaching AirPods Pro ear tips.
Step 1: Grip the ear tip where it meets the AirPod and pull it straight off with steady pressure.
How to clean AirPods Pro ear tips in four steps
1. Remove each ear tip from the AirPod
Hold the earbud securely and pull the tip from its base. Remove both tips before you start rinsing. This keeps water away from the electronics and also lets you inspect each tip from both sides.
2. Rinse the detached tips with plain water
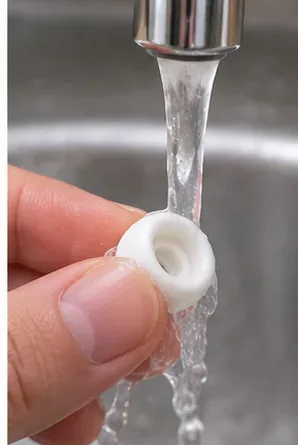
Rinse each ear tip with clean water. Do not add soap, dishwashing liquid, disinfectant, alcohol, or another household cleaner. The key condition here is that the tip must already be detached from the AirPod.
Step 2: Rinse only the detached silicone ear tip with plain water; keep the AirPod itself out of the stream.
You do not need to scrub aggressively. The goal is to rinse away the residue that can be removed with water while avoiding unnecessary abrasion or chemicals. If buildup does not come away easily, repeated gentle rinsing is safer than improvising with a sharp object.
3. Wipe and let the tips dry completely
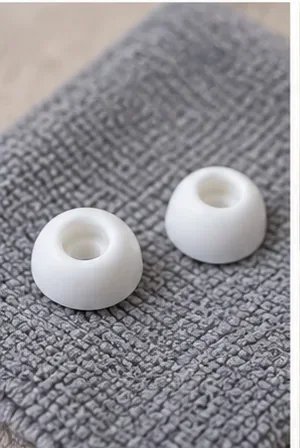
Use a soft, dry, lint-free cloth to wipe the ear tips. Then leave them off the earbuds until they are completely dry. Apple does not give a fixed drying duration for detached ear tips in this specific step; the condition that matters is complete dryness before reattachment.
Step 3: Wipe the rinsed tips with a soft lint-free cloth and keep them detached until they are completely dry.
Do not rush this part. Moisture trapped inside the tip can be transferred toward the earbud when the tip is reinstalled. If you can still see droplets or feel dampness, keep drying.
4. Align the oval connector and click the tip back on
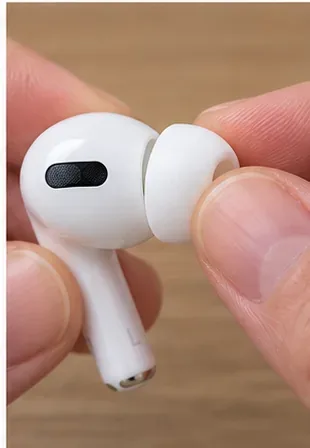
AirPods Pro ear tips and their connectors are oval rather than perfectly round. Line up the shapes, then press the tip onto the connector until it clicks into place. Apple recommends gently tugging the attached tip afterward to confirm that it is secure.
Step 4: Align the oval ear tip with the oval connector, press until it clicks, and check that the fit is secure.
What should you avoid when cleaning the tips?
Do not use soap or household cleaners on the ear tips. Apple’s current instructions call for water only.
Do not rinse the AirPod body under running water. The removable tip and the electronic earbud are not cleaned the same way.
Do not use sharp tools or abrasive materials on the AirPods. They can damage surfaces or meshes.
Do not reinstall a damp tip. Wait until it is completely dry.
Do not force a mismatched replacement tip. Apple says ear tips are not interchangeable between AirPods Pro models.
How often should you clean AirPods Pro ear tips?
Apple says regular cleaning can help maintain AirPods Pro, but it does not publish a universal calendar such as “once a week” for every user. A practical approach is to clean the tips when you can see buildup, when they feel less clean or comfortable, or after conditions that leave sweat or residue on them.
Apple also advises cleaning and drying AirPods Pro after workouts and after exposure to substances such as sweat, soap, shampoo, makeup, sunscreen, or lotion that may contribute to irritation. If you use your AirPods heavily during exercise, you may therefore need to clean the ear tips more often than someone who uses them only at a desk.
What if the tips still look dirty after rinsing?
First, rinse again with plain water and inspect the tip under good light. If residue remains but the silicone is otherwise intact, avoid escalating to harsh chemicals simply because water did not remove everything in one pass. Apple’s ear-tip instructions do not authorize soap or household cleaners as a stronger second step.
If a tip is torn, permanently discolored, misshapen, no longer clicks securely into place, or no longer provides a comfortable seal, replacement may be more appropriate than more aggressive cleaning. Make sure you buy the correct tip for your specific AirPods Pro model.
Why does a clean, correctly attached ear tip matter?
The ear tip is not just a removable cover. Its size, shape, and seal affect comfort and acoustic performance. After cleaning, a tip that is only partly attached can feel loose or produce a poor seal even though the silicone itself is clean.
If the AirPods feel different after you reinstall the tips, confirm that each tip has clicked fully onto the connector. If the fit is still loose or uncomfortable, try the correct alternate size for your model. Apple’s current fit guidance says properly fitting AirPods Pro should feel snug and secure without excessive pressure; its AirPods Pro fit guide also explains how to check the acoustic seal on supported devices.
Ear tips, earbuds, and the charging case need different cleaning methods
Part
Safe starting point
Important caution
Removable ear tips
Remove and rinse with water
No soap or household cleaners; dry completely before reattaching
AirPod body
Follow the model-specific Apple cleaning procedure
Do not treat the electronic body like a detached silicone tip
Charging case
Use a soft, dry, lint-free cloth
Keep liquid out of the charging ports
This separation is useful because current Apple guidance has become more model-specific. AirPods Pro 2 and AirPods Pro 3 mesh-cleaning instructions are more detailed than the basic ear-tip procedure. When you are cleaning only the ear tips, the simplest method remains the correct one: detach, rinse with water, dry completely, align, and click them back on.
Quick check before you use them again
Both tips are visibly clean.
No water droplets remain inside or outside the tips.
Each tip is aligned with the oval connector.
Each tip clicks into place and stays secure with a gentle tug.
The AirPods feel comfortable and sealed normally when worn.
If those checks pass, the ear tips are ready to use. If cleaning does not resolve a fit, sound, or hardware problem, Apple recommends seeking service rather than continuing with more aggressive cleaning methods.