Home
» How To
»
How to Get Deodorant Off a Black Shirt: Fast Fixes for White Marks and Set-In Residue
How to Get Deodorant Off a Black Shirt: Fast Fixes for White Marks and Set-In Residue
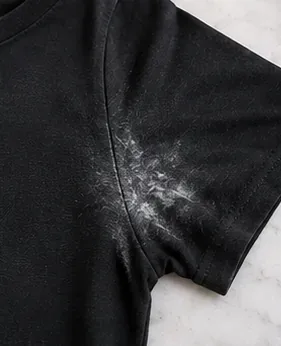
For a fresh white deodorant mark on a black shirt, start dry: gently rub the mark with a clean dry microfiber cloth, a clean piece of nylon, or another soft section of the shirt. If the mark is waxy, gray, crusty, or still visible after dry removal, brush away loose residue, pretreat the washable fabric with laundry detergent, and wash it according to the care label. Check the area before using the dryer. This sequence is usually safer for dark fabric than immediately attacking every mark with a strong household mixture.
The reason is simple: not every “deodorant stain” is the same. A chalky streak from pulling a black shirt over freshly applied antiperspirant is mostly surface transfer. A stiff or gray underarm patch that has built up over repeated wears can contain deodorant or antiperspirant ingredients, body oils, sweat, and laundry residue. The first may come off in seconds without water; the second usually needs laundering.
The instructions below are intended for washable black shirts. If the label says dry clean only, hand wash only, no bleach, or gives another restriction, follow that instruction. The U.S. Federal Trade Commission requires care labels to identify regular care procedures and warnings that matter to the garment. See the FTC Care Labeling Rule.
Choose the method by what the mark looks like
What you see
Best first move
When to escalate
Powdery white streak that appeared while dressing
Dry microfiber, clean nylon, or clean fabric-on-fabric rubbing
If a pale film remains, move to gentle wet cleaning
Loose chalky chunks or crust
Lift loose residue with a soft brush or dull edge on sturdy fabric
Pretreat and wash if material is embedded in the fibers
Gray, waxy, oily, or stiff underarm area
Pretreat washable fabric with laundry detergent
Repeat treatment before drying if residue remains
Discoloration rather than removable residue
Stop treating it like a simple surface mark
Check dye condition, fabric type, and consider professional cleaning
Dove’s U.S. guidance, updated February 5, 2026, suggests using nylon fibers such as tights to diffuse fresh white marks; if a wipe is used, it advises dabbing and patting rather than rubbing. Tide’s current deodorant-stain guidance recommends removing excess residue, pretreating, washing according to the care label, and repeating treatment before machine drying when the stain remains. See Dove’s white-mark guidance and Tide’s deodorant-stain instructions.
Start by deciding whether you are looking at a fresh white transfer mark or a heavier underarm buildup; the right first step is different.
How to get deodorant off a black shirt
1. Read the care label and inspect the mark while the shirt is dry
Before adding water or cleaner, look at the underarm area in good light. A fresh transfer mark is usually bright white and sits on top of the fibers. Older buildup may feel stiff, greasy, rough, or slightly sticky. Also check whether the shirt is plain cotton, a cotton-poly blend, a performance knit, wool, silk, or a garment with a screen print, foil detail, embroidery, or bonded trim.
This matters because the most aggressive method is not automatically the most effective. A washable cotton tee tolerates more mechanical handling than a fine knit. If you cannot tell whether the fabric or decoration is colorfast, test any wet pretreatment on an inconspicuous inside area first.
2. Remove a fresh white transfer mark without wetting the shirt first
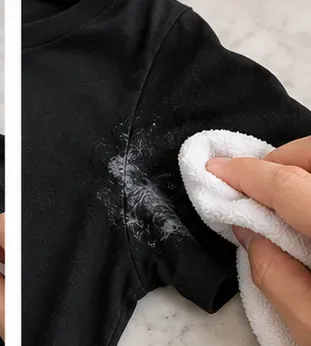
For the common “I just put on my black shirt and now there are white streaks” problem, use a clean, dry microfiber cloth or a clean piece of nylon. Work gently from the edge of the mark toward the center. You can also rub the marked area lightly against a clean section of the same shirt if the fabric is sturdy and does not pill easily.
The goal is not to polish the fabric. Stop as soon as the powdery film releases. If the surface starts looking shiny, fuzzy, stretched, or lighter than the surrounding black fabric, you are applying too much friction.
Fresh white transfer often responds to gentle dry friction. If you use a wipe, dab and pat rather than scrubbing the black fabric aggressively.
3. Lift loose crusty residue before adding detergent
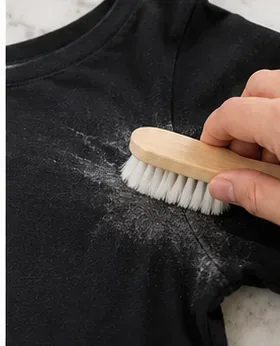
If the deodorant has dried into small flakes or a crusty ridge, remove only what comes away easily. On a sturdy cotton or cotton-blend shirt, a soft brush can loosen particles. A dull plastic card can lift thicker surface residue, but keep it nearly flat and use light pressure. Skip scraping on delicate knits, wool, silk, loosely woven fabric, printed graphics, or anything that shows abrasion quickly.
Tide specifically begins its stain-removal process by removing excess deodorant before pretreatment. That makes sense here because loose solids do not need to be dissolved deeper into the fabric.
For dry, crusty residue on sturdy washable fabric, lift only the loose material with light pressure. Do not scrape delicate knits or decorated areas.A soft brush can remove loose dry particles on durable fabric, but use a dry cloth or nylon instead when the knit, dye, or finish seems easy to abrade.
4. If residue remains, pretreat the washable fabric with laundry detergent
When dry removal leaves a gray or waxy shadow, switch to a laundering method. Use the laundry detergent you normally use for dark clothing, following its dosing and pretreatment directions. Work a small amount into the affected washable area with your fingers or a very soft brush only if the fabric can tolerate it. Avoid flooding a tiny spot with concentrated cleaner.
For a black cotton T-shirt, this is usually a reasonable next step. For wool, silk, acetate, embellished fabric, or a garment labeled for professional dry cleaning, do not assume the same pretreatment is safe. Follow the label or use a professional cleaner.
Household recipes involving vinegar, baking soda, peroxide, or bleach are often circulated online, but they are not necessary for the first-line process here. Dark dyes and specialty finishes vary. A detergent-based method tied to the garment’s care instructions is easier to control, and chlorine bleach should never be used when the label prohibits it.
5. Wash according to the shirt’s care label
Wash the shirt using the cycle, temperature, and drying instructions allowed by its label. Tide advises using the hottest wash temperature permitted by the garment’s care instructions, rather than a universal “always cold” or “always hot” rule. For black clothing, many owners choose cooler settings to help preserve appearance, but the controlling instruction should still be the label.
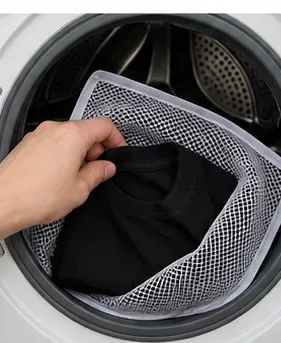
Turn the shirt inside out if that is compatible with its construction and wash it with similar dark colors. A mesh laundry bag is optional: it can reduce abrasion for fine knits, decorative details, or lightweight performance shirts, but a plain durable T-shirt usually does not need one.
If laundering is needed, choose the cycle and water temperature allowed by the shirt’s care label rather than assuming every black shirt should use the same setting.A mesh bag can reduce rubbing on delicate trims or graphics, although a plain sturdy T-shirt usually does not require one.
6. Check the underarm before using the dryer
As soon as the wash cycle ends, inspect the treated area in good light. Do not judge only while the fabric is soaking wet, because water can temporarily hide pale residue. If possible, let the shirt air-dry enough to see the true surface.
Tide advises repeating the treatment if the deodorant stain persists before putting the garment in the dryer, because drying can make the remaining stain more difficult to remove. If a waxy ridge or gray film remains, repeat the detergent pretreatment rather than escalating immediately to a harsher chemical.
Air-drying makes it easy to inspect the underarm area before exposing a remaining stain to dryer heat.
7. Decide whether the cleaning actually worked
A successful result is more than “the white powder is gone.” Once dry, the black underarm area should match the surrounding fabric reasonably well, feel flexible rather than stiff, and have no chalky line, sticky coating, gritty residue, or obvious detergent film. The seam should not be stretched, fuzzy, or abraded from scrubbing.
If the visible white material is gone but a permanent light patch remains, the issue may no longer be removable deodorant. It can be dye loss, fiber abrasion, or long-term chemical and sweat interaction. Additional scrubbing may make that kind of damage more noticeable rather than reverse it.
A good result is an even black surface with no chalky streaks, waxy ridge, sticky feel, or detergent residue after the fabric is fully dry.
Examples: which method fits your black shirt?
Black cotton T-shirt with a fresh white stripe
Start with dry microfiber or nylon. If the streak disappears and the fabric looks normal, stop. There is no benefit to washing the shirt immediately just to treat a mark that has already released.
Black gym shirt with a stiff gray underarm patch
Dry rubbing alone is unlikely to remove embedded buildup. Check the care label, lift loose residue, pretreat with compatible laundry detergent, then wash. Performance fabrics can be sensitive to aggressive brushing and some additives, so keep mechanical action light.
Black dress shirt labeled dry clean only
Do not turn a simple deodorant problem into a dye or finish problem by soaking the underarm at home. Remove only loose dry transfer if it comes away without damage; otherwise point out the stain to the cleaner.
Black graphic tee with deodorant near a printed area
Keep friction and pretreatment off the graphic unless the garment instructions allow it. Treat the fabric portion only, and test first if cleaner could contact the print.
When to stop and change approach
The black fabric is getting shiny or fuzzy: stop rubbing. You are abrading the surface.
The mark looks lighter but no residue transfers to a cloth: consider dye change or fiber damage rather than more deodorant buildup.
The shirt is wool, silk, dry-clean-only, or heavily embellished: follow its specialized care route rather than a standard T-shirt process.
The area still feels waxy after one normal pretreat-and-wash cycle: repeat the compatible detergent treatment before drying, but do not keep stacking untested household chemicals.
There is odor but no visible residue: treat it as a laundering/odor issue rather than scrubbing the surface harder.
How to prevent white marks on black shirts
Use only as much deodorant or antiperspirant as needed and give it time to dry before pulling on a black shirt. Dove recommends letting antiperspirant dry before dressing and avoiding over-application. If a product repeatedly transfers onto dark clothing, an invisible or clear-finish formula may reduce visible marks, although no product choice replaces the shirt’s care instructions.
Wash underarm buildup before it becomes thick and stiff. Fresh surface transfer is much easier to remove than a layered deposit that has gone through repeated wear, detergent, and drying cycles.
Bottom line
For most fresh white deodorant marks on a washable black shirt, the best first move is gentle dry removal—not a chemical soak. Move to detergent pretreatment and washing only when residue is embedded, waxy, or persistent. Let the care label control water temperature and cleaning limits, inspect before machine drying, and stop if the fabric itself starts changing. The right outcome is a clean-looking black surface without residue and without trading a removable deodorant mark for permanent abrasion or dye damage.