Home
» How To
»
How to Get Rust Off Golf Clubs Without Damaging the Finish
How to Get Rust Off Golf Clubs Without Damaging the Finish
If you see rust on a golf club, do not reach for vinegar, steel wool, or a strong rust remover first. The safest starting point is to identify what finish you are looking at, clean the club with a damp cloth or soft brush, and then decide whether the remaining rust should be removed at all.
That last point matters because some wedges are intentionally left unplated. Titleist's Vokey staff explains that raw and certain black finishes expose carbon steel and are designed to rust over time. Callaway gives similar guidance for its raw slate-finish wedges. By contrast, rust on a plated iron, a painted area, or a steel shaft can indicate finish damage or corrosion that deserves a more cautious approach.
Quick reference: what kind of rust are you dealing with?
What you see
Best first action
What not to do first
Light orange spots on a chrome or plated iron
Clean gently with a damp cloth, mild soap, warm water, and a soft nylon brush; dry immediately
Do not jump straight to acids, aggressive polishing compounds, wire wheels, or coarse abrasives
Even brown patina on a raw wedge
Confirm the finish; leave it alone if the rust is intentional and acceptable to you
Do not assume the wedge is damaged simply because it rusted
Raw wedge rust you personally want to reduce
Use only a method the wedge maker approves for that finish; some Callaway raw wedges specifically allow a synthetic scouring pad
Do not assume one abrasive pad is safe for every wedge finish
Pitting, flaking, peeling plating, or deep rough spots
Stop home abrasion and have a clubmaker or manufacturer inspect the club
Do not polish until the surface looks smooth and call it repaired
Rust on a steel shaft
Clean and dry the surface, then inspect closely for pitting or coating failure
Do not aggressively sand a structural component without knowing how much metal has been lost
What you need
Two clean microfiber or soft cotton cloths
A soft nylon or plastic-bristle brush or toothbrush
Warm water
A small amount of mild soap
A dry towel
Optional: a manufacturer-approved synthetic pad or protective product for a specific raw, non-plated finish
Titleist's club-care guidance recommends a damp cloth, soft-bristle brush, light soap, and warm water, while warning that harsh chemicals can alter finishes. Titleist also advises against running water over or submerging modern multi-material clubs because water can enter clubheads. See Titleist's Club Care 101 guidance.
Five steps to remove rust safely
1. Identify the finish and assess the rust
Before cleaning, determine whether the head is plated, painted, PVD-coated, black oxide, or raw carbon steel. If you still have the model information, check the manufacturer's product page or support documentation. Raw wedges are the important exception because visible rust may be expected rather than a maintenance failure.
Look at the severity as well. A thin orange film or a few small spots is different from deep pits, flaking metal, or lifting chrome. Callaway's official used-club condition guide treats pitting and flaking as abnormal rust rather than normal patina, which is a useful dividing line between cosmetic surface work and damage that deserves professional inspection.
Practical rule: if the finish is unknown, start with cleaning only. Do not use an acid, abrasive pad, metal polish, or wire brush until you know what surface you are dealing with.
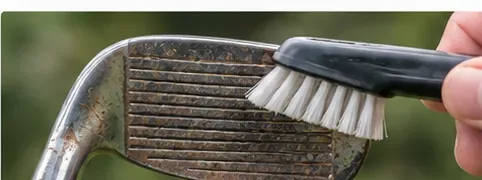
Start by identifying where the rust is and whether the club is plated or intentionally raw. A uniform raw-wedge patina is a different case from rust breaking through a plated iron.
2. Remove dirt before you attack rust
Rust-removal attempts work poorly when dried mud, grass, sand, and fertilizer residue are still packed into the face and grooves. Wipe loose debris away with a damp cloth, then use a soft nylon brush for the grooves and textured surfaces.
Use only enough water to clean the head. Modern clubs can contain multiple materials, inserts, weights, badges, and bonded parts. Titleist specifically advises against submerging clubheads or running water over them because water can enter areas that are not hermetically sealed.
If the club has a headcover, remove it while cleaning. A damp head sealed inside a wet cover is exactly the storage condition you want to avoid.
3. Use mild soap and warm water for the first rust-removal pass
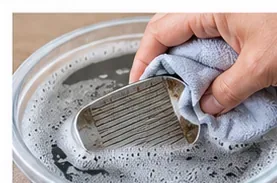
Mix a small amount of mild soap with warm water. Dampen the cloth or brush rather than soaking the entire club. Work gently over the rusty area and the grooves, then wipe the surface clean.
This conservative pass has two advantages: it removes contamination that can look like corrosion, and it tells you how firmly attached the rust really is. Light surface oxidation may diminish substantially without stronger treatment.
Use a damp cloth and mild soap before trying stronger rust-removal methods. Avoid soaking the hosel, shaft connection, badges, or multi-material head.
For plated or polished heads, stop if the surface begins to show scratches, coating lift, or unusual discoloration. The goal is not to make the head look factory-new at any cost. Removing the remaining finish can expose more steel and create a larger corrosion problem later.
4. Decide whether the remaining rust should be removed
This is where the method branches.
For a raw wedge
Rust may be intentional. Titleist's Vokey product staff says raw wedges are un-chromed, leaving carbon steel exposed so it rusts by design, and specifically advises against trying to remove that rust with abrasive chemicals or buffing wheels. Callaway says its raw slate-finish wedges are also expected to oxidize.
If you dislike the look, check the instructions for your exact finish. Callaway's support page for its Vintage/raw wedge line says a synthetic scouring pad can be used to clean the wedge and slow visible rusting. That is a model- and finish-specific recommendation, not a universal instruction for chrome irons, painted woods, or PVD finishes. See Callaway's official support FAQ.
For a plated or coated iron
If light rust remains after soap, warm water, and a soft brush, the conservative choice is to stop before escalating to household acids or aggressive abrasives. Titleist warns that harsh chemicals can alter the finish. If rust appears to be coming through cracked or chipped plating, removing more material does not restore the plating.
For a valuable set, a newer club under warranty, or corrosion around cosmetic inserts and bonded components, contact the manufacturer or a reputable club repair shop before experimenting.
For grooves
Use a soft-bristle brush and work along the grooves. Avoid sharp picks, wire wheels, and hard metal brushes unless the manufacturer explicitly approves them for that exact surface. Titleist recommends soft plastic-style brushes for routine groove care on modern irons.
A soft brush can clean rust residue and dirt from the grooves without the aggressive cutting action of a wire wheel or coarse abrasive.
5. Dry completely, inspect, and store the clubs dry
Drying is part of rust removal, not an optional finishing step. Wipe the head, hosel, shaft, ferrule, and grip area with a dry towel. Leave the clubs in an open, ventilated place until no moisture remains before putting them back under headcovers or into long-term storage.
Callaway recommends that wedges used in damp conditions or stored for the off-season be cleaned and thoroughly dried. Golf Pride gives the same broad storage principle for grips: keep clubs in a cool, dry place and dry moisture thoroughly. See Golf Pride's grip-care guidance.
On a non-plated raw surface, use a lubricant-cleaner or corrosion-preventive product only if the manufacturer approves it for that finish. Keep oily products off the striking face before play; the simplest preventive measure is still prompt cleaning and complete drying.
Store clubs only after the heads, shafts, grips, and headcovers are dry. Dry storage is the most reliable way to slow new corrosion.
Should you use vinegar to remove rust from golf clubs?
Vinegar can dissolve rust on bare steel, but that does not make it the best default for a finished golf club. The club may have chrome plating, PVD coating, paint fill, badges, adhesives, or raw areas that react differently. The manufacturer guidance reviewed for this article consistently starts with mild cleaning and finish-specific care rather than a universal acid soak.
If your club maker explicitly approves an acid-based treatment for your exact finish, follow that procedure. Otherwise, do not soak a complete clubhead in vinegar as a first-line method. A home remedy that removes rust but also dulls or undercuts the finish is not a successful repair.
What about steel wool, sandpaper, and wire brushes?
These tools can remove material as well as rust. On a raw piece of steel that may be acceptable; on a plated, polished, painted, or PVD-coated club it can permanently change the surface. Titleist's Vokey guidance specifically says it does not recommend abrasive rust removal with chemicals or buffing wheels on finishes designed to rust.
Use the least aggressive tool that solves the problem. For routine cleaning and light surface oxidation, a soft nylon brush is the practical default.
When rust is a repair problem, not a cleaning problem
Stop home treatment if you see any of the following:
Deep pitting that remains after the surface is clean
Flaking or peeling chrome/plating
Cracks near the hosel or ferrule
A loose clubhead
Heavy shaft corrosion, especially around the hosel or beneath a damaged coating
Rust combined with a bent or visibly weakened shaft
Callaway's official condition guide classifies pitting and flaking as abnormal rust. A clubmaker can determine whether the issue is merely cosmetic, needs refinishing, or calls for head or shaft replacement.
Quick prevention checklist
Wipe mud and grass from iron and wedge faces during or after the round.
Dry clubs after rain, morning dew, or a wet range session.
Do not store wet heads inside wet headcovers.
Keep the golf bag in a cool, dry, ventilated location rather than a damp trunk or shed.
Inspect raw wedges separately from plated irons so intentional patina is not mistaken for damage.
Check steel shafts for new rust spots when you clean the set.
Avoid harsh chemicals unless the club manufacturer approves them for the exact finish.
Bottom line
For most golf clubs, start with a damp cloth, mild soap, warm water, a soft nylon brush, and thorough drying. If the rust remains, identify the finish before doing anything more aggressive. A raw wedge may be doing exactly what it was designed to do; a plated iron with rust breaking through the finish is a different problem; and pitting or flaking deserves professional inspection rather than harder scrubbing.
The useful goal is not simply “remove every brown spot.” It is to remove unwanted corrosion while preserving the club's finish, grooves, bonding, and structural condition.