Home
» How To
»
How to Remove a Kitchen Sink Drain Without Damaging the Sink
How to Remove a Kitchen Sink Drain Without Damaging the Sink
A kitchen sink can start leaking around the drain even when the faucet and supply lines are completely dry. In many cases, the problem is the basket-strainer assembly: the metal drain body that passes through the sink, seals at the rim, and connects to the tailpiece and P-trap below. Removing it is usually straightforward, but only after you identify the hardware and disconnect the drain piping in the right order.
Illustrative example: imagine a homeowner named Jordan notices a small drip forming under the left bowl of a stainless steel sink whenever a full basin is released. The drip appears around the large nut directly beneath the drain, not at the faucet. Jordan wants to remove the old basket strainer so the gasket and seal can be inspected. This is only a hypothetical example used to explain the process; it is not a report of an actual repair or test.
The general sequence is: clear the cabinet, put a bucket under the trap, disconnect the P-trap or tailpiece, remove the drain's retaining hardware, break the old seal, and lift the drain body out from above. The exact hardware varies. A conventional basket strainer may use one large locknut, a mounting nut with screws, or a center ferrule. A sink flange attached to a garbage disposal uses a different mounting system and adds an electrical-safety step.
Know what you are removing before you loosen anything
A basket strainer is the removable screen or stopper you see from above and, in everyday speech, also the name people often use for the entire drain assembly. The drain body or strainer body is the metal fitting that passes through the sink. Under it you may find a rubber washer, fiber or steel washer, and a large retaining or mounting nut. The tailpiece is the short vertical tube leading downward. The P-trap is the U-shaped section of pipe that holds a water seal to block sewer gas.
What you see under the sink
Likely assembly
Removal implication
Large threaded nut directly under a typical kitchen drain
Common basket strainer
Disconnect the tailpiece, then loosen the locknut and remove the washers and gasket.
Mounting nut with three small screws
Screw-tightened strainer design
Back off the screws, then unthread the mounting nut from the drain body.
Center ferrule or center screw arrangement
Ferrule-style drain
Follow the product's assembly instructions because the center fastener is what clamps the drain together.
Garbage disposal hanging from the drain opening
Disposal sink flange
Turn off electrical power and remove the disposer from its mounting flange before removing the flange hardware.
Kohler's sink-strainer installation guide shows one common arrangement: drain body, rubber washer, steel washer, mounting nut with screws, a small gasket, tailpiece, and tailpiece nut. Moen documents other drain designs, including ferrule-style assemblies. These manufacturer diagrams are useful because removal is generally the reverse of assembly, but the exact model should control your work. See the Kohler sink strainer installation guide and Moen drain assembly instructions.
Tools and preparation
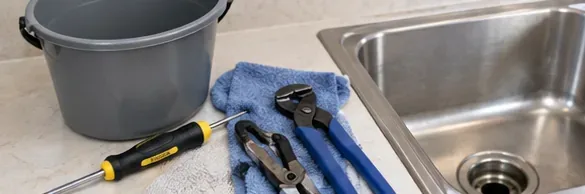
For a typical non-disposal basket strainer, you may need a small bucket or pan, towels, channel-lock pliers or another wrench appropriate to the locknut, an adjustable wrench, a flat screwdriver for some screw-retained designs, and a plastic scraper or putty knife for old sealant. A flashlight helps in a dark cabinet. If the trap is metal and badly corroded, do not simply apply maximum force; Oatey's current P-trap guidance recommends gentle pressure and notes that severely corroded parts may be safer to replace.
You normally do not have to shut off the home's water supply just to remove a drain assembly because you are not opening pressurized supply plumbing. Still, do not run the faucet while the drain is disconnected. If cabinet access is cramped or someone might accidentally use the faucet, closing the sink's local shutoff valves can reduce that risk.
Gather a bucket, towels, pliers, and the tools that match your drain hardware before opening any slip-joint connections.
How to remove a standard kitchen sink basket-strainer drain
1. Remove the basket or stopper and inspect the top flange
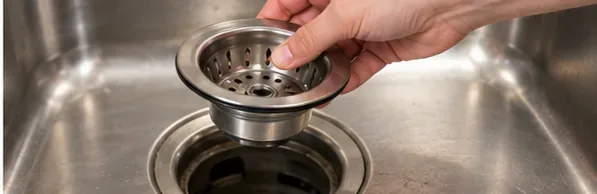
Jordan's hypothetical sink has a conventional stainless basket strainer, so the first move is simply to lift out the removable basket. This exposes the fixed flange around the drain opening and makes it easier to recognize whether the drain is a standard locknut design or something less common.
If you see a garbage-disposal flange rather than a normal basket-strainer body, skip to the disposal section below instead of trying to follow the same sequence.
Remove the basket or stopper first so you can see the drain flange and understand which assembly you are working on.
2. Put a bucket under the P-trap and disconnect the drain piping
Place a bucket below the U-shaped P-trap because it normally contains water. Loosen the slip-joint nuts at the trap connections and lower the trap carefully. Oatey's 2026 P-trap guide describes the same basic removal method: put a bucket under the trap, loosen the slip nuts at the sink tailpiece and wall or trap-adapter side, then lower the trap and drain the water into the bucket. See the Oatey P-trap installation and removal guide.
On some kitchen sinks you only need to disconnect the tailpiece from the drain body, while other layouts are easier to work on after the entire trap is lowered. Double-bowl sinks may have a tee and extra waste arm, so take a quick photo before disassembly if you want a reference for reassembly.
3. Disconnect the tailpiece from the drain body
Loosen the nut that joins the vertical tailpiece to the bottom of the basket-strainer body. Support the tubing so it does not twist the rest of the drain system. Keep the washer with the nut and note its orientation.
This is where Jordan's hypothetical repair becomes easier to diagnose: once the tailpiece is out of the way, the large locknut and the washer stack directly under the sink are fully visible.
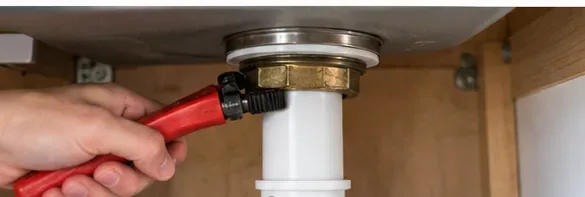
After the trap and tailpiece are disconnected, loosen the drain's retaining hardware from below while supporting the assembly.
4. Loosen the locknut or mounting hardware
Hold the drain steady from above if it wants to rotate. From below, turn the large locknut counterclockwise. Channel-lock pliers can work on many exposed locknuts, but a tight cabinet may require a wrench designed for the available space. If your strainer uses a three-screw mounting nut like the Kohler example, loosen the screws first, then unthread the mounting nut.
Do not keep increasing force if the metal is severely corroded, the sink is flexing, or the locknut is deforming. At that point, replacement may be inevitable and cutting a stuck nut can be safer when done with the right tool and enough clearance. If you are not comfortable working close to the sink basin, supply lines, or cabinet wall, this is a reasonable point to call a plumber.
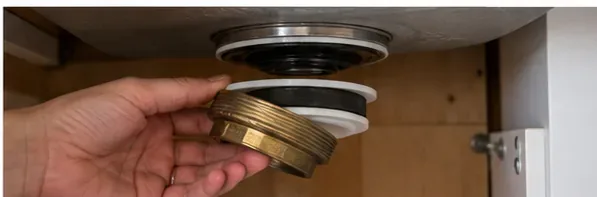
Remove the locknut, washers, and gaskets in order so you can identify how the assembly was stacked if you plan to reinstall it.
5. Remove the washers and break the old seal
With the locknut off, slide down the washers and gasket. Keep them in order if you are trying to identify the assembly. From above, press or gently wiggle the drain body. Old plumber's putty or silicone can hold the flange surprisingly firmly even after the hardware is removed.
Use a plastic scraper or putty knife carefully around the rim if necessary. Avoid prying hard against a thin stainless-steel sink or scratching a finished surface. The objective is to separate the seal, not bend the sink.
6. Lift the drain body out from above
Once the seal releases, lift the drain body through the sink opening. In Jordan's hypothetical case, the old assembly comes out as one metal body from the top while the locknut, washers, and gasket have already been removed below.
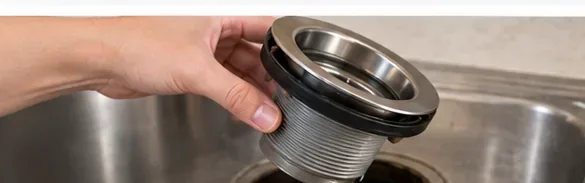
Once the retaining hardware is off and the old seal is broken, lift the basket strainer body out through the top of the sink.
7. Clean the sink opening and remove old sealant
Scrape away the remaining plumber's putty or manufacturer-specified sealant, then wipe the contact surface clean. InSinkErator's official replacement instructions similarly direct users to remove the old sink flange and scrape old putty from the sink opening before installing a new flange. Even though that guide is for a disposal flange, the cleanup principle is relevant: a new seal needs a clean seating surface. See the InSinkErator replacement installation instructions.
Do not assume plumber's putty is appropriate for every replacement installation. Kohler's guide specifies plumber's putty or another sealant according to the sealant manufacturer's instructions, while some products use a rubber gasket or a specific caulk. Use the instructions supplied with the new drain and the sink material.
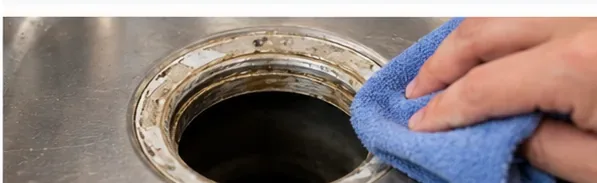
Clean old plumber's putty, silicone, mineral residue, and debris from the sink opening without gouging the sink surface.
8. Inspect the removed parts before deciding what to reuse
Lay out the drain body, gasket, washers, locknut, and tailpiece nut. Look for cracked rubber, warped washers, damaged threads, deep corrosion, or a distorted flange. If the reason for removal was a leak at the sink opening, reusing a hardened or damaged gasket defeats much of the purpose of the repair.
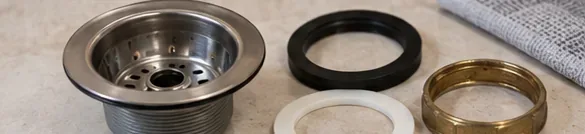
Inspect the removed drain parts for corrosion, cracked gaskets, distorted washers, or damaged threads before deciding whether to reuse them.
What changes if there is a garbage disposal?
A disposal is not just a heavier version of a basket strainer. It hangs from a dedicated mounting assembly and is connected to electricity. InSinkErator's official replacement procedure instructs users to disconnect electrical power before removing an existing disposer. Its standard mounting system uses three mounting screws and a snap ring; once the disposer is off, the mounting hardware can be removed and the old sink flange pushed up through the sink opening.
For a disposal-equipped sink, the safe order is therefore different:
Turn off power at the circuit breaker or fuse box, or unplug the disposer if it uses an approved cord-and-plug connection.
Disconnect the drain plumbing and any dishwasher connection as the manufacturer's instructions require.
Support the disposal before releasing it from the mounting ring; the unit can fall when disengaged.
Remove the mounting assembly and sink flange only after the disposer is safely out of the way.
InSinkErator specifically warns not to position your head or body under the disposer because it can fall during removal. For hardwired units, electrical disconnection adds another layer of risk; if you are not confident identifying and isolating the circuit, use a qualified electrician or plumber as appropriate. See the InSinkErator COMPLETE installation manual.
How to know the removal was successful
For Jordan's hypothetical sink, success is not “the drain came out at any cost.” A good result leaves the sink opening intact and ready for the next assembly. Use this checklist:
The P-trap and tailpiece were disconnected without cracking or distorting the tubular drain fittings.
The basket-strainer body is fully removed.
The sink opening is not bent, chipped, gouged, or deeply scratched.
Old putty or sealant has been removed from the sealing surface.
Loose parts are accounted for so nothing is left inside the cabinet or drain line.
Any corroded, cracked, hardened, or distorted components have been identified for replacement.
The finished opening should be clean and undamaged, ready for a replacement drain or the manufacturer's specified reinstallation procedure.
When to change the plan instead of forcing the drain
Stop and reassess if the locknut is seized solid, the drain body spins endlessly without loosening, a thin stainless sink flexes when you apply torque, the piping is badly corroded, or the assembly is attached to a disposal you have not electrically isolated. Those conditions call for a different tool, replacement hardware, or professional help rather than more force.
Also remember that “kitchen sink drain” can mean different components. If your actual problem is a clogged P-trap, you may not need to remove the basket-strainer body at all. If the leak is at a slip-joint nut, reseating or replacing the slip-joint washer may solve the problem without disturbing the sink flange. The best repair starts by locating exactly where the water appears.